A WooCommerce product builder solves a longstanding problem on the WooCommerce platform. In a default WooCommerce store, the only way to create a configurable product is via a variable product. But that simply doesn’t cut it if you need a visual way for someone to customize their products in order for them to make an informed choice.
Fortunately, with the help of a WooCommerce product builder plugin, you can ensure customers know exactly what the finished product will look like. This is achieved by using layered images that automatically update with each selection. An added bonus is that they’ll work and look great on mobile devices too.
So, by the end of this article, you’ll know exactly how to create an enjoyable product configuration experience for you and your customers with the help of the WooCommerce Product Configurator plugin.
What are product builders, and how do they work in WooCommerce?
WooCommerce product builders are one of the most essential WooCommerce plugins for your store if you sell configurable products. They allow you to present several accurate visual representations of the customization options for your products.
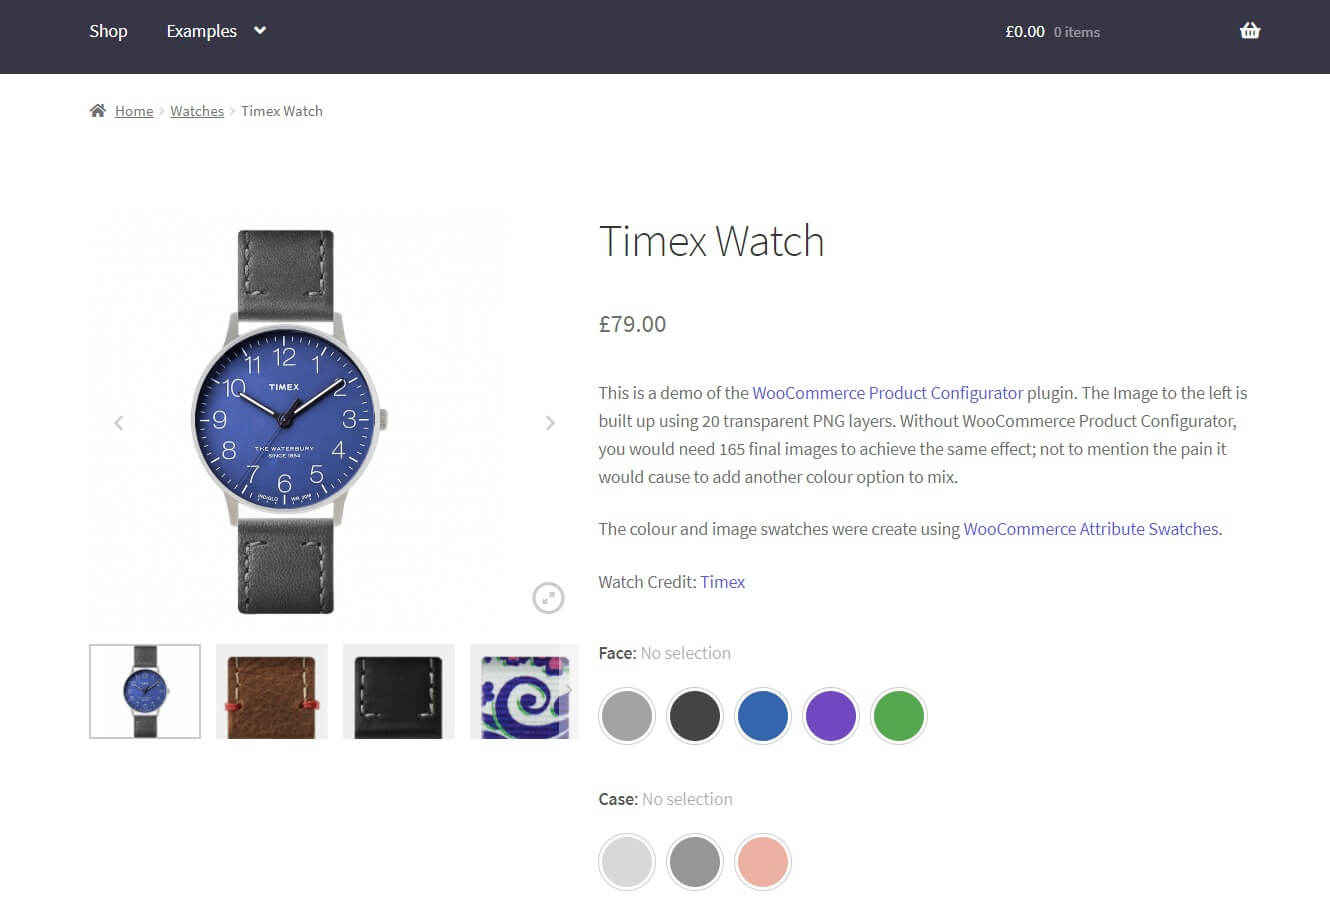
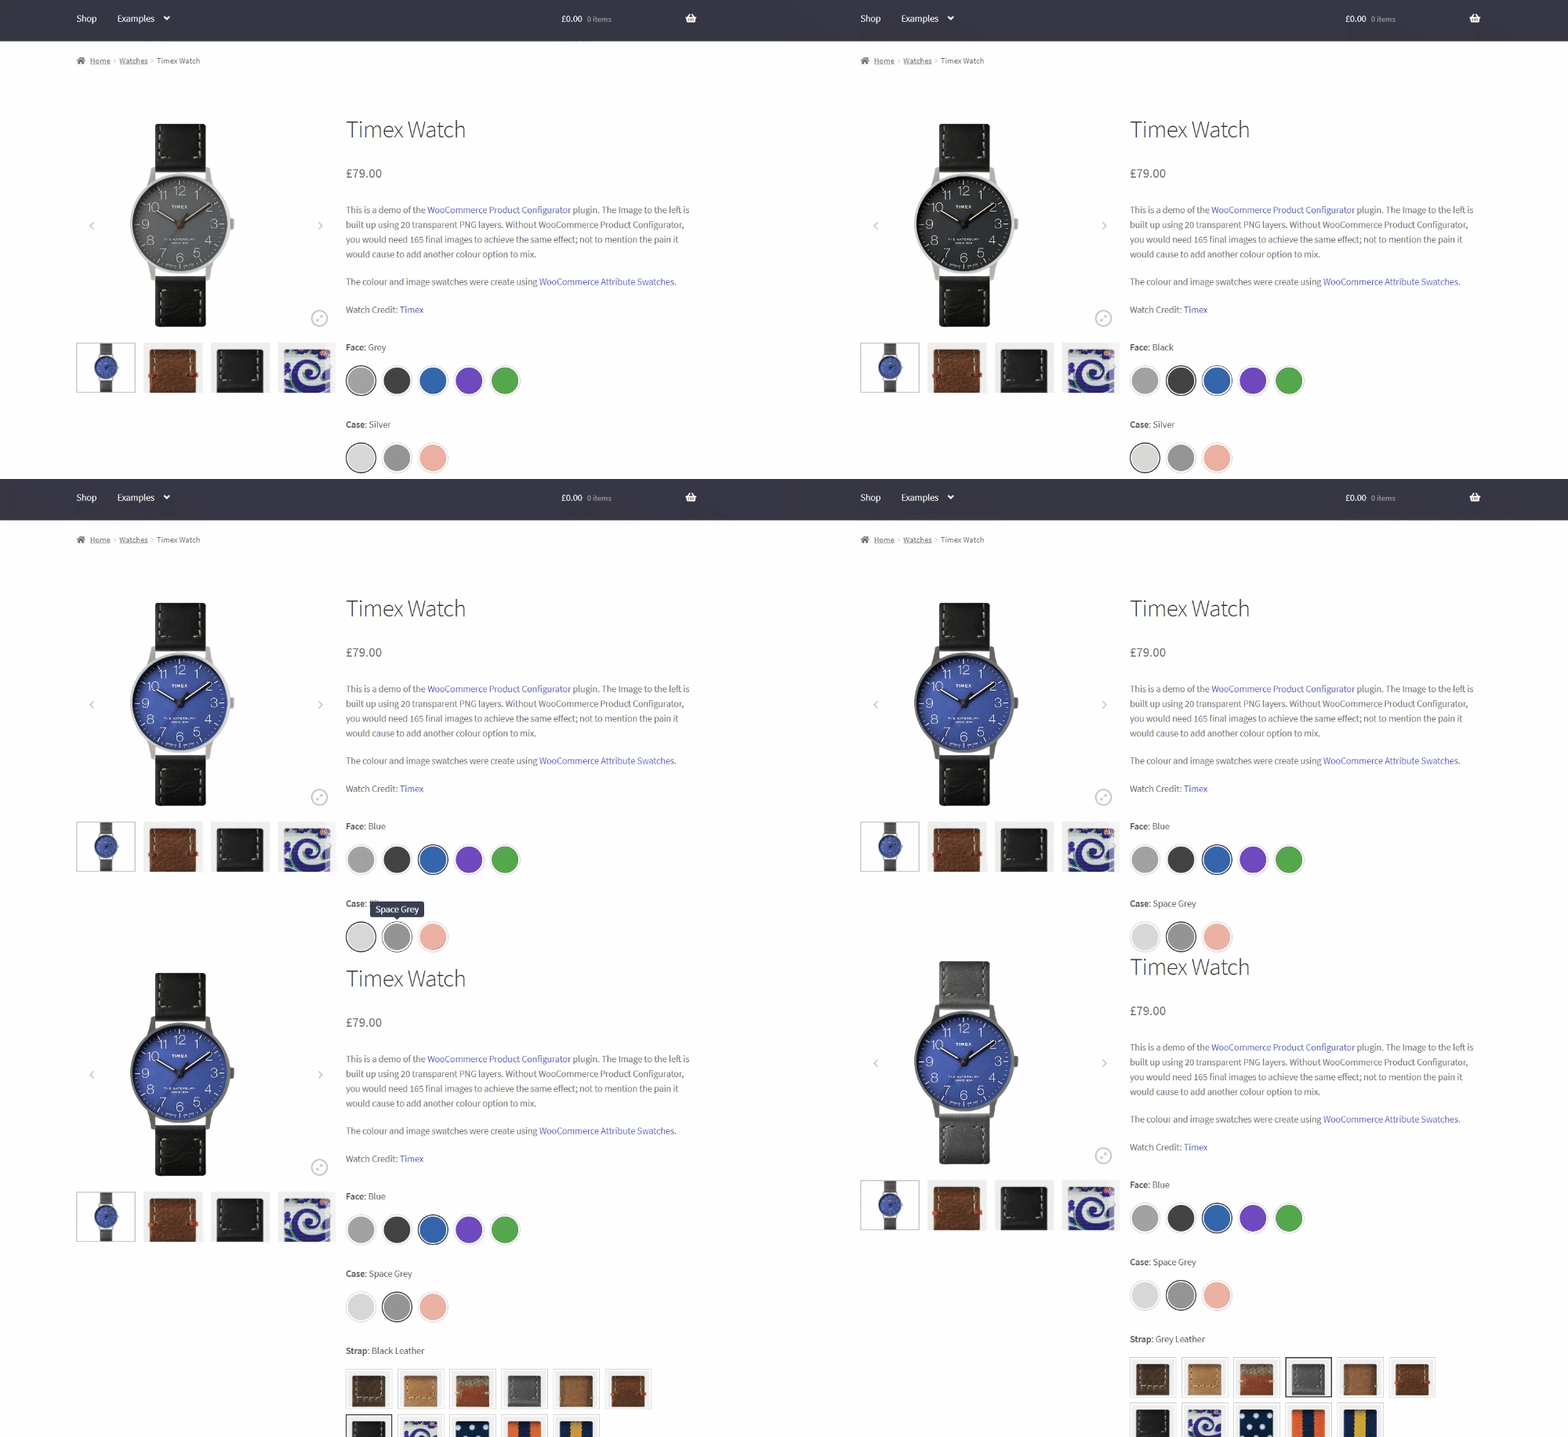
On the product page, customers will be able to select their options, such as a change of color or an added component. The customer will be able to search through as many possible combinations as they please. All before settling on their final choice, delivering an enjoyable shopping experience.
But the benefits of installing a WooCommerce custom product builder plugin don’t end there. It also allows store owners to save tons of time when creating highly configurable products, such as shoes or watches.
Instead of creating 100s of product images for each conceivable combination of the final product, a WooCommerce product customizer allows you to upload a single transparent image (PNG) for each product attribute.
Those singular images are then layered over the top of the original picture, allowing the customer to adjust a product until they end up with one they love.
Why a custom product builder will help you increase sales
Customers buy with their eyes. So if you have a customizable product, but customers can’t see what the final product will look like, they’re less likely to make a purchase.
If a customer is buying a pair of shoes, for example. Then there may be a few configurable product attributes such as:
- The color of the laces.
- The material of the inner lining.
- The tread pattern of the sole.
While the customer may like the idea of a fuzzy lining in their hiking books, they will want to gauge:
- Where the lining will be placed in the boot.
- Whether it matches their choice of laces.
- And more.
A customer looking to wear boots as a fashion statement rather than for exercise may want to opt for a smooth tread on the bottom of the sole. Or someone looking to spend time hiking their local trails will want a sturdier sole with protruding rubber studs for added grip.
Without a reliable way to assess how the product will look and function, customers will simply head elsewhere.
By giving customers the tools they need to make an informed choice. You can increase your conversions, drive up customer satisfaction, and reduce the likelihood of returns.
How to add a custom product builder to WooCommerce
The good news is it only takes a few minutes to install a WooCommerce product builder on your store using a plugin such as WooCommerce Product Configurator.
Using WooCommerce Product Configurator
Adding WooCommerce Product Configurator to your store allows you to save time by creating a single transparent image for each variation of a product attribute. It also delivers a much more reliable and enjoyable shopping experience to your customers.
Now, let’s walk you through how to install and use this helpful plugin.
Step #1: Install WooCommerce Product Configurator
To get started, purchase WooCommerce Product Configurator from the Iconic store.
Then follow these steps:
- Go to Plugins > Add New > Upload Plugin.
- Choose the zip file you downloaded, upload it, and then click Activate.
- Once activated, you’ll need to enter your license key.
Now that we have WooCommerce Product Configurator installed, we can move on to creating your configurable product or product builder in WooCommerce.
Step #2: Create a variable product
WooCommerce Product Configurator uses variable products as its base. So, we need to start by creating one. If you need help at this stage, head over to the WooCommerce docs for creating a variable product.
For simplicity, we are going to use watches as an example product. In this case, our watches have three separate configurable attributes: the face, the case, and the strap.
Each attribute will then contain several different options for changing the appearance of the watch. Each option is known as a variation.
You may need to alter your variations further based on the circumstances. For instance, you may have a small red strap but not a large red strap.
Once you’ve added your variations, make sure they are in stock and have a price. Otherwise, they won’t be available to the customer.
When you’re done adding variations to your attributes, save the product, and we’ll move onto enabling Product Configurator.
Step #3: Enabling WooCommerce Product Configurator
This step is simple. To enable Product Configurator, do the following:
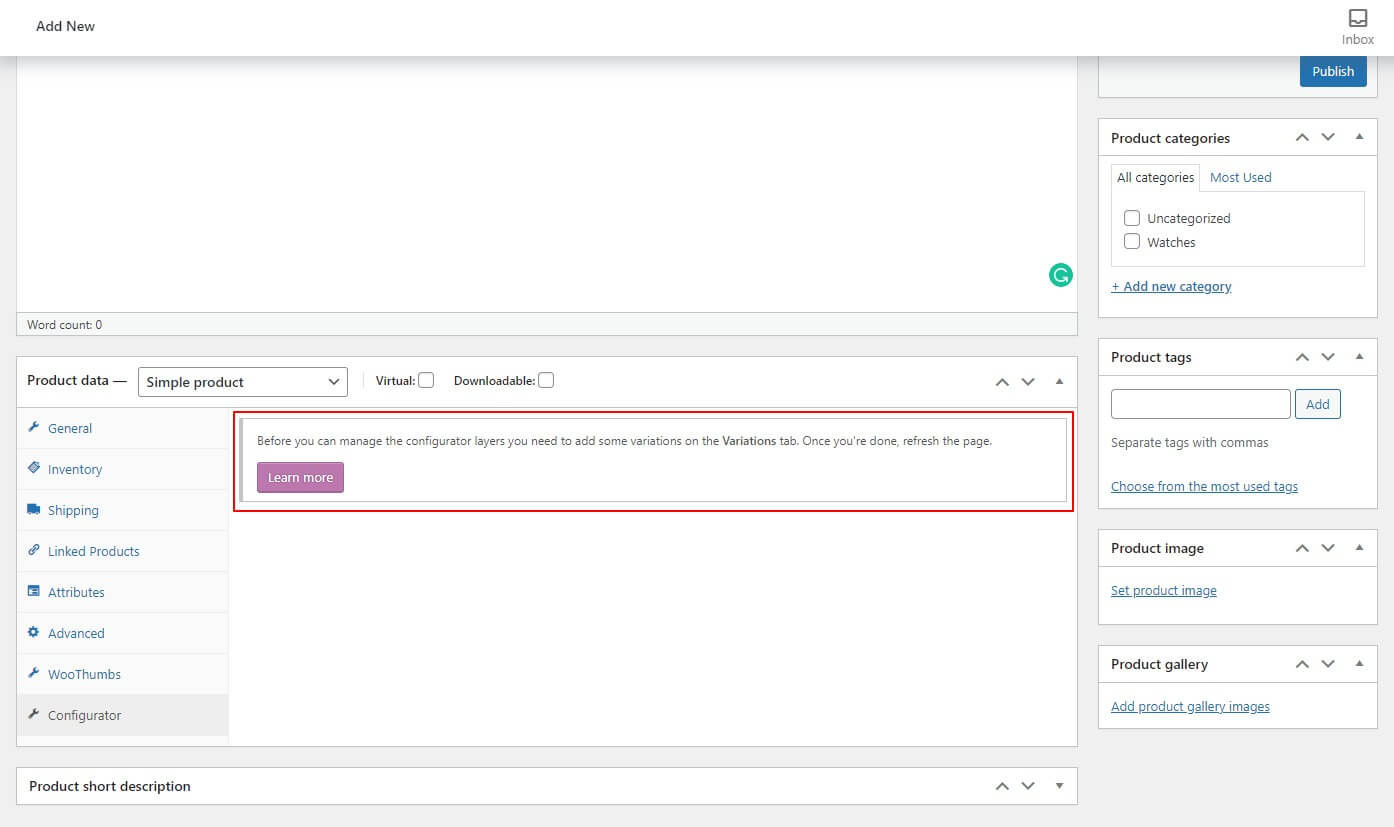
- Scroll down to the Product Data section of the product you’re editing.
- Select the Configurator tab.
- Once there, click the Product Configurator checkbox.
- Then Save your product.
Next, we’re going to prepare the product images.
Step #4: Create configurable product images
Creating excellent configurable product images is vital when using Product Configurator. Otherwise, they won’t be as effective.
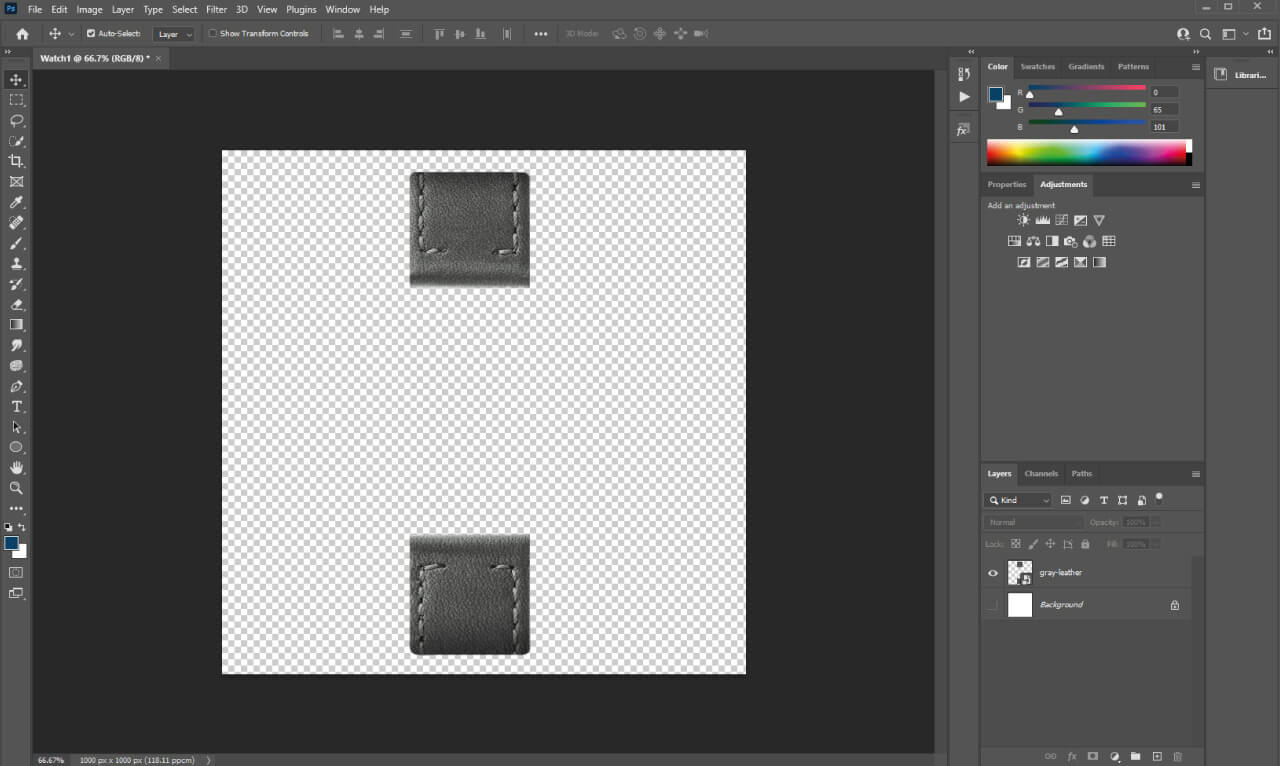
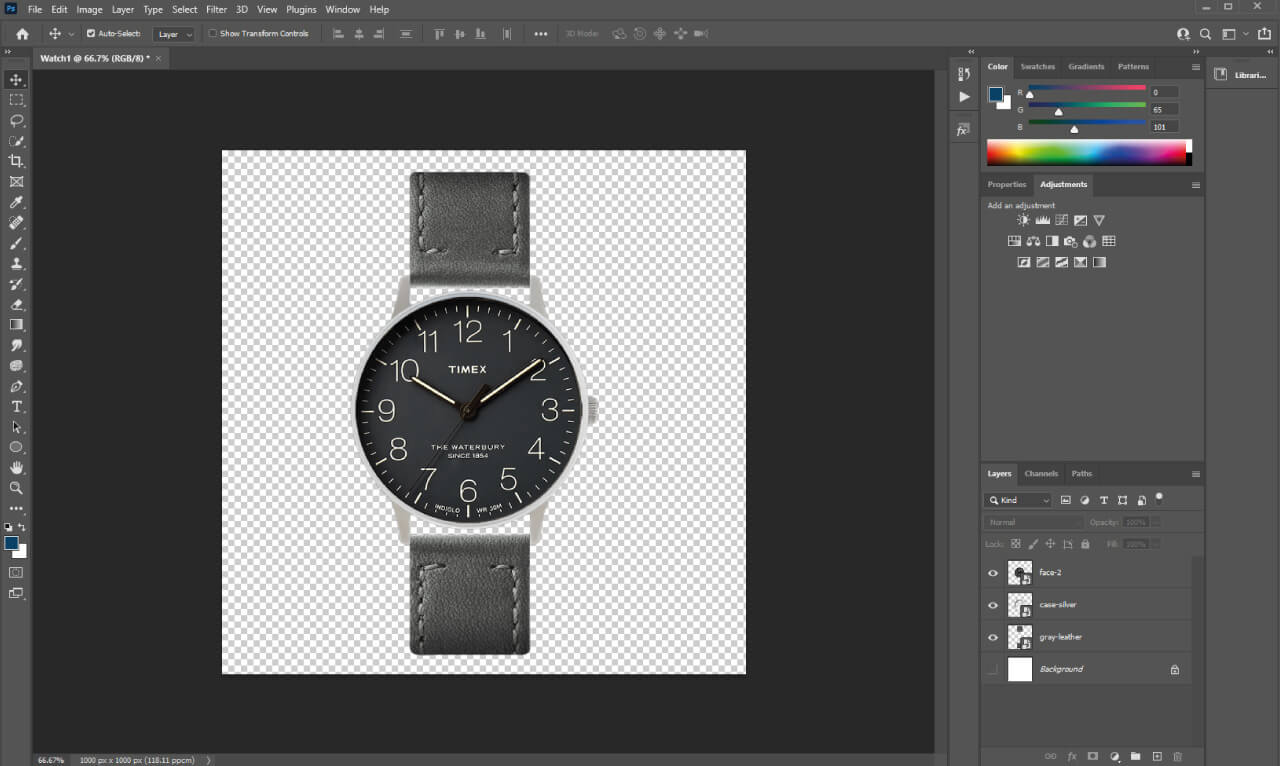
For this step, we recommend the well-known photo editing program, Adobe Photoshop. But you can use whatever you have at hand. (Note: make sure to save your images as PNGs).
- Start by creating an artboard in your program of choice. We recommend making it 1000px by 1000px minimum.
- Then, start putting together your image layers. These are the individual elements of the product that your customer can configure.
- In this case of this tutorial, you would create a layer for each watch strap, each case, and each face type.
- When adding a new product element, make sure it’s on its own layer with a transparent background, ensuring everything lines up to the layer below.
- Save each layer at the size of the artboard (1000px x 1000px) with the background remaining transparent.
- Once all layers are saved as individual images, you’ll need to create a background layer. This can be a solid color if you like, but it must still be saved as a PNG image.
Step #5: Add your images to your configurable products
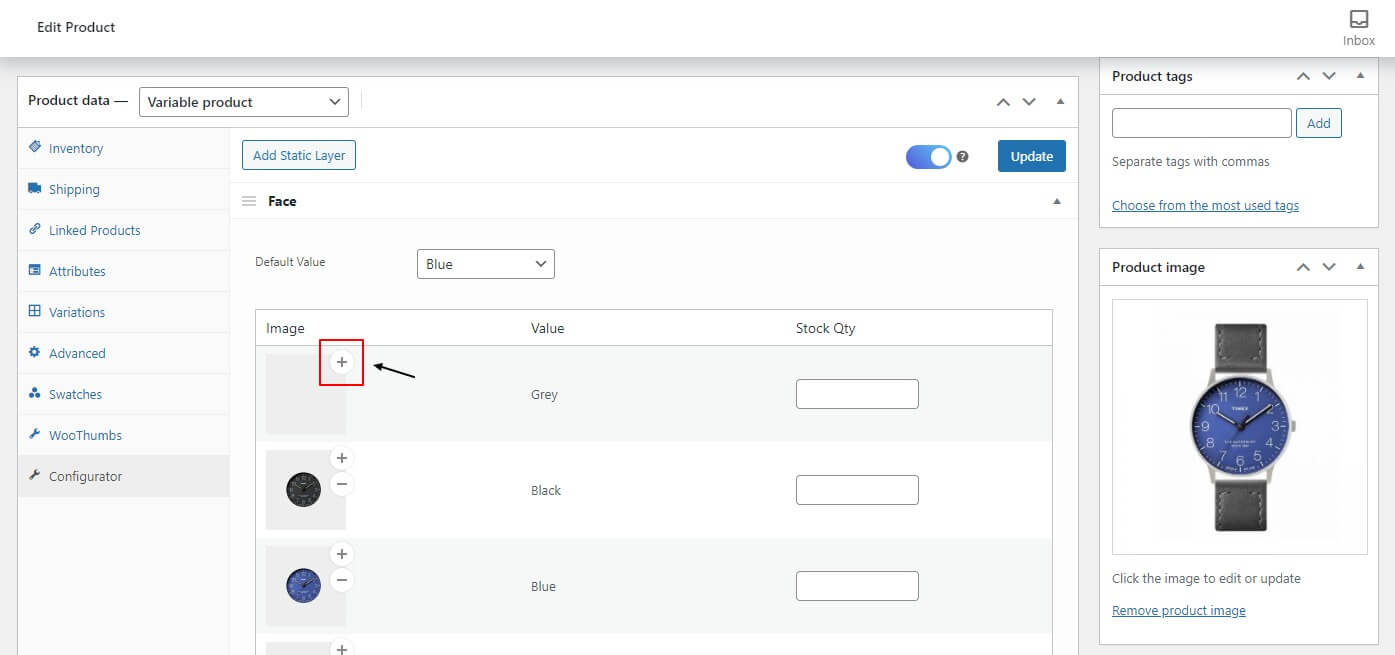
Once you have your images saved, navigate back to the product you’d like to configure in WooCommerce. Below the checkbox to enable Product Configurator, you’ll see a list of your attributes. That’s where you’ll be adding your image layers.
- To add an image to one of your attribute values, click the Plus (+) Icon on the grey square.
- Then, upload your previously created image layer to the media library.
- Click Set Image and your image layer will be displayed in the grey box.
- Repeat these steps until all your individual images are assigned to their values. If you need to, you can remove any images by clicking the Minus (-) Icon.
- Make sure to re-order the layers to sit properly on the final product. In this example, we want the watch face to be displayed on top of the watch strap, so the order of our attributes reflects this.
- To re-order the attributes, click the 3 Lines Icon to drag and drop them.
- Finally, add the background layer. This is a required part of the configurator and helps the plugin to know the size of your artboard.
- Once done, Save or Update, and your configurable product will now be added to your WooCommerce store.
That’s it! You’re done with creating your first-ever product builder in WooCommerce.
Add a WooCommerce product builder to your store with ease
If you sell products with multiple configurable options, you need to ensure that your customers can gauge precisely how a product will look before they order it. Otherwise, they will head to another online store that allows them to better assess their customization choices.
Fortunately, by installing the WooCommerce Product Configurator, you can deliver a smooth shopping experience to your customers. Plus, you’ll leave them in no doubt about what their product will look like before they add it to their cart.
Why not try their free demo and enjoy the boost to your sales and customer satisfaction?







2 Responses
oooooh c’est très important pour mon travail merci
I prefer to use a theme that has a builder included. The best I’ve found so far is Flatsome, which has UX Builder included. 🙂 And it works good with Woocommerce too.