


In a nutshell, Entry Automation helps you automate tasks in Gravity Forms by letting you export and/or delete form submissions automatically using your own custom rules. You can set up unique schedules for when to run tasks, use conditional logic to target specific types of entries, and export/delete full entries or only certain fields.
In our hands-on Entry Automation review, I’ll show you how you can use this plugin from ForGravity to automate Gravity Forms tasks.
Entry Automation Review: A Quick Look at the Features
Entry Automation comes with two high-level types of automations:
- Export entries – export some/all entries to a certain file format (listed below). You can choose exactly what fields and what submission data to export.
- Delete entries – delete entire entries or only delete specific fields within an entry.
You can also use conditional logic to only target specific entries, such as only exporting or deleting submissions where a respondent answered a question in a certain way.
Another useful feature is that you can chain these tasks together. For example, you could export entries and then delete those entries once you’ve safely exported them.
To control when to run the task(s), you can choose to run the task manually, on specific dates or times (or days of the week), or immediately upon form submission.
When you export entries, you can choose specific fields and form metadata to export. You can also choose from four different file types:
- CSV
- XLSX
- JSON
You can have Entry Automation automatically email the finished file to one or more email addresses. Or, with the Agency license, you can also export to Amazon S3 or Dropbox, as well as via a generic FTP option.
That’s just a quick summary of the features – when we get to the hands-on section I’ll show you everything in detail.
Example Use Cases for Entry Automation
One of the nice things about Entry Automation is that you can easily adapt it to your own unique workflows, so this list is by no means complete. These are just some ideas for how you could use Entry Automation to automate tasks:
- Submission digests – create a daily or weekly digest of your latest submissions in your preferred format.
- Reporting – export specific data to create your own reports in Excel or Google Sheets.
- Order fulfillment – if you have payment forms, you could automatically export a file that summarizes the orders you need to fulfill.
- GDPR compliance – automatically delete entire submissions or even just specific form fields within a submission to comply with privacy laws for handling user information.
How to Use Entry Automation
Now, let’s go hands-on and I’ll show you what it’s like to work with Entry Automation.
Set Up Your Form in Gravity Forms
To get started, you’ll first want to set up your actual form in Gravity Forms if you haven’t done so already. I won’t show you this because Gravity Forms itself isn’t the focus of this review (you can learn more in our Gravity Forms review – it’s what we use for the forms here at WP Mayor) – I just want to make it clear that Entry Automation works within the regular Gravity Forms interface.
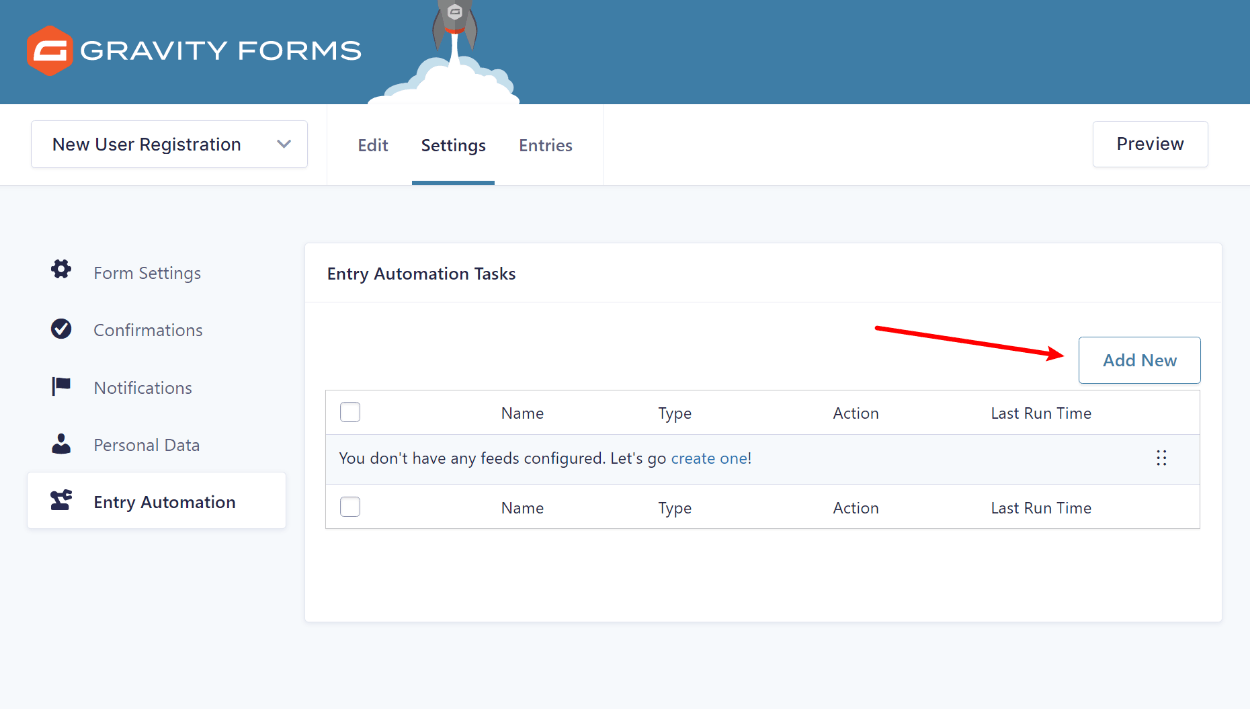
Once you’re happy with your form, you can access the new entry automation settings by going to Settings → Entry Automation:
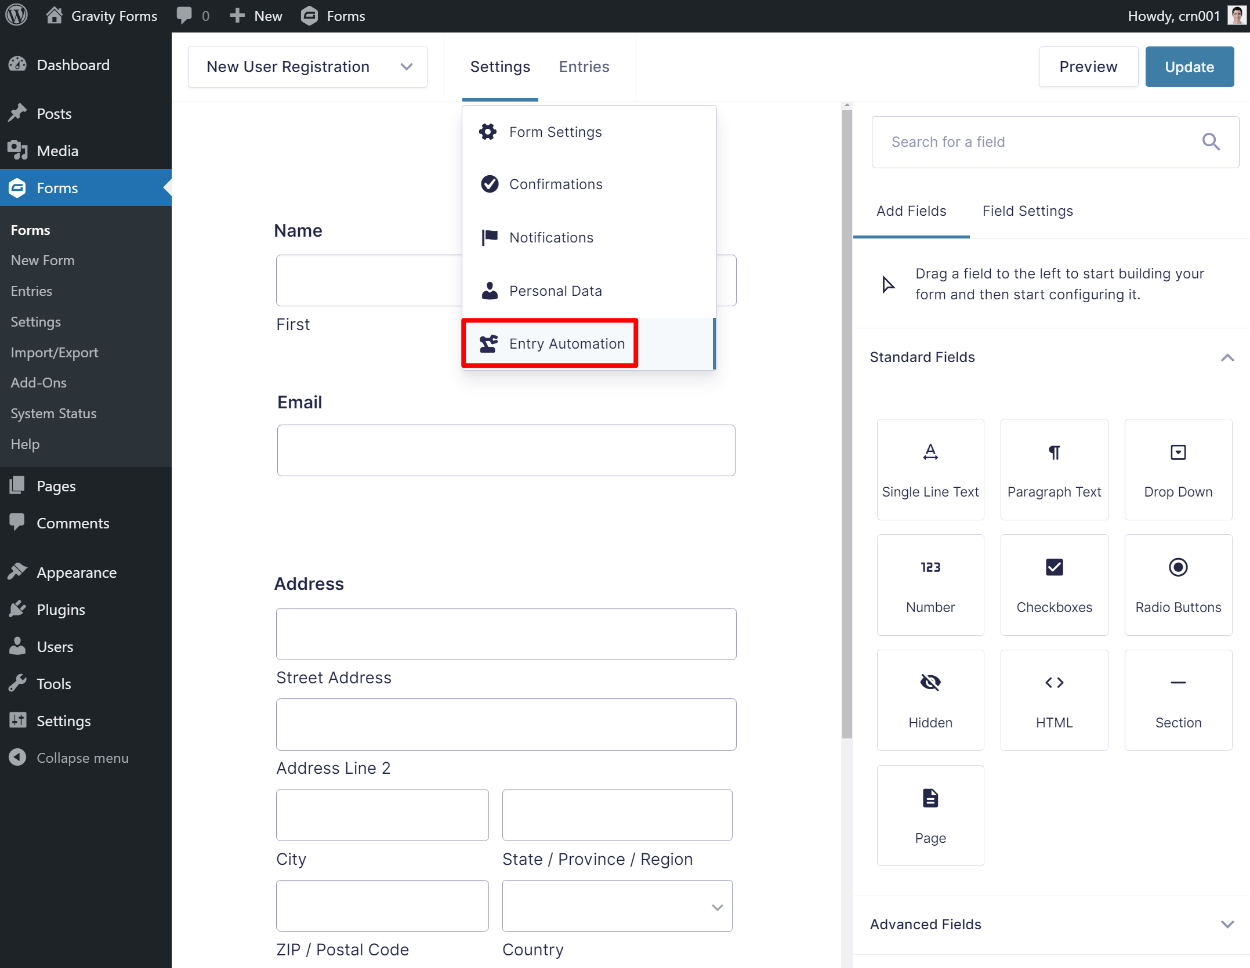
Create a New Entry Automation Task
Entry Automation uses the standard Gravity Forms terminology so you can create a new task by setting up a “feed”:
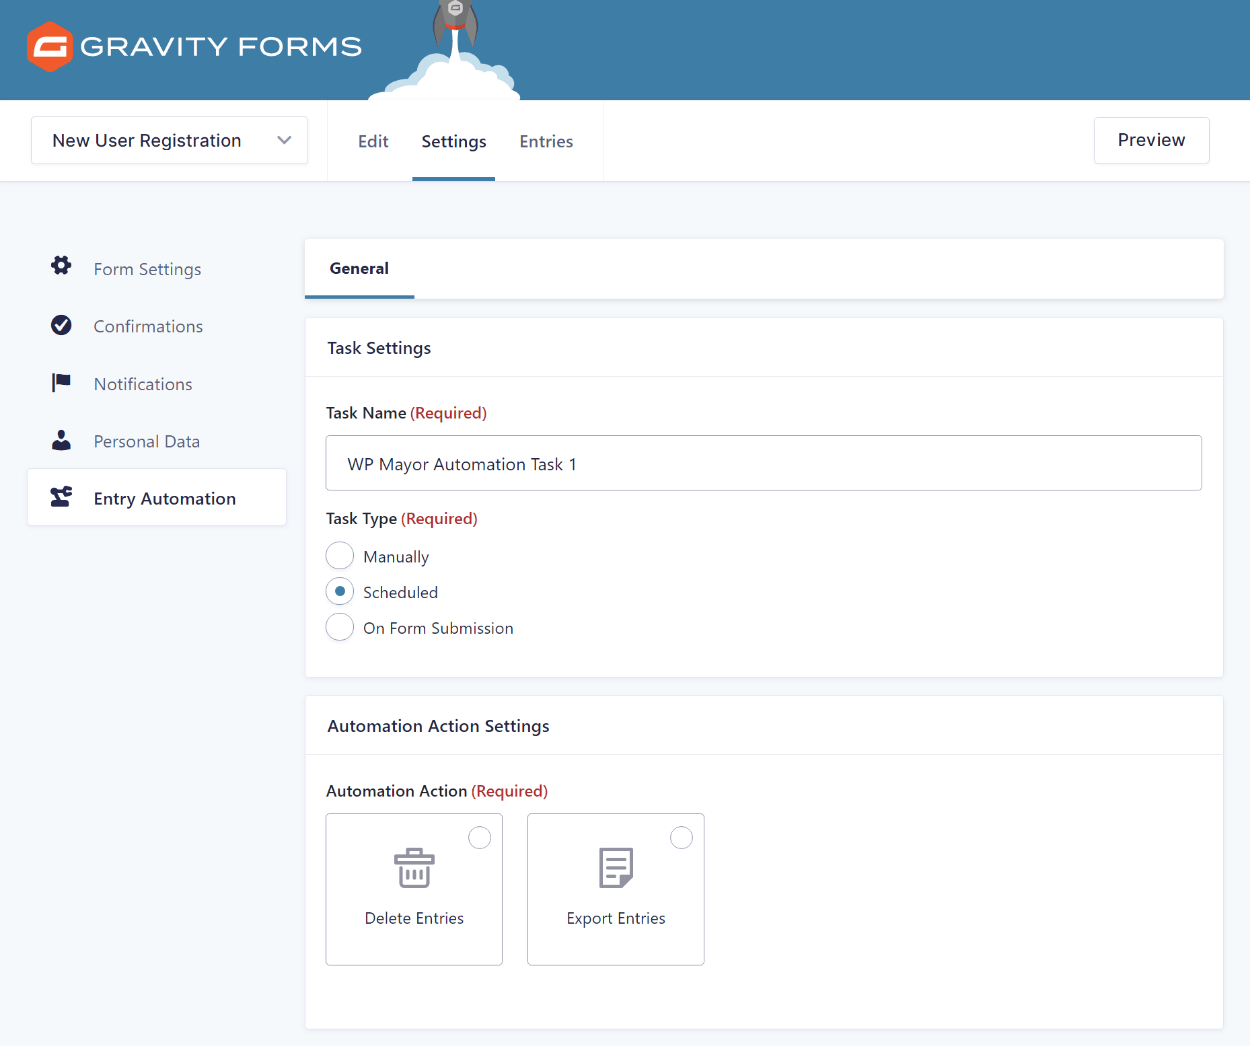
When you first create your task, you can make two choices.
First, you can choose when to run the task using the Task Type checkbox list. You get three options:
- Manually – you’ll need to manually initiate running the task. This is good for tasks with variable schedules that you only want to run at certain times.
- Scheduled – you can set the task to run on a certain schedule, like running it every Monday at 9 PM.
- On Form Submission – you can set the task to run immediately upon form submission. For example, you could automatically export an entry as a CSV file immediately after a person submits the form.
You can also choose the Automation Action. Again, you get two options:
- Delete entries
- Export entries
Configure Automation Action
Once you choose your automation action, you’ll see a new list of options below. The settings that you see depend on your schedule:
- If you choose a scheduled task, you can set your schedule and choose which entries to target.
- If you choose to manually run the task, you can choose which entries to target.
For example, with a scheduled task you can set up your own custom schedule – you can run it anywhere from “X times per minute” to “X times per month”:

You can also choose specific dates or times instead. For example, you could run it “Every Monday at 9 PM” or even “Every Monday, Wednesday, and Friday at 9 PM”.
Below that, you can choose to target certain entries. You get three options:
- All Entries – run the task on all entries.
- All Entries Since Last Task Run – run the task on all new entries since the last time the task was run. If you’re not deleting entries, this lets you make sure you’re not exporting the same entry multiple times.
- Custom date range – set up a date range, like running the task on all entries from the previous week.

Finally, no matter which schedule you chose, you can also get more control over which entries to run the task on by using conditional logic.
For example, you could only run the task on entries where a user chose a certain option in a list of checkboxes:
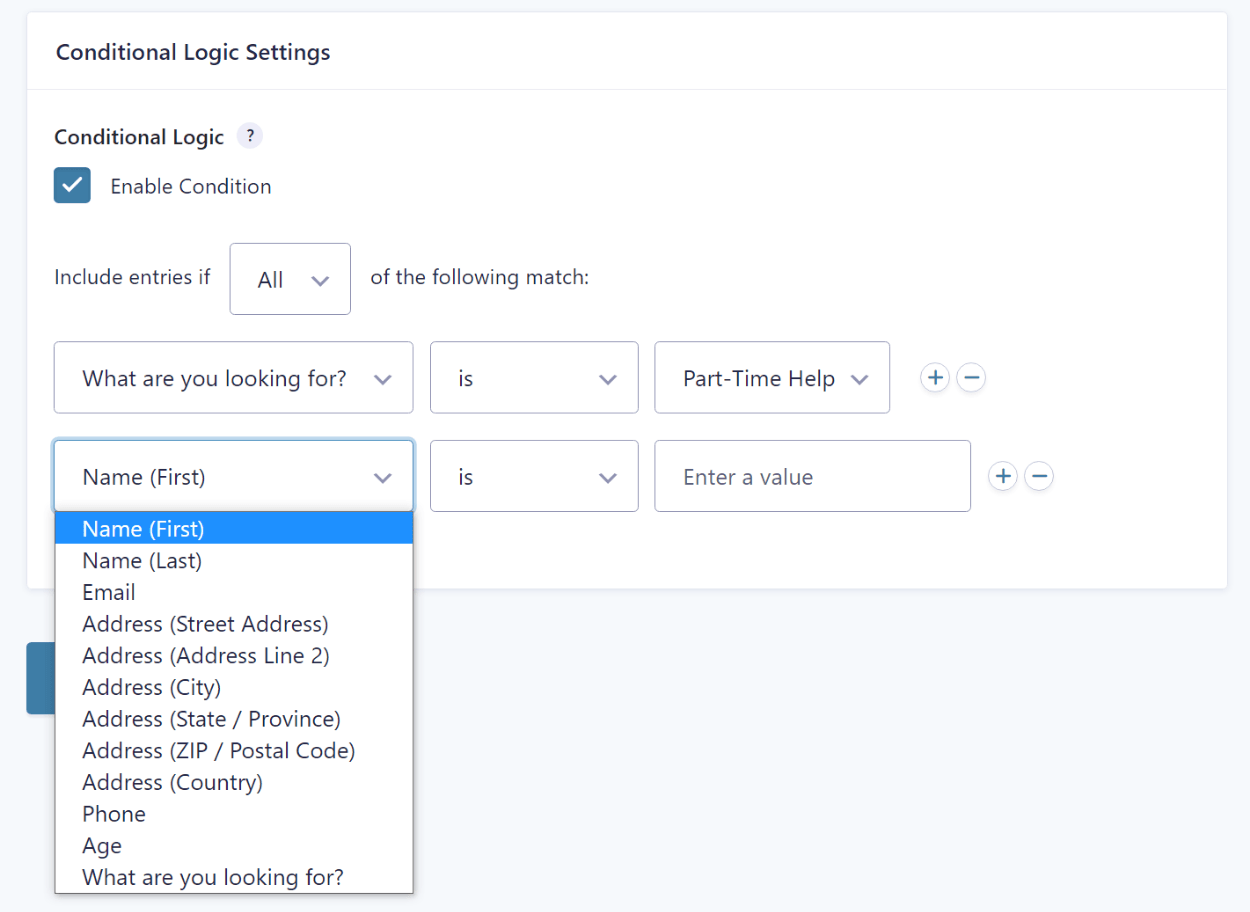
This gives you a lot of flexibility for only targeting a very specific selection of entries.
For additional settings regarding your automation action, Entry Automation adds new tabs to the settings area. These tabs depend on whether you chose to export entries or delete entries – let’s go through them.
Export Settings
The Export Settings tab lets you choose how you want to export your entries and what content you want to export.
At the top, you can choose from four different file formats, along with the file name and export order:
- CSV
- XLSX (it’s nice to have a dedicated Excel option. While you can open CSV files in Excel, the formatting doesn’t always look right).
- JSON
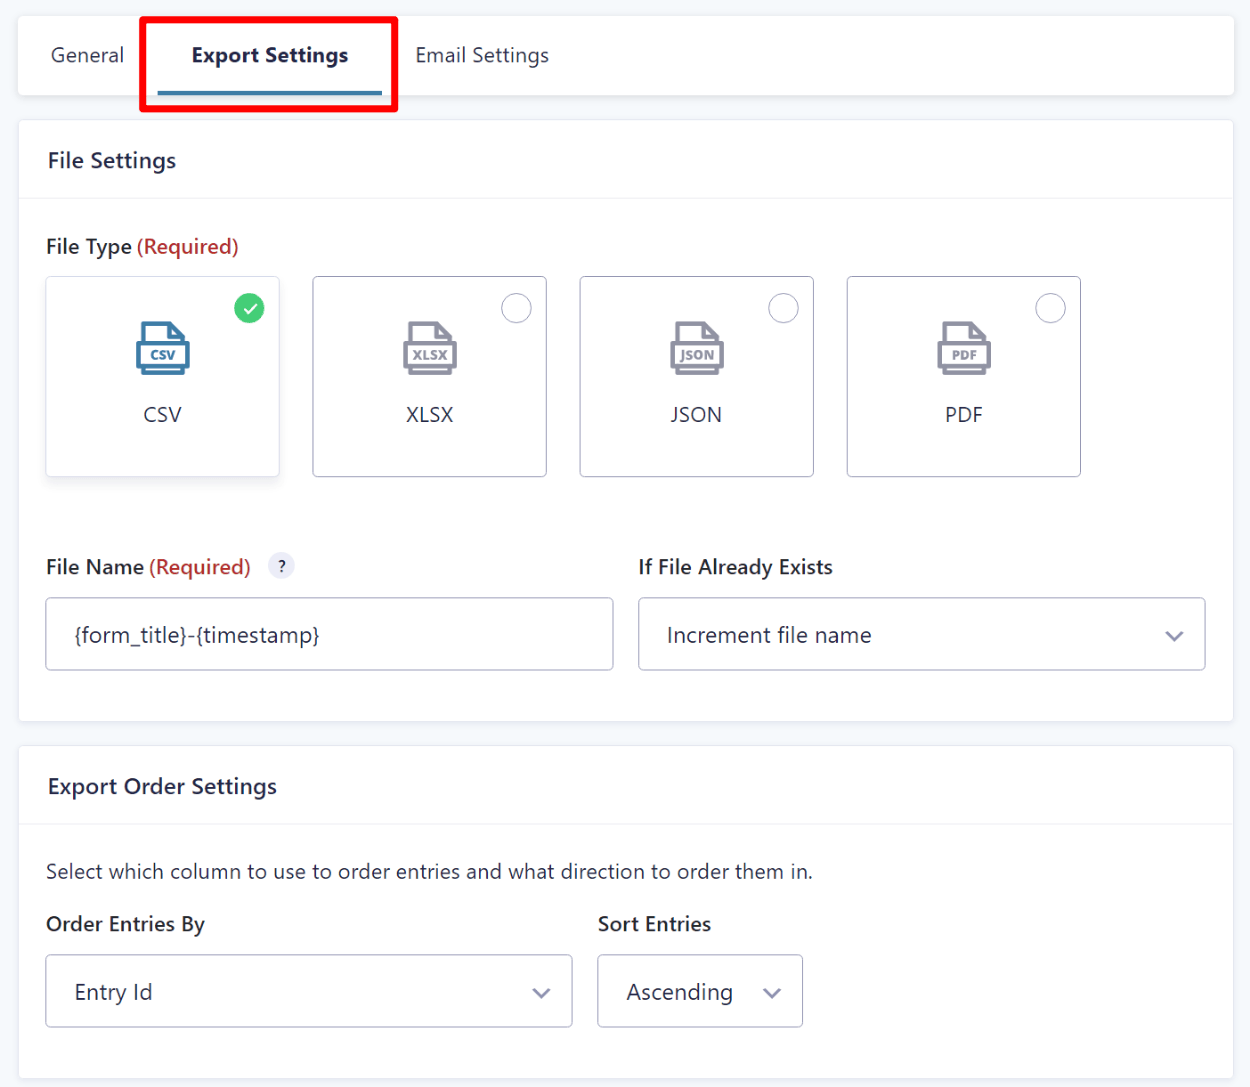
Below that, you can choose what content to export. This includes both fields in the form, as well as form submission data (such as the entry submission date, source URL, payment status, etc). You can also use drag-and-drop to rearrange the order of the information:

At the bottom, you can also choose to delete the export file after the task is completed. This is useful if you’re emailing the file to yourself or using one of the export options to export it to S3, Dropbox, or FTP.
Speaking of email options – in the Email Settings tab, you can set up email notifications to email the generated export file to a certain email address:
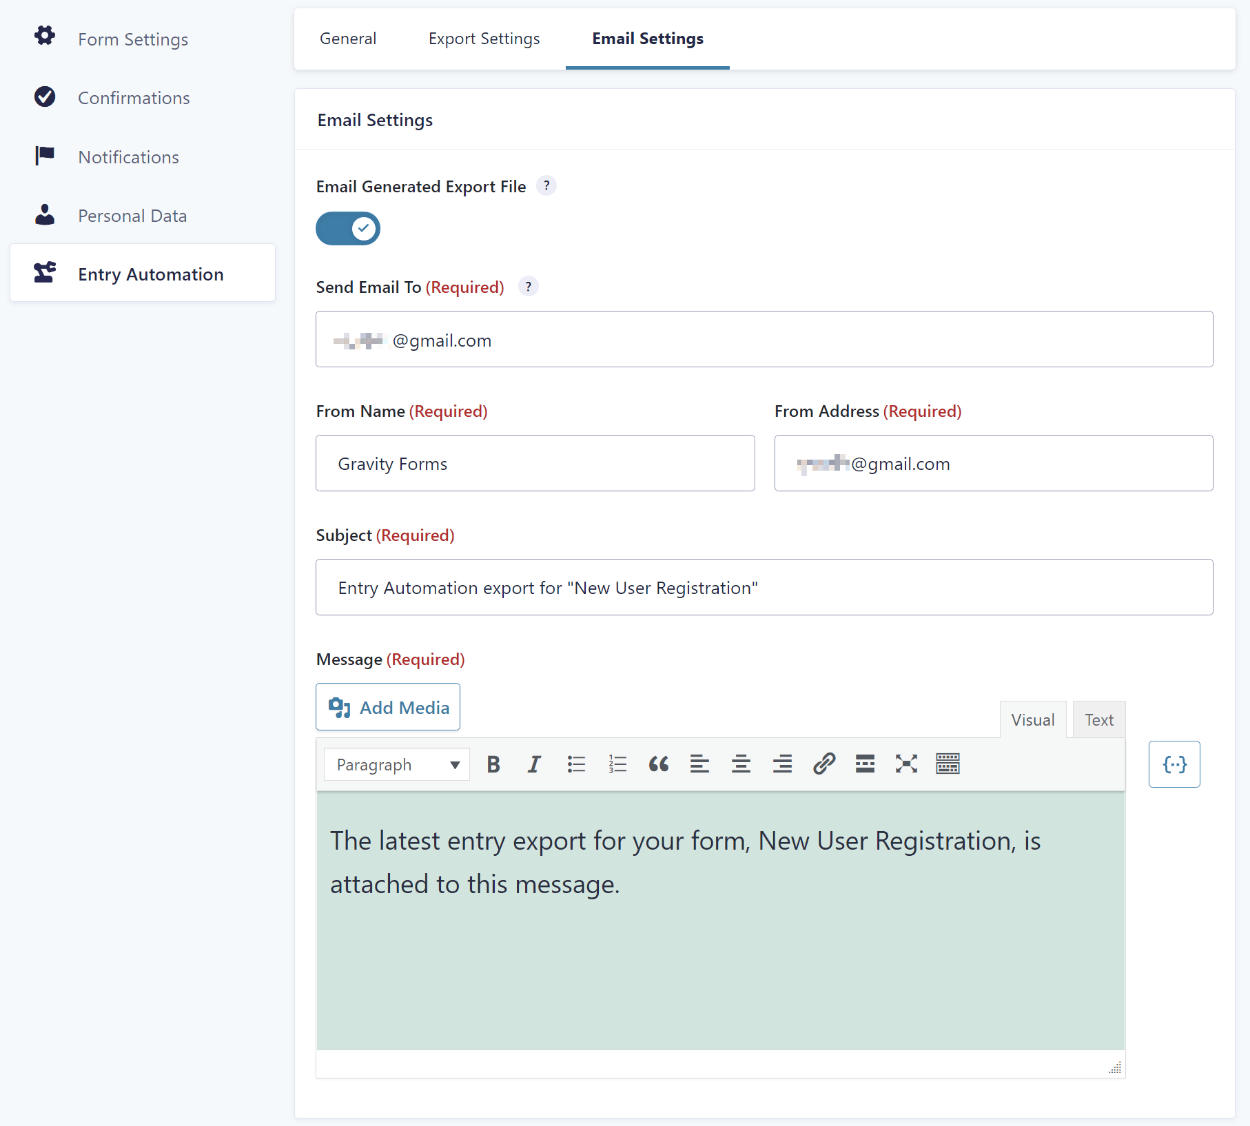
You can also dynamically include a submitter’s email. So you could, for example, automatically send the form submitter a PDF export upon form submission.
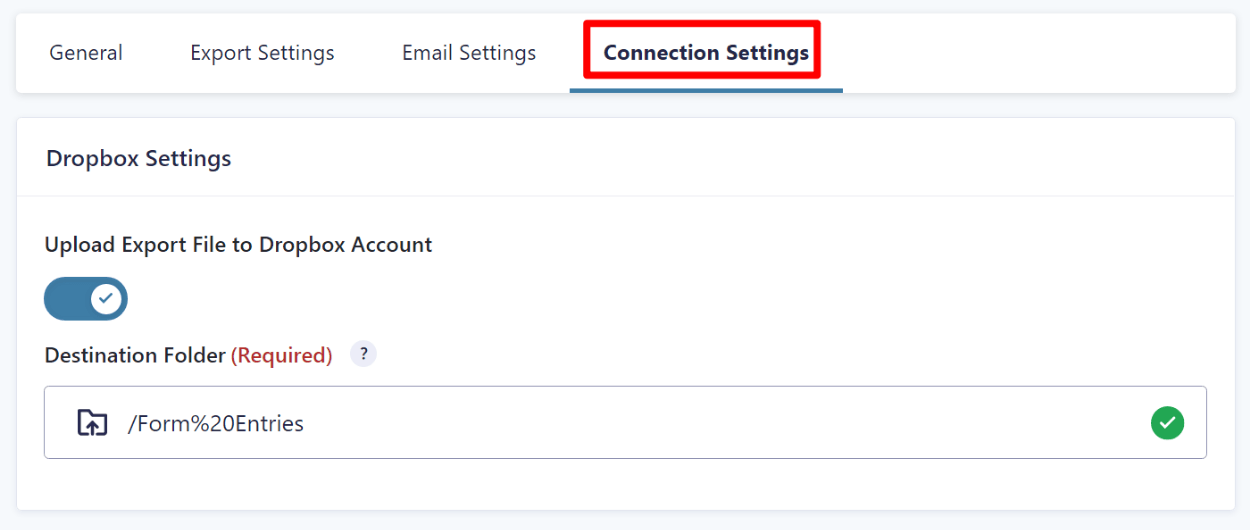
If you have the Agency license, you also get access to the additional add-ons to export files to Amazon S3, Dropbox, or any FTP server. You would first need to install the add-on plugin and authenticate your account/add connection details in the Entry Automation settings (Forms → Settings → Entry Automation).
Then, you’ll get a new Connection Settings tab that lets you automatically export the file to an external location. For example, in the screenshot below, you can see that I’m able to export the file to a specific folder on Dropbox:
That’s it for export settings – now let’s look at the delete settings.
Delete Settings
If you choose to delete entries, the Delete Settings tab lets you choose between deleting the entire entry or only deleting certain fields within the entry:
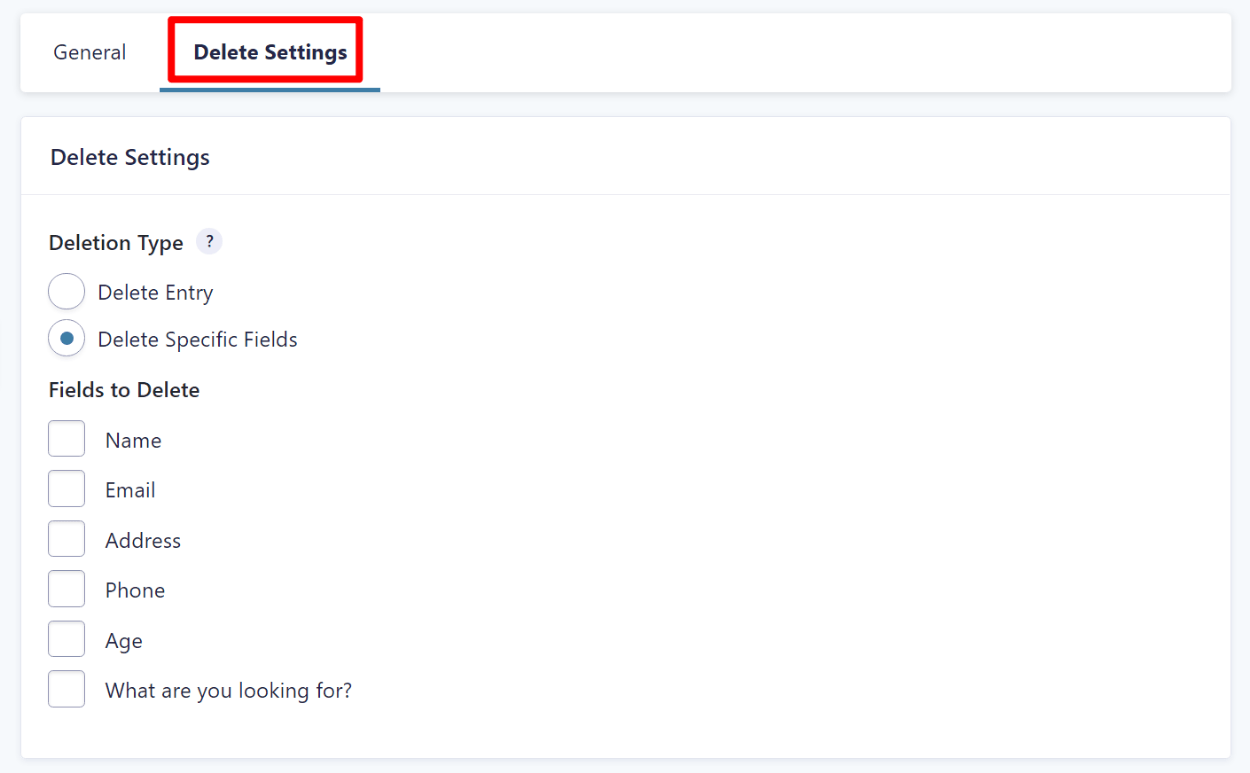
If you choose to delete entire entries, you can also choose between completely deleting the entries or only moving them to trash.
How to Chain Multiple Actions Together
As I mentioned earlier, one of the neat things about Entry Automation is that you can chain multiple automation actions together by creating multiple tasks.
For example, you could first export entries and then delete those entries once you’ve exported them.
To chain tasks together, there are a few basic requirements – the tasks must meet one of these two criteria:
- The tasks are set to run on form submission.
- The tasks are set to run on a schedule and scheduled to run at the same time.
As long as these requirements are met, the tasks will run in the order they appear in the task list. You can use drag-and-drop to easily adjust the order.
For example, in the screenshot below, you can see two chained tasks set to run on form submission. When a user submits a form, the plugin would first export the entry according to the settings and then delete it:

If you’re using Gravity Flow (another third-party extension) to create your own automation workflows, Entry Automation also integrates with Gravity Flow, which gives you even more flexibility for setting up more complex workflows.
Entry Automation Pricing
Entry Automation is a premium plugin. The plans start at $129 for use on a single site and one year of support and updates. This plan includes all of the features except for the external storage integrations (Amazon S3, Dropbox, and FTP) and WordPress multisite support.
To add those cloud storage integrations, you need the $299 Agency license, which also allows use on unlimited sites:

Final Thoughts on Entry Automation from ForGravity
Entry Automation is one of those plugins where if you need it, you really need it. Because it’s an add-on for Gravity Forms, it’s obviously a niche plugin in the grand scheme of things. But if you need to automate exporting and/or deleting entries in Gravity Forms, it can save you a ton of time and effort vs trying to manually cobble together some system.
At $129, it’s a bit more expensive than an “average” WordPress plugin. But given that it’s such a targeted business use case, I think the value is still there. For example, if it saves you even just 30 minutes of manual work per week, that’s 26 hours of saved time per year. Paying $129 to save 26 hours of work is a pretty good deal in my mind, and it could probably save you (or your clients) a lot more than 26 hours if you need to work with entries like this.
As for the plugin itself, it’s well-thought-out and includes plenty of options for customizing the schedule and targeting specific submissions and/or specific information in your automations.
All in all, you should definitely give this one a look if you need this type of automation for Gravity Forms.
