


This post will walk you through 4 easy ways to remove the quantity field from your WooCommerce product and cart pages. We’ll include both free & premium options, methods for beginners and developers, and provide you with the best plugins to manage WooCommerce quantity fields.
By default, WooCommerce will show a quantity field on all of your product pages, as well as next to each product on the cart page. While this works for many eCommerce shops, it might not make sense for your specific shop. Let’s dive into what the quantity field looks like, the reasons you might want to remove it, and the best ways to do just that.
What is the WooCommerce Quantity Field?
When we say “WooCommerce quantity field,” it’s important to know what we’re referring to.

The quantity field on a WooCommerce product page is typically located next to or around the “Add to Cart” button. Your theme is responsible for exactly where the quantity field is located, and site owners can place a quantity field anywhere using a page builder that supports custom WooCommerce layouts.
The quantity input field allows shoppers to increase or decrease the quantity of an item they’d like to purchase.
You’ll also find the quantity field on the WooCommerce cart page, once a shopper has added an item to their cart.

While these are the two main places you’ll find the quantity field, some themes and custom WooCommerce sites might include it elsewhere. Regardless of where it’s located on your site, all of our methods below will remove it from all locations.
Why Remove the WooCommerce Quantity Field
The quantity input field makes sense for traditional eCommerce sites selling physical goods, however, it might not be needed for all shop owners. Here are a few reasons why you might want to hide the quantity field on your WooCommerce site:
- Services: Selling services instead of physical products, i.e. consulting (read our guide on selling services with WooCommerce)
- Subscriptions: You’d only want a customer to be able to purchase a single active subscription. You would handle recurring payments with a subscription plugin, not the quantity field.
- Custom Art: If you’re creating custom art or handmade goods for a customer, you would set a unique price for that one item. Additional items would be discussed separately and require the purchase of a new product.
- Inventory Limitations: If your inventory is limited, or you want to control the flow of products from your warehouse, you might want to limit each customer to a single product.
You can remove the WooCommerce quantity field on individual products, as well as site-wide for all products. Some methods involve using free plugins while others are more developer friendly. We’ll even include a premium plugin for managing WooCommerce quantities at a more granular level.
Here are our quick recommendations for different use cases:
- Less than 30 products, no plugins or code required: WooCommerce Product Data metabox
- Any number of products, no plugin required, one code snippet to update ALL products:
woocommerce_is_sold_individuallyfilter - If you’d rather use a free plugin, and update ALL products: WPC Product Quantity for WooCommerce
- Premium plugin with many quantity-related features: WooCommerce Quantity Manager
1. WooCommerce Product Data Metabox
If you have a small number of products in your shop (<30), I’d recommend this option. It’s built right into WooCommerce so it doesn’t require any additional plugins or custom code. If you need to remove the quantity field for many more products, this option is very tedious. Skip to the next method.
- Navigate to a single product page
- Scroll down below the Product Description to find the Product Data metabox
- Click the Inventory tab
- Check the box for Sold individually: Limit purchases to 1 item per order
- Click the Update button

Now customers can only buy one of this single product per order.
You will need to repeat this process for each product that you want to be sold individually.
NOTE: It is also possible for them to submit multiple orders, which would allow them to buy more than one of the product.
Here’s a quick video demonstrating the process of removing the quantity field for one product using this method.
If a shopper goes back to the product page and clicks “Add to Cart” after the item is already in their cart, they will not be allowed to do so and will receive the following message:
“You cannot add another {Product} to your cart.”
2. WooCommerce Filter (developer)
If you’re looking for an easy way to remove the quantity field for ALL of your WooCommerce products, this method is the most efficient. It requires two simple lines of custom code but is easy enough for most WooCommerce shop owners to implement.
The code below will remove the quantity field for all the WooCommerce products across your entire store.
function custom_remove_all_quantity_fields( $return, $product ) {
  return true;
}

add_filter ( 'woocommerce_is_sold_individually','custom_remove_all_quantity_fields', 10, 2 );
We recommend the Code Snippets plugin to manage custom code snippets.
- Navigate to Snippets > Add New
- Give your snippet a title (for internal use only)
- Make sure you’re adding a Functions (PHP) snippet (tab at the top)
- Add the code to the Code area
- Leave Run snippet everywhere checked (this is the default)
- Description and Tags are optional and only for internal use
- Click Save Changes and Activate
You can use this guide on how to add custom code to your website if you’re not sure how to do it safely.
Developers can expand upon this filter and use custom PHP to remove quantity fields for only certain product types (variable, external, grouped, etc.), specific product categories, and any number of different WooCommerce metadata that you’re using with your products. To achieve these same things without code, see method 4 below.
Quick tip: Now that you’ve simplified the product page, make the next step even simpler. Clicking on “Add to cart” usually sends your customers to a long and tedious checkout form on a separate page. Use a shopping cart plugin to increase conversions with an optimized checkout process.
3. WPC Product Quantity for WooCommerce (free)

The free WPC Product Quantity for WooCommerce plugin doesn’t allow you to remove the quantity field, but you can prevent users from adjusting the quantity field. You can set the minimum & maximum quantity to 1, which means shoppers can only buy one of each product per transaction.
NOTE: The free version only allows you to make changes globally, to all products. The premium version provides options on a per-product level.
The WPC Product Quantity plugin offers some additional features related to quantity management in WooCommerce:
- Use an input field, radio buttons, or a dropdown menu for the quantity field
- Set a default quantity to be shown when first viewing the product
- Set minimum & maximum quantities for each product
- Set a custom step value for the quantity input field (i.e. customers can only purchase an item in increments of 2)
- Use decimals in your quantity values
I don’t love how this plugin adds a WPClever top-level menu item to the main WordPress admin navigation. They could have added their options within the existing WooCommerce settings.
They also promote their premium version (and other WooCommerce plugins) pretty heavily in the admin area. If you prefer to keep your admin area clean, use the woocommerce_is_sold_individually filter instead (method 2).
4. WooCommerce Quantity Manager Plugin (premium)
The WooCommerce Quantity Manager plugin by Barn2 Media is the most feature-rich plugin to manage product quantities across your site. It costs $69/yr., or you can purchase the all-access bundle from Barn2 to gain access to all 12 of their premium WooCommerce plugins.
Some of the plugin’s features include:
- Set global quantity rules and defaults throughout your store
- Set quantity minimums and maximums for specific categories
- Add minimum or maximum quantity rules for individual products
- Set quantity rules for individual product variations
It also comes with additional features such as quantity step values (add interval-based quantities and multiples) and helpful errors and prompts to guide your customers on their buyer journey.
4a. How to set a maximum quantity of 1 for all products
Once you have installed and activated the plugin, head to the WooCommerce Quantity Manager settings page in WooCommerce.
Scroll down to the Order quantity rules section and set the maximum to 1. This will set all your products to have a maximum quantity of 1.

As you can see in the screenshot above, the plugin lets you set order values, default quantities, and step values. You can also choose which user roles have access to manage your product quantity settings.
4b. How to set a maximum quantity of 1 for all products in a category
Another great feature of this plugin is that you can set quantity rules for specific categories of products.
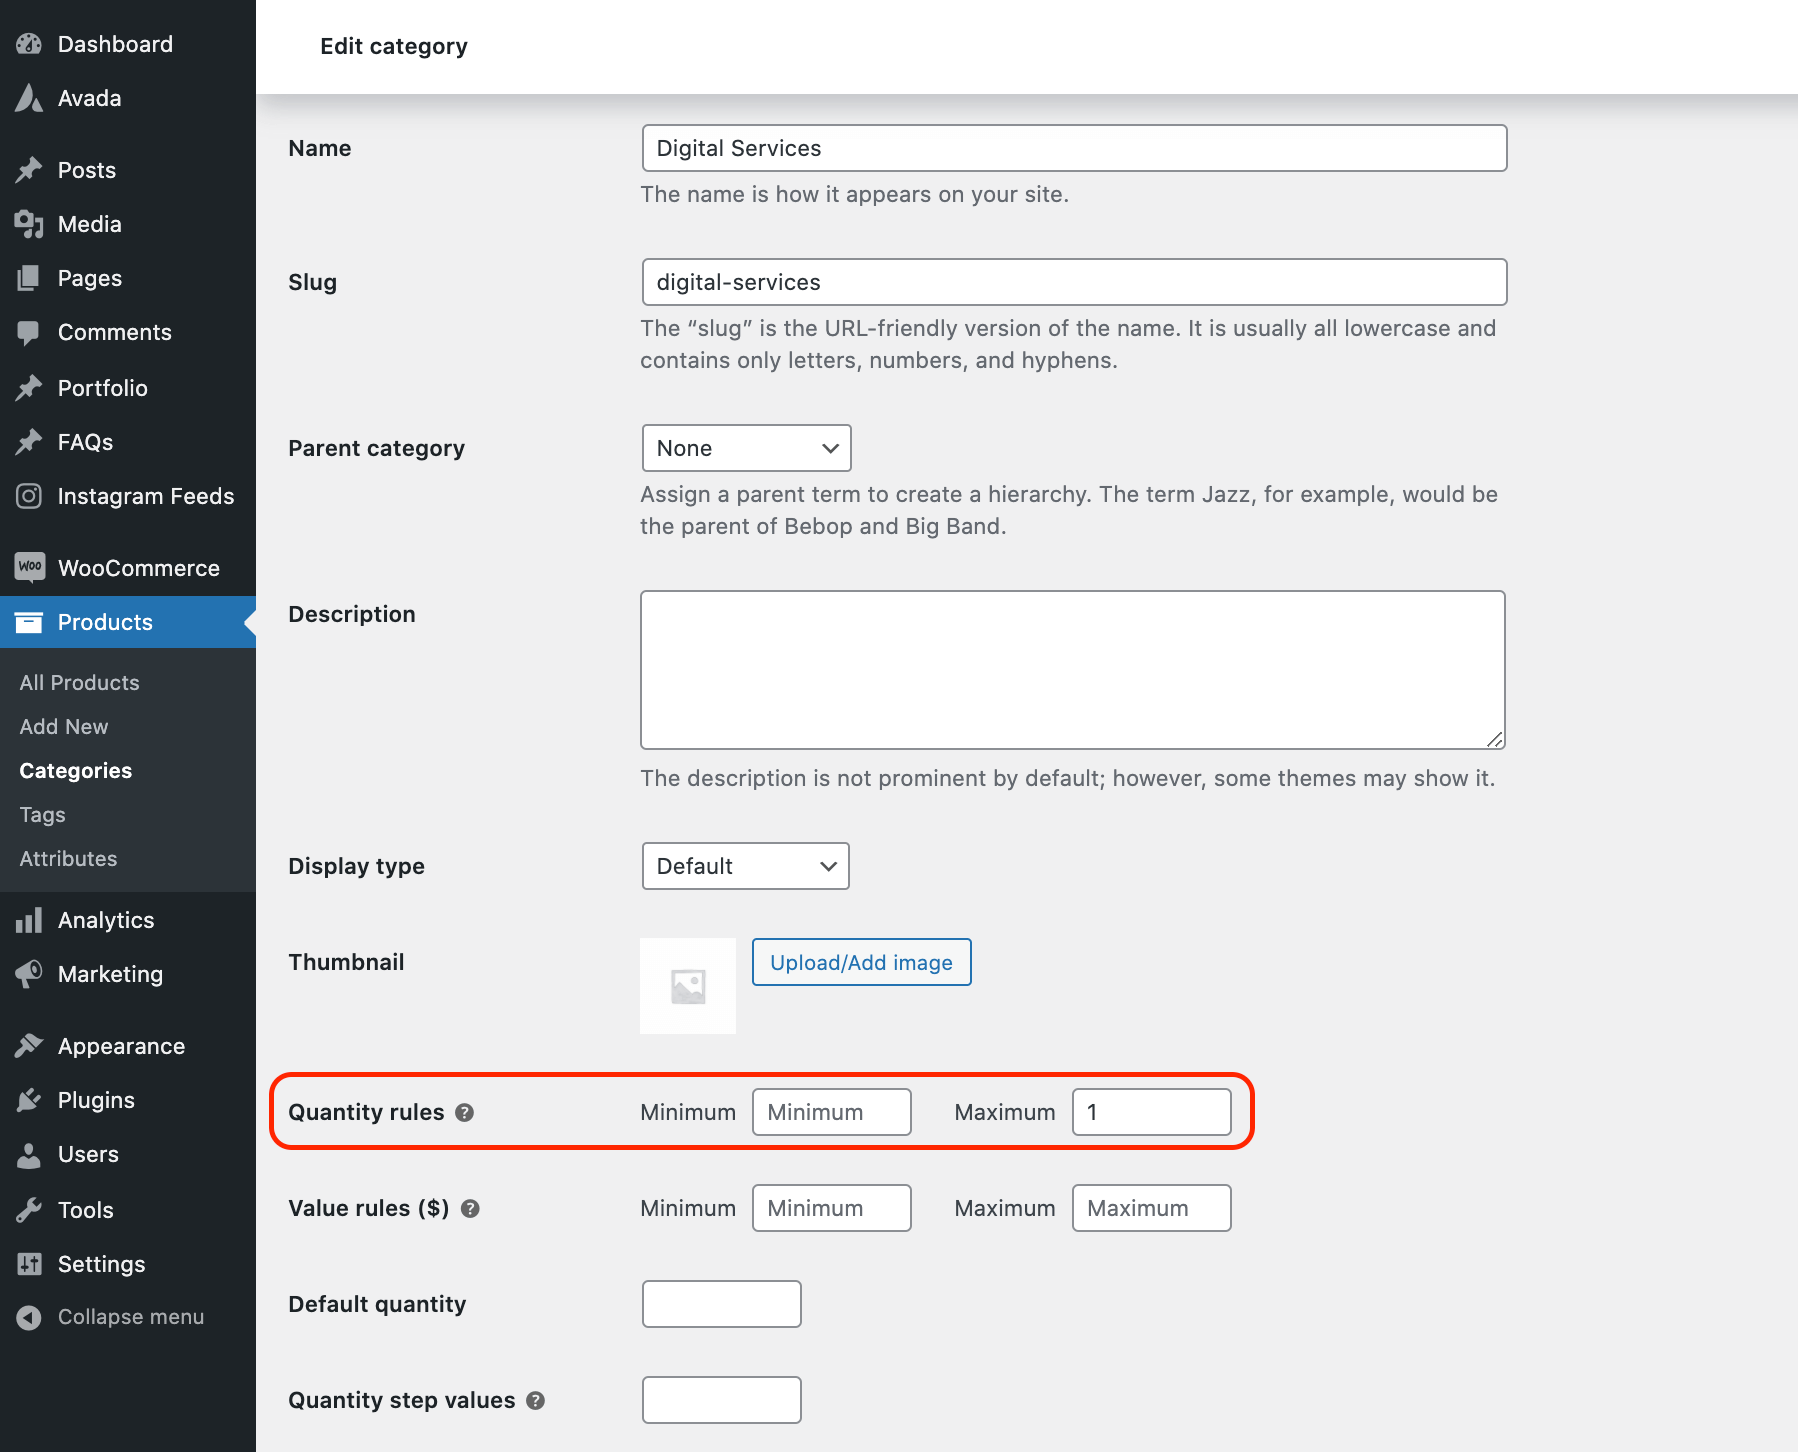
Let’s say we have a category called “Digital Services.” We would like all the products in this category to have a maximum quantity of 1.
Go to the Digital Services category and scroll down to the Quantity rules section. Set the maximum amount to 1. All products in that category will now be sold individually.
Other Options
There is another premium WooCommerce plugin called Advanced Product Quantity by Addify. It’s available on the Woo Marketplace for $59/yr. It includes many advanced settings similar to the WooCommerce Quantity Manager plugin by Barn2.
We have not fully evaluated this plugin, but it doesn’t offer anything unique that Barn2’s plugin doesn’t already offer. Since we know & trust all of Barn2’s WooCommerce plugins, we recommend their quantity manager plugin over this one.
Bonus: Remove the Quantity Column from the WooCommerce Cart Page
All of the methods above remove the quantity field, but they don’t remove the entire quantity column that appears on the WooCommerce cart page. If your entire shop is not using quantity and you want to remove the entire column, you’ll need to customize the WooCommerce template files.
WARNING: This is an advanced method. We recommend some developer experience before proceeding.
- Locate this file:
/wp-content/plugins/woocommerce/templates/cart/cart.php - Copy that file and paste it in the following folder:
/wp-content/themes/{your-theme}/woocommerce/cart/- Now you’ll edit the
cart.phpfile in your theme, making the following edits.
Delete the table header:
<th class="product-quantity"><?php esc_html_e( 'Quantity', 'woocommerce' ); ?></th>Delete the quantity field within each product row:
<td class="product-quantity" data-title="<?php esc_attr_e( 'Quantity', 'woocommerce' ); ?>">
	<?php
	if ( $_product->is_sold_individually() ) {
		$min_quantity = 1;
		$max_quantity = 1;
	} else {
		$min_quantity = 0;
		$max_quantity = $_product->get_max_purchase_quantity();
	}

	$product_quantity = woocommerce_quantity_input(
		array(
			'input_name'   => "cart[{$cart_item_key}][qty]",
			'input_value'  => $cart_item['quantity'],
			'max_value'    => $max_quantity,
			'min_value'    => $min_quantity,
			'product_name' => $product_name,
		),
		$_product,
		false
	);

	echo apply_filters( 'woocommerce_cart_item_quantity', $product_quantity, $cart_item_key, $cart_item );
	?>
</td>
Once you save/upload this file to your server, the entire quantity column will be removed from the WooCommerce cart page.

Which is Your Preferred Method?
We’d love to know which method you prefer and why. Let us know in the comments.
Developers, the woocommerce_is_sold_individually filter is likely your best option. For small shop owners, just use the built-in WooCommerce Product Data metabox. For larger and more advanced shops, Barn2’s WooCommerce Quantity Manager is a solid choice.

19 Responses
nice! as a non-experienced user, I’d been looking for this answer for two weeks in a row
Thanks for the Solution
Thank you so much for posting this article it is really helpful for me.
Thanks for the information. It’s very useful.
Thanks ! It works
Works perfectly in 21 theme, just drop it at bottom of functions.php file 🙂 Thanks!
Thank you so much.
The second method is really helpful.
I’m glad we helped you out 🙂
Thank you for this solution.
Great solution with snippet.
Thank you so much.
The second method is really helpful
Hey, I don’t suppose you have a hook to set the increment value of the quantity box? so 10, 20, 30 instead of 1,2,3?
Hi Andrew, we’re a bit late to the party here, but the WooCommerce Quantity Manager plugin could definitely take care of this for you. 🙂
Hi, that’s really useful. Thanks for publishing. Can you add if it is possible to use the functions.php hook but restricted to a certain category?
They should really make this a global setting you can set in the backend. But I appreciate the hook.
Brilliant! it works with my flatsome theme.
Thanks so much!
Thank you for this solution.
Thank you, helpful tip! What would be the snippet to remove the qty field from shop/archive pages as well? I found that this field is not working well on mobile devices.
Thank you For sharing the Great article and this article is very helpful for me.
we follow this technique in my activities to improve.keep it up my friend.