


COVID-19 has impacted individuals and organizations across the globe, forcing us to reconsider our approach to social and professional gatherings. As a business owner, this may mean moving your company events, conferences, and meetings to a virtual environment.
Fortunately, there are many benefits to hosting, managing, and organizing events online — and WordPress makes doing so quick and easy. Setting up a virtual event website can help streamline nearly every aspect of event management, including promotion and registration.
In this post, we’ll discuss the benefits of using WordPress for your online event website. Then we’ll walk you through how to set one up in five steps and suggest some helpful plugins you can use to maximize your site’s value. Let’s get started!
The Benefits of Using WordPress to Create Your Virtual Event Website
An event website is an essential tool you can use to market and promote your conference or event. However, in addition to making it easier to get the word out about it, an event website can also help with communicating key details and information to potential guests and prove a quick way for them to register and purchase tickets online.
To create a virtual event website, we recommend using WordPress:

This popular, powerful, and flexible Content Management System (CMS) can be used to build nearly any type of site, including professional event websites. Some advantages of using WordPress to create your virtual event website include:
- Responsive themes specifically designed for events. WordPress offers a wide variety of free and premium themes that can both simplify and accelerate the web design process. Some even come with event promotion and management features built-in.
- Plugins to expand the functionality of your site. The WordPress Plugin Directory provides a plethora of plugins that allow you to extend and enhance the functionality of your website with just a few clicks. This includes add-ons for event scheduling, ticketing, and payment processing.
- Email marketing, social media, and other third-party integrations. WordPress supports a wide variety of third-party tools, platforms, and service integrations that you can use to automate cross-channel communications and promotions.
As an open-source platform, WordPress is free to download and use. Plus, it’s incredibly user-friendly, making it suitable even for beginners.
How to Set Up a Virtual Event Website With WordPress (In 5 Steps)
Now that we’ve covered some of the benefits of using WordPress, it’s time to get to work. Let’s take a look at how to set up a virtual event website with WordPress in five simple steps.
Step 1: Choose a WordPress Host and Domain
As with any website, the first step is to choose a WordPress host and register a domain name. If you’re setting up an event site on an existing WordPress site, you can skip this step.
There are a variety of WordPress hosting providers to choose from. Some, such as GoDaddy, let you purchase and register a domain with your plan. Alternatively, you can use a third-party domain registrar such as Namecheap.com:

Once you choose your hosting and register your domain, you can follow the host’s specific instructions on setting up your WordPress installation. Many hosting providers offer one-click WordPress installations.
Step 2: Install and Customize Your WordPress Theme
Your WordPress theme plays a pivotal role in your site design and appearance. While not necessary, choosing one that is specifically designed for event websites can save you time.
To browse options in the WordPress Theme Directory, navigate to Appearance > Themes > Add New from your WordPress dashboard:

You can find event-related themes by typing “event” in the search field. For more information about a theme, hover over it and select Details & Preview:

When you decide on one, click on the Install button, followed by Activate:

Once activated, you can modify the theme via the Theme Customizer (Appearance > Customize):

When you’re done, click on the Publish button. Note: You can return to this section any time to change the appearance settings.
Step 3: Download an Event Management Plugin
The next step is to download an event management plugin. An event management plugin can add functionality and features to your virtual event website that WordPress (or your theme) doesn’t come with by default.
This includes features for:
- Creating event lists, calendars, and schedules
- Building registration forms and sign-up pages
- Processing ticket and payment information
There are a handful of event management plugins you can use. A popular one we recommend is WP Event Manager:

This free, lightweight plugin lets you quickly create and manage event listings. It also offers a handful of premium add-ons. For more details, check out our WP Event Manager review.
Other event management plugins to consider include:
- Events Calendar Pro to easily create and manage an events calendar on your WordPress website. The plugin comes with loads of features. It’s also extensible, easy to use, and completely customizable. Upgrading to the Pro version unlocks recurring events, views, premium support, and more.
- Events Manager for easy event registration, bookings management, and Google Calendar integration. Premium add-ons include PayPal and Authorize.net payments, custom booking forms, and coupon codes.
- Event Espresso if you’re looking for the best plugin for selling tickets. The free version lets you use PayPal Express Checkout, send automated confirmation emails to attendees, and create and manage guest profiles.
To download your event management plugin, navigate to Plugins > Add New from your admin dashboard. Search for the plugin, then click on Install Now, followed by Activate:

Subsequent instructions vary by which plugin you use. Therefore, we recommend referring to the plugin website for further guidance.
Step 4: Integrate Tools for Promoting Your Event
In order for your virtual event to be successful, it’s important to have a marketing and promotion strategy. There are a variety of methods and tools you can use to spread awareness about the event, generate leads, and ultimately increase attendance.
One is to add social icons to your virtual event website using a plugin such as Easy Social Share Buttons. Connecting your site with social networks makes it easy to share promotions and event-related content on popular platforms.
Another way is by creating limited-time offers for event tickets or offering discounts to subscribers.
Finally, break the barriers of virtual events and create a sense of community for your attendees by creating an Instagram wall displaying tagged and hashtagged posts.
You can do this by using a plugin such as Spotlight PRO.
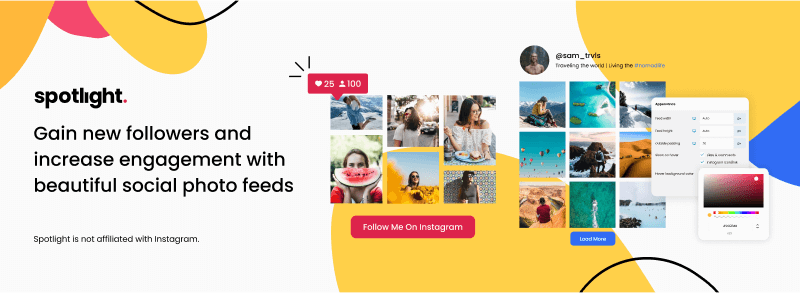
Spotlight is a powerful yet easy-to-use plugin that lets you display Instagram posts on your WordPress virtual event site. With the Pro version, you are able to display posts that tag your event account and any posts with a specific hashtag.
All you need to do is to create a branded hashtag campaign for your attendees to link to and you can then generate as much content as you wish.
One great example of this is WordCamp Europe’s hashtag for its online conference in 2020. Organizers asked their attendees to post selfies and use the hashtag #WCEUFamilyPhoto.
With Spotlight, you can showcase these photos with the use of a hashtag feeds in minutes:

Another great way to engage with your audience is to have speakers or performers take over your Instagram stories account and create live content that can then be displayed on your event page.
Instagram marketing is notorious for generating a lot of buzz, ensuring that your event will be a successful one!
Step 5: Heighten the Accessibility of Your Site
Since your event or conference is going to be online, it’s important to make web accessibility a priority. This means ensuring everyone can access and navigate your virtual event website with ease, including those using screen readers or text-only browsers.
To do this, we recommend using the WP Accessibility Helper (WAH) plugin:

This plugin makes it easy to identify any barriers on your site that may hamper its accessibility. You can download it the way you would any other plugin (Plugins > Add New).
There are a plethora of accessibility options and settings. For example, the DOM scanner analyzes the pages and posts on your virtual event website for potential issues.
To use it, navigate to Accessibility > DOM Scanner from your dashboard:

Select the page or post you want to scan from the dropdown menu, then click on the Start WAH Scanner button. It will then present a list of errors to asses, such as missing Alt text on images.
The free plugin comes with plenty of helpful features for improving your site’s accessibility. However, you can unlock even more by purchasing a premium plan.
Conclusion
A website dedicated to your online event or conference can make it easier to promote and manage the event, as well as sell tickets and register guests. To create one, we recommend using WordPress.
As we discussed in this post, you can set up a virtual event website with WordPress in five simple steps:
- Choose a WordPress host and register your domain.
- Install and customize your WordPress theme.
- Download an event management plugin such as WP Event Manager.
- Integrate your site with marketing and promotion tools such as Spotlight.
- Heighten the accessibility of your event website using the WP Accessibility Helper plugin.
Do you have any questions about setting up a virtual event website with WordPress? Let us know in the comments section below!

One Response
Good explanation for newbs.