


Does your business need to hire some help?
One method that a lot of businesses use to find candidates is to create a “Careers” page on their website that lists all of the openings. For example, we have our own job listing page (where we also aggregate other available WordPress jobs).
If you’re on WordPress, you could do that just by creating a page and listing your jobs, but that would leave you with no way to actually track your jobs and the applications for each job.
In this tutorial, we’ll show you how to use the WP Job Openings plugin to set up a much more robust WordPress job listing system for recruiting candidates on your site.
You’ll be able to create a stylish careers page that lists all of your company’s jobs. Then, you’ll get application forms and an application tracking system so that you can manage all of your applications right from your WordPress dashboard.
Introducing WP Job Openings, a WordPress Job Listing Plugin

WP Job Openings is the plugin that we’ll use for this tutorial.
It uses a freemium model, which means that there’s a free version at WordPress.org as well as a premium version that adds more features.
We’ll focus mostly on the free version in the tutorial, but we will note a few areas where the premium version might make more sense.
To start, the plugin lets you create a careers page on your site that lists all of your available jobs. You can choose from multiple built-in layouts and you can also add useful features for job seekers such as a search box and job filters.
But the plugin does a lot more than just listing jobs – it also provides a full recruitment system to manage candidates and applications from WordPress:
- Create custom job application forms to accept applications.
- Rate applications.
- Select, shortlist, or reject applications.
- Add private internal notes.
- Send custom email notifications to your staff and job seekers.
- Track activity on all your jobs.
- Mark positions as filled when you find someone.
- Receive an email digest of new applicants.
If you want to see it in action, you can check out a demo here.
You can also view a feature comparison of the free vs Pro version here. In general, all you’ll need is the free version if you just want to list jobs and accept applications. However, you’ll want the Pro version if you want to access all of the more advanced recruiting and application management features.
If you need the Pro version, it starts at just $49 for use on a single site.
How to Set Up a WordPress Job Listing Page With Application Form
Now, let’s get into the step-by-step guide for how you can start displaying jobs and accepting applications on your WordPress site.
Again, almost all of the features that we’ll show you are available in the free version. When we cover something that’s paid, we’ll be sure to note that so that you know where you might want to spend money.
1. Install Plugin and Complete Setup Wizard
To get started, install and activate the free WP Job Openings plugin from WordPress.org (or purchase and install the premium version).
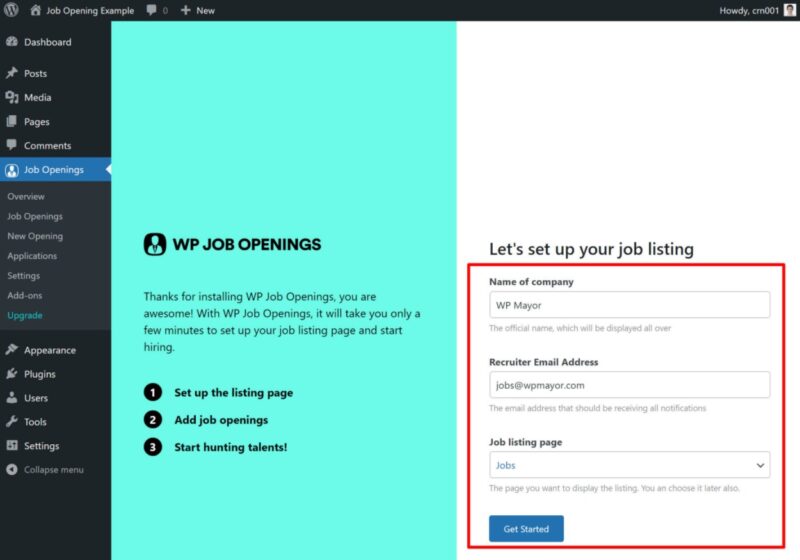
Once you activate the plugin, it will automatically launch a short setup wizard. To begin, you’ll want to set up a few basic details about your company. Then, click Get Started:
2. Configure Basic Settings
Next, you’ll want to configure a few other general settings for how your job listings function, such as what layout to use and what information to display for each job.
To access these settings, you can go to Job Openings → Settings. In the free version, this area is divided into five tabs:
- General
- Appearance
- Job Specifications
- Form
- Notifications
General Settings
The General tab holds a few basic settings. Most of the time, you can leave these as the defaults:

Appearance Settings
The Appearance tab lets you control how your jobs page looks and functions. You can choose between a list view and grid view and configure other important settings, such as whether to enable filters (and which filters to allow, if enabled):
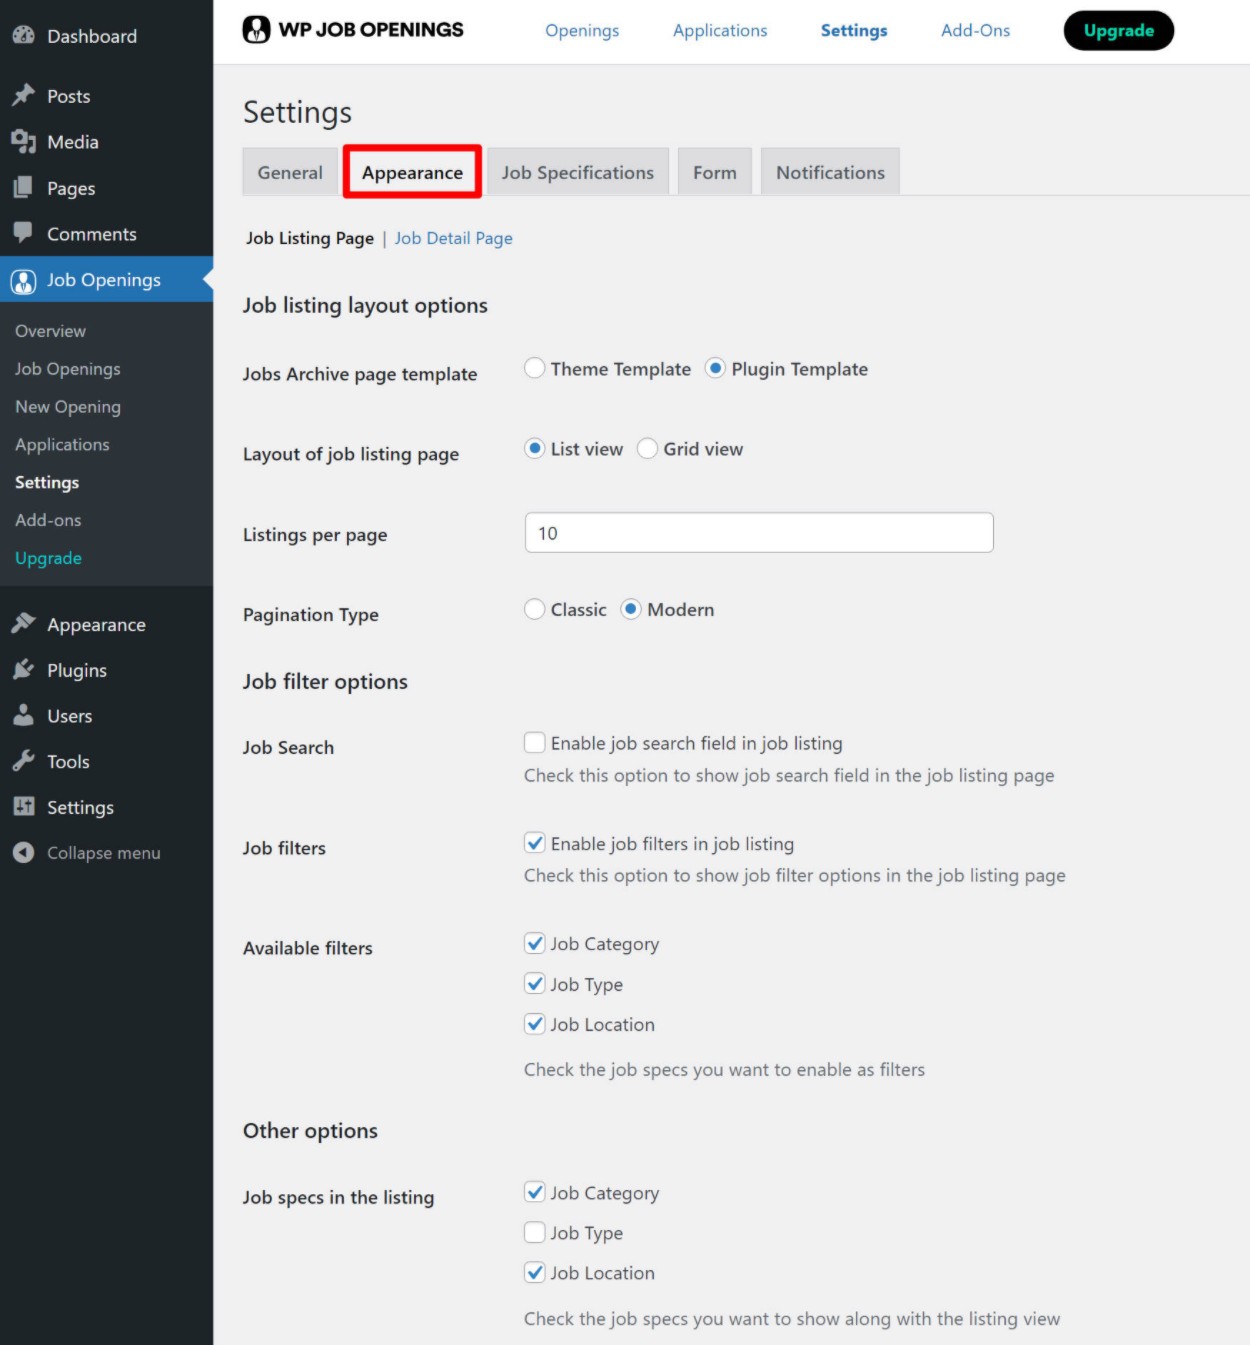
For the settings related to filters and job specifications, you might want to come back to them after configuring the next settings.
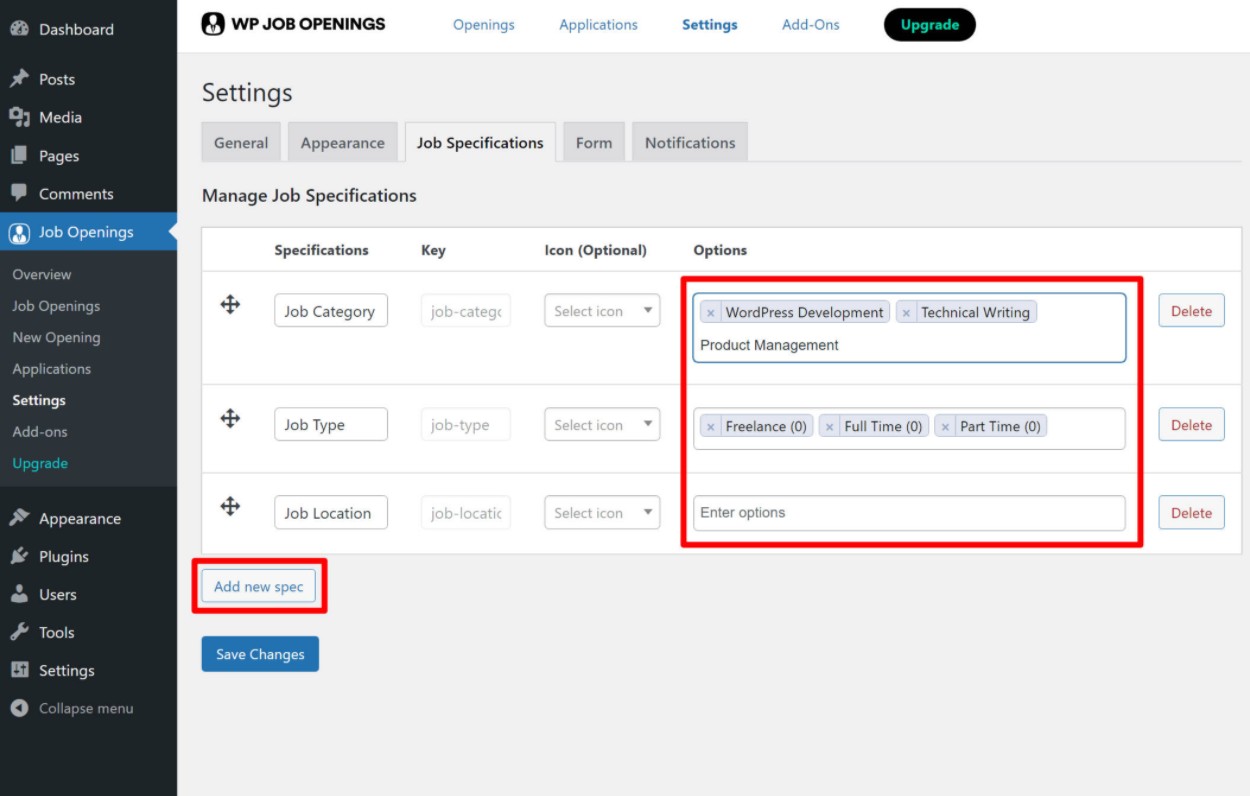
Job Specifications Settings
The Job Specifications tab lets you control what information you want to collect about each job. By default, it will collect the category, type, and location for each job.
You’ll want to fill out the Options as they pertain to your business. You can also add your own custom specifications or delete some of the default specifications if they don’t apply:
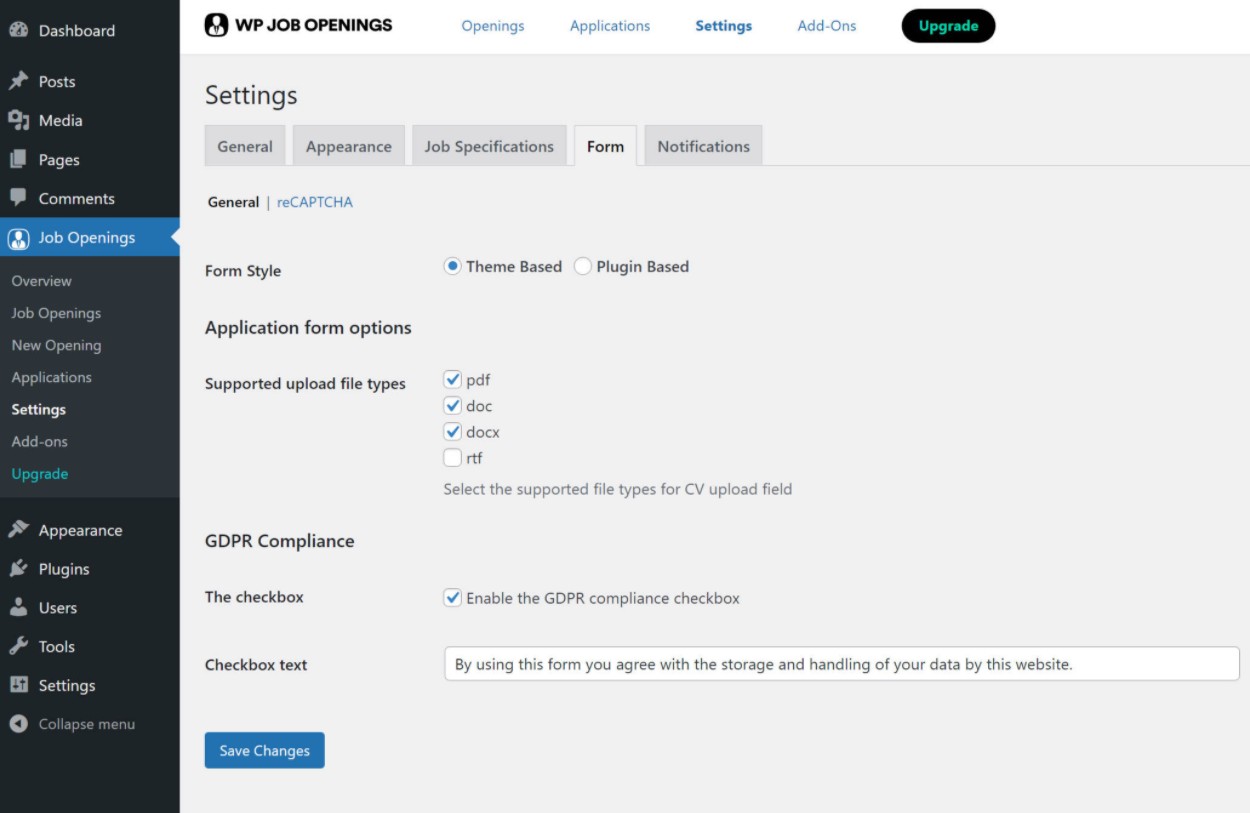
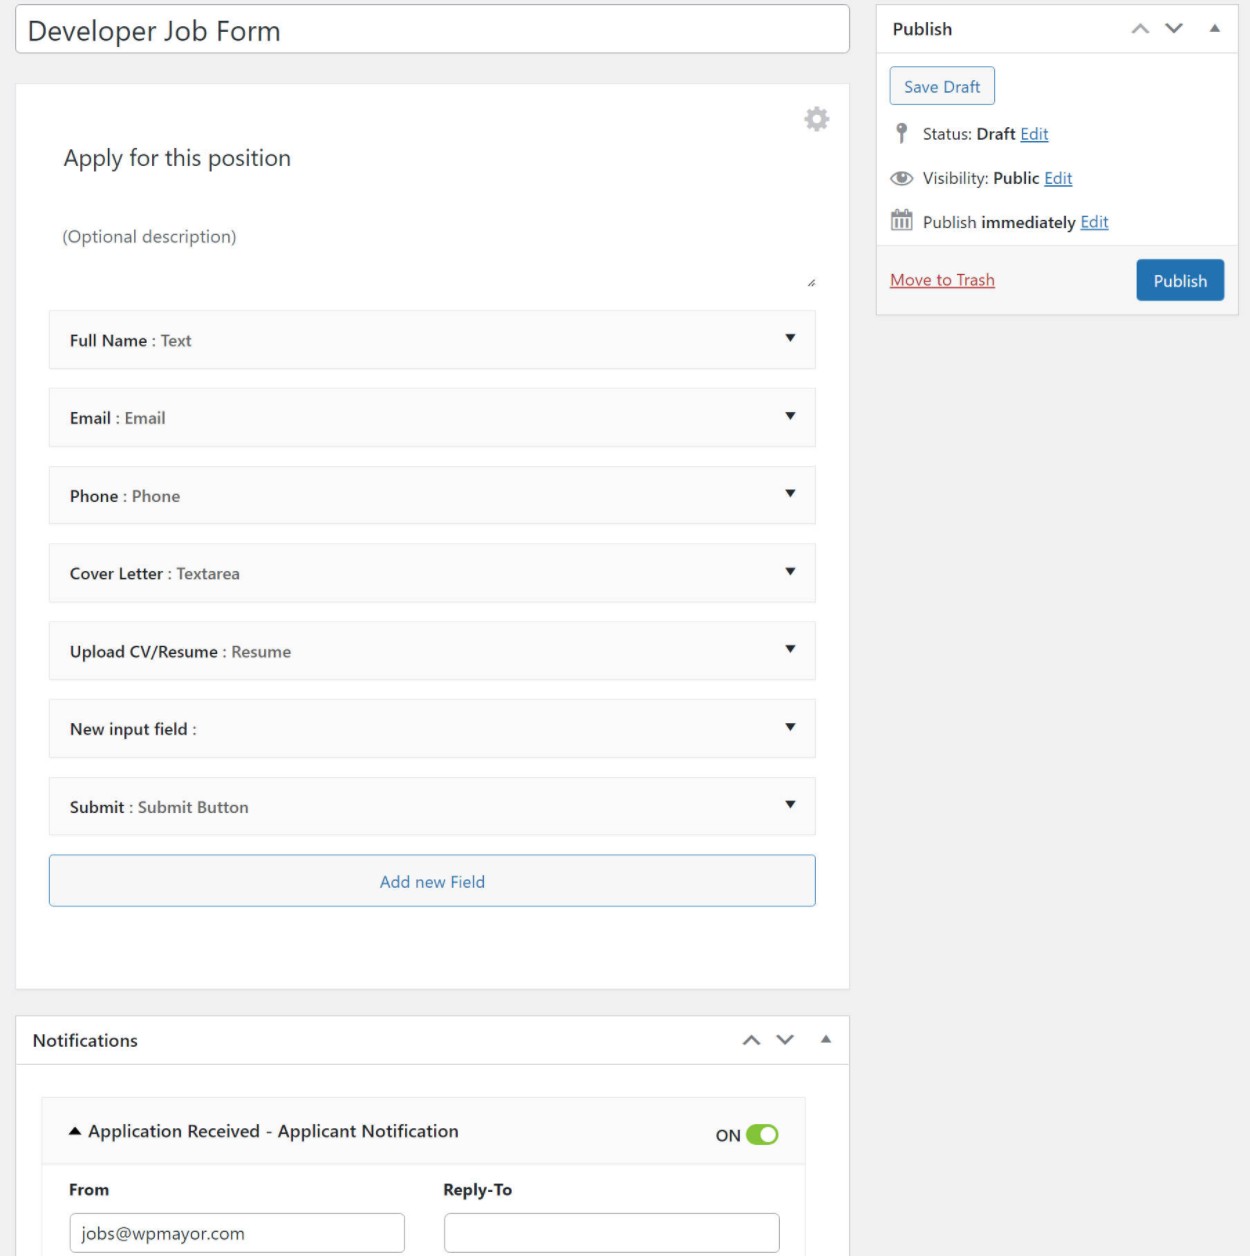
Form Settings
The Form settings let you control the job application form.
You can choose which file upload types to allow and you can also add reCAPTCHA to deal with spam:
With the Pro version, you also get a custom form builder to control the form fields and create multiple unique application forms if needed:
Notifications Settings
Lastly, the Notifications tab lets you configure the email notifications that the plugin sends to admins (e.g. you or your HR staff) and applicants.
You can customize the text using the editor and add template tags to insert dynamic information. The Customize tab also lets you adjust the style.

That’s it for settings! You can always come back and change something after you’ve added some jobs.
3. Add Your First Job Opening
Once you’ve configured the plugin’s settings, you’re ready to add your first job opening.
To do this, head to Job Openings → New Opening.
You can add the job description and title using the regular WordPress editor. Then, you’ll get two job-related settings:
- Job Specifications – in this meta box, you can add the specifications that you entered in the settings.
- Job Expiry – in the sidebar, you can set up an expiration date for this job listing.
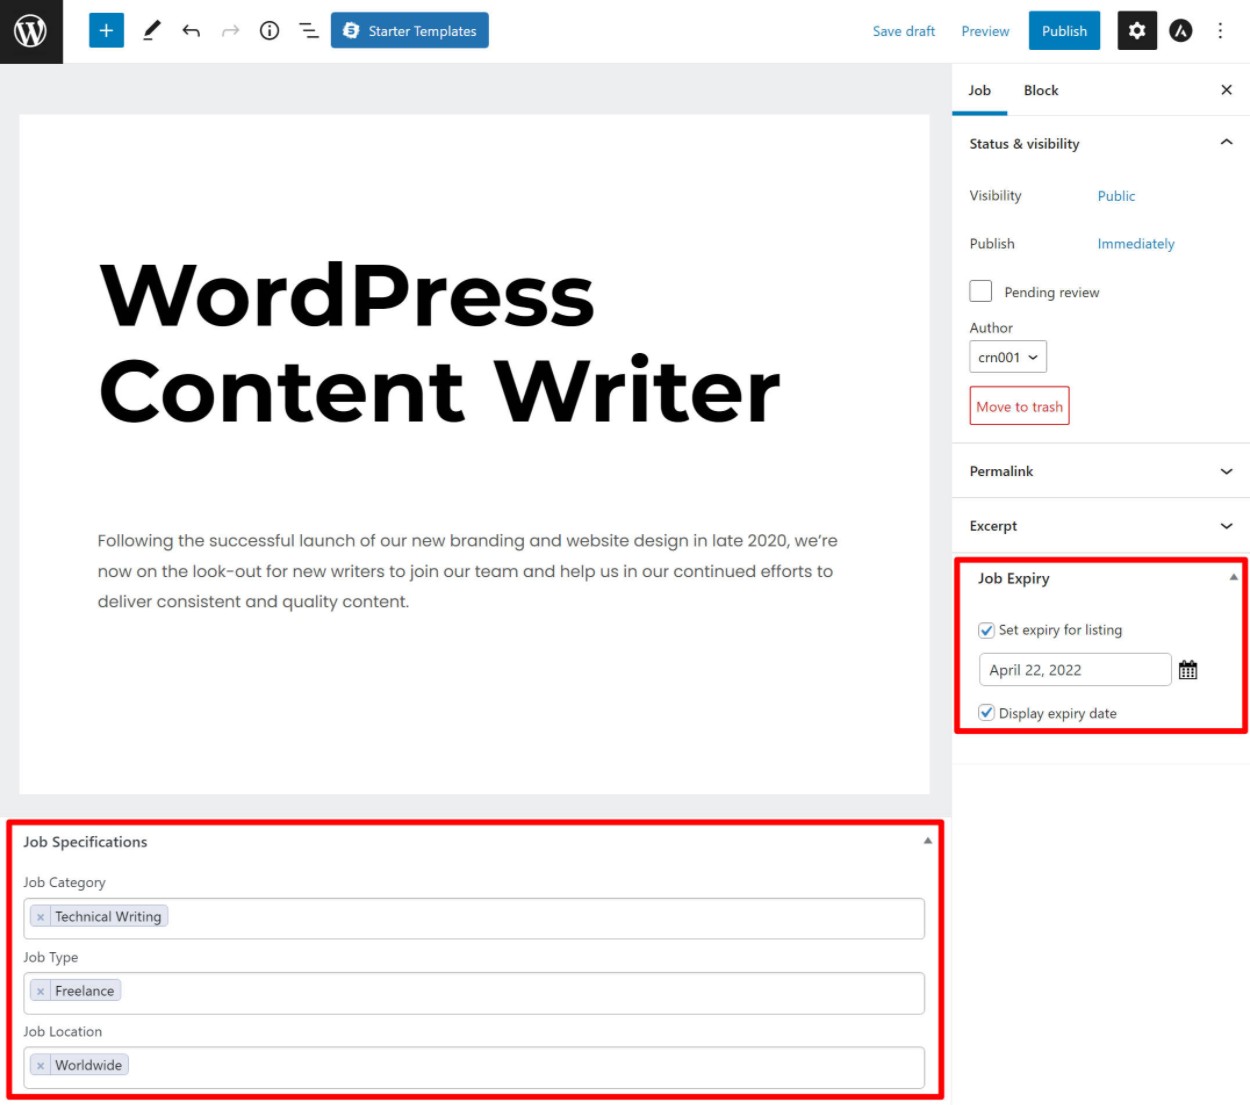
Once you’re happy with how it looks, just Publish it like you would a regular blog post.
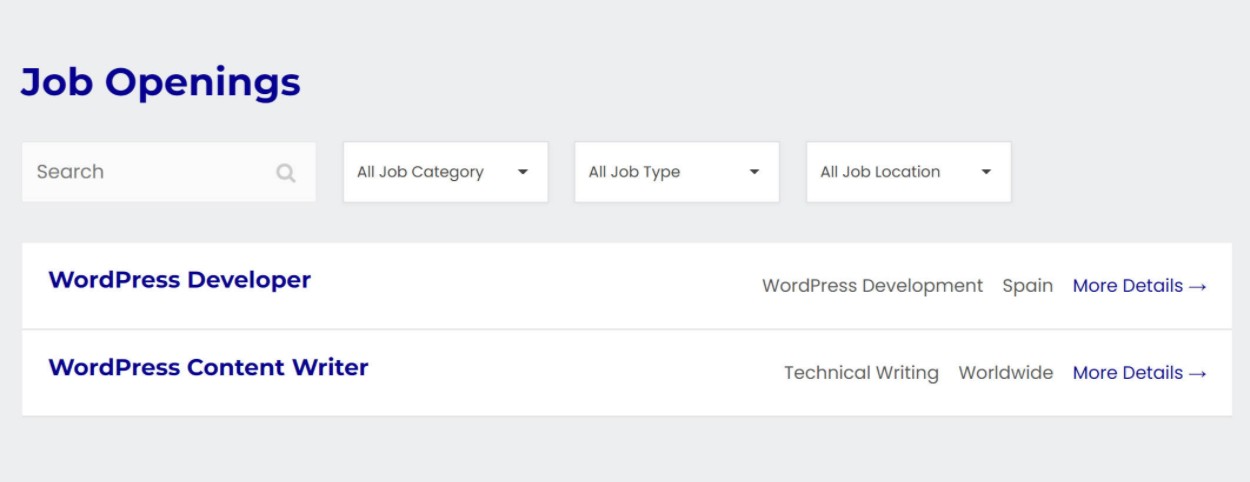
4. Preview Your Jobs
At this point, you’re pretty much done. To see how your jobs page looks, you can open your job page (by default, it’s yoursite.com/jobs).
It should look something like this:
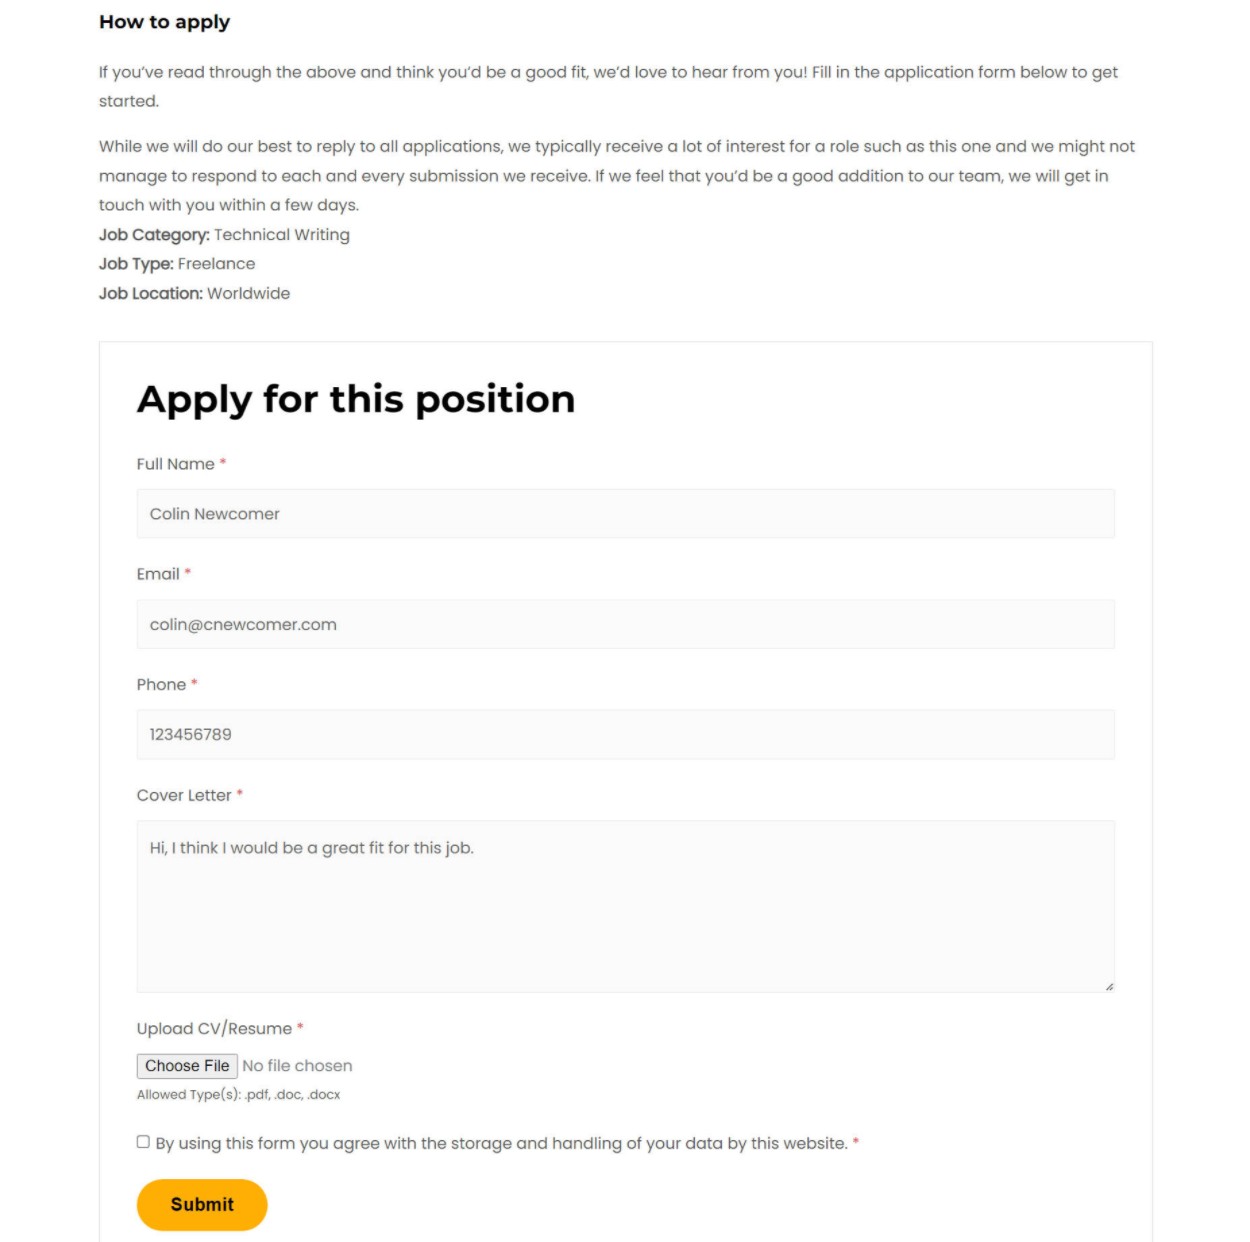
If you click on a job, you’ll see the full details:

At the bottom of the listing, you’ll see the application form:
If you want to change how anything looks, you can always head back to the Appearance settings.
5. Manage Applications
If someone applies to a job, you’ll see them show up when you go to Job Openings → Applications:

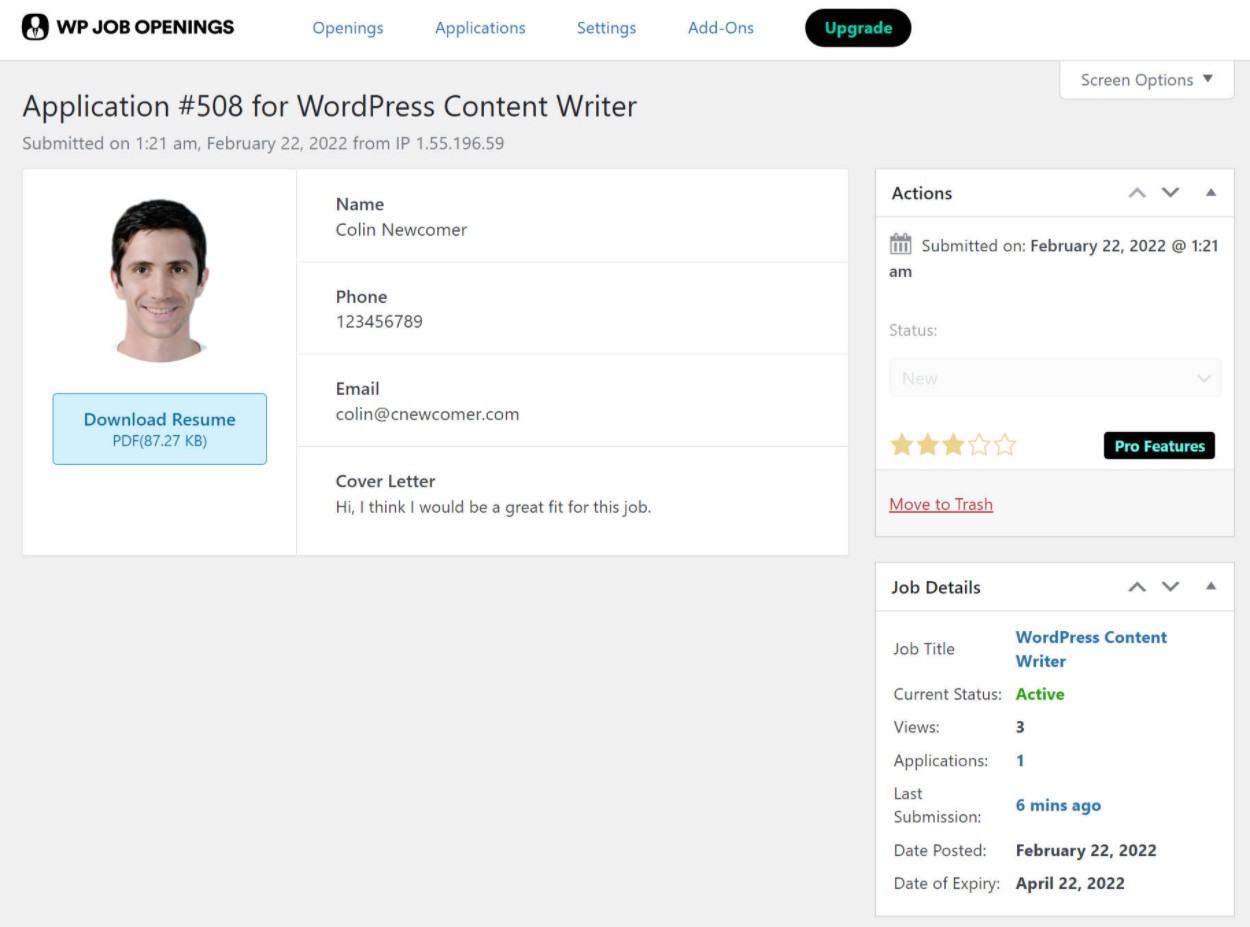
If you click on an application, you can see the details:
There’s also a free Resume Viewer add-on that lets you preview uploaded resume files right from your dashboard (instead of needing to download them).
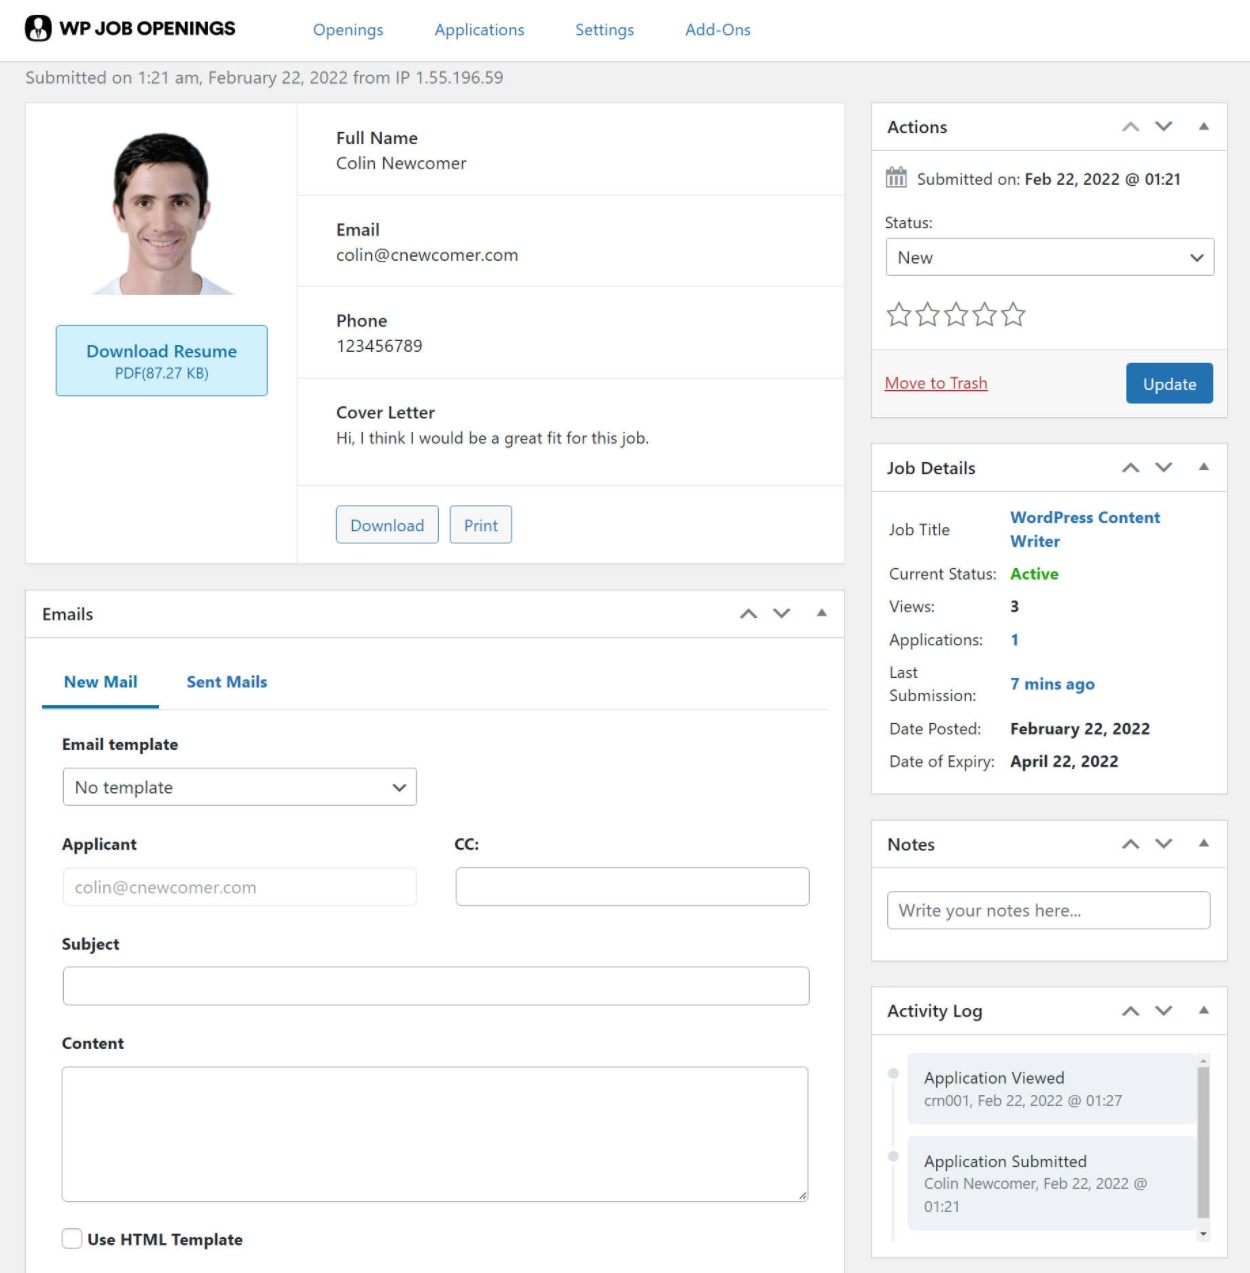
With the Pro version, you get a lot more options for managing individual applications, such as adding notes, changing statuses, adding ratings, sending emails, viewing an activity log, and more:
With the Pro version, you’ll also be able to see these details from the application listing page.
You can also go to Job Openings → Job Openings to see the views and applications for each job (and edit a job if needed):

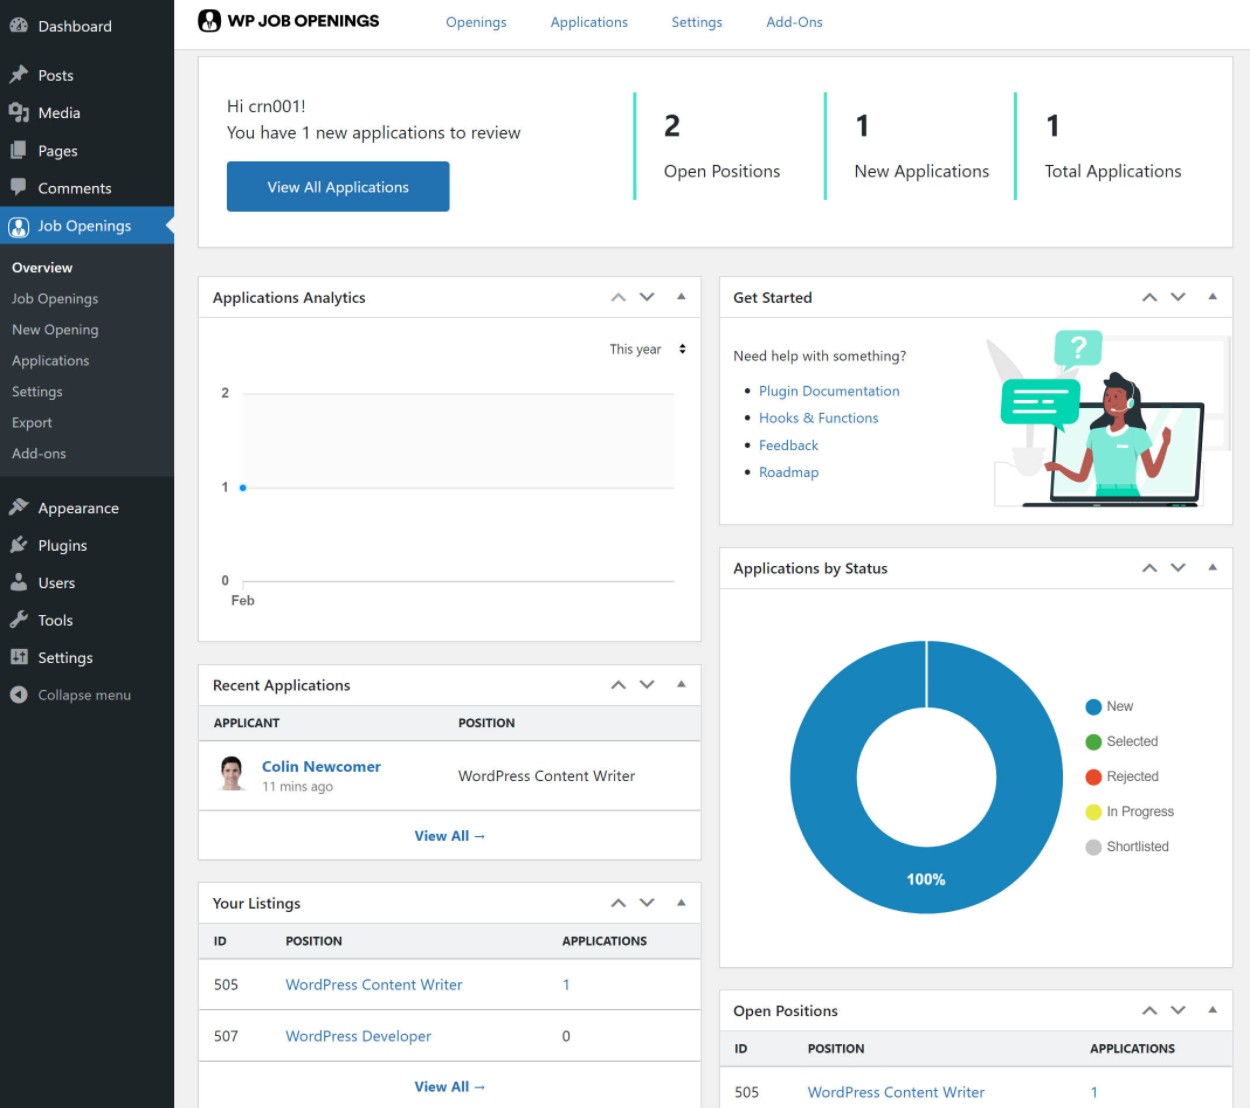
And if you go to Job Openings → Overview, you’ll see a high-level look at all your jobs and applications:
Create Your WordPress Job Listing Page Today
With the WP Job Openings plugin, you can easily find candidates for your jobs directly from your WordPress site.
If you just want a stylish way to list your available jobs and accept applications, you should be fine with the free version of the plugin at WordPress.org.
If you want a full recruitment solution to manage applications and candidates from your WordPress dashboard, you can upgrade to the Pro version starting at $49.
And if you’re not sure yet, you can always start with the free version and upgrade later. All your jobs will still be there even if you switch from free to Pro.
Do you still have any questions about how to create a WordPress job listing page? Let us know in the comments!

One Response
Hi Colin,
It was a great share! A friend of mine has been thinking about setting up a Job listing portal, and I am sure this plugin will be a great help for him. I will definitely be sharing this plugin with him, and hopefully, he can get desired results with your help. I really appreciate you sharing about the setup, it will definitely be a great guide for many people. I will be sharing this guide within my network to help people out.