


Ever wished that you could create a multilingual WordPress site?
Going multilingual is a great way to connect with more visitors and boost your site’s traffic via multilingual SEO (because you can start ranking content for Google searches in multiple languages).
However, you might’ve been put off by the complexity of some WordPress translation plugins or just the idea of having to translate all of your site’s content from scratch.
Linguise offers a simpler approach to creating a fully multilingual, SEO-friendly website. With its easy setup process and automatic translation support, you can be up and running with a fully multilingual site in under five minutes. That’s not an exaggeration – you really can do it in under five minutes.
Plus, even though Linguise uses automatic translation, you’re still able to fully edit all of those translations using a side-by-side editor or a visual frontend editor.
In our hands-on Linguise review, we’ll take a look at this simple translation service and its dedicated WordPress plugin.
Let’s dig in!

Linguise Review: Features and Approach
In a nutshell, Linguise lets you instantly translate your website into 80+ different languages. To achieve this instant effect, Linguise uses automatic machine translation to start. However, you have the option to go back and edit the translations if needed.
As we mentioned above, you’ll get two interfaces to edit translations:
- Backend side-by-side editor
- Frontend visual editor

The translated content gets its own static page, which is important because that means Google and other search engines are able to index your translated content and rank it in search results.
In our Linguise review, we’re specifically focused on using Linguise to translate WordPress via its dedicated WordPress plugin. However, you can use Linguise to translate any CMS or site builder that runs on PHP including Drupal, Joomla, Magento, OpenCart, or a custom build.
The advantage of Linguise’s SaaS approach is that it’s incredibly simple. This approach is the absolute easiest way to create a multilingual WordPress site as you can have a fully working multilingual site within just a few minutes.
It also has excellent compatibility with WordPress plugins because it translates your site’s frontend code. This means that Linguise should automatically work with pretty much any plugin or theme (as long as the content appears on the frontend of your site).
You’re also still able to translate metadata such as your SEO title/description and social media graph information from plugins like Yoast SEO.
One thing to note, though, is that Linguise uses a SaaS approach instead of the one-time purchase price that most WordPress plugins use. This means that you’ll need to pay an ongoing fee for as long as you want to use Linguise – it’s not a one-time purchase like a WordPress translation plugin.
Additionally, translations are served from Linguise’s servers, though Linguise uses smart caching to ensure fast performance. Linguise says that the whole process only takes 10 ms and I didn’t notice any issues in my testing. My test site loaded just as quickly as it normally does (which is pretty fast because it’s hosted on DigitalOcean).
Hands-On With Linguise: How to Translate Your WordPress Site
Now, let’s go hands-on with Linguise and I’ll show you what it’s like to translate a WordPress site.
My example site is built with WooCommerce, so this will let you see how Linguise can handle both regular WordPress sites and WooCommerce stores.
There are two parts to using Linguise:
- The Linguise WordPress plugin – this helps you integrate Linguise into your site.
- The Linguise cloud dashboard – this is where you’ll spend most of your time managing translations once you’ve performed the initial setup.
Setting Up Linguise on WordPress
To set up Linguise on WordPress, you’ll first want to register for a Linguise account. More on pricing later, but you get a one-month free trial with no credit card required, so you won’t need to pay anything to get started.
Once you’ve registered your account, you’ll see a short setup wizard to add your site, including adding your domain name and choosing which languages to use:
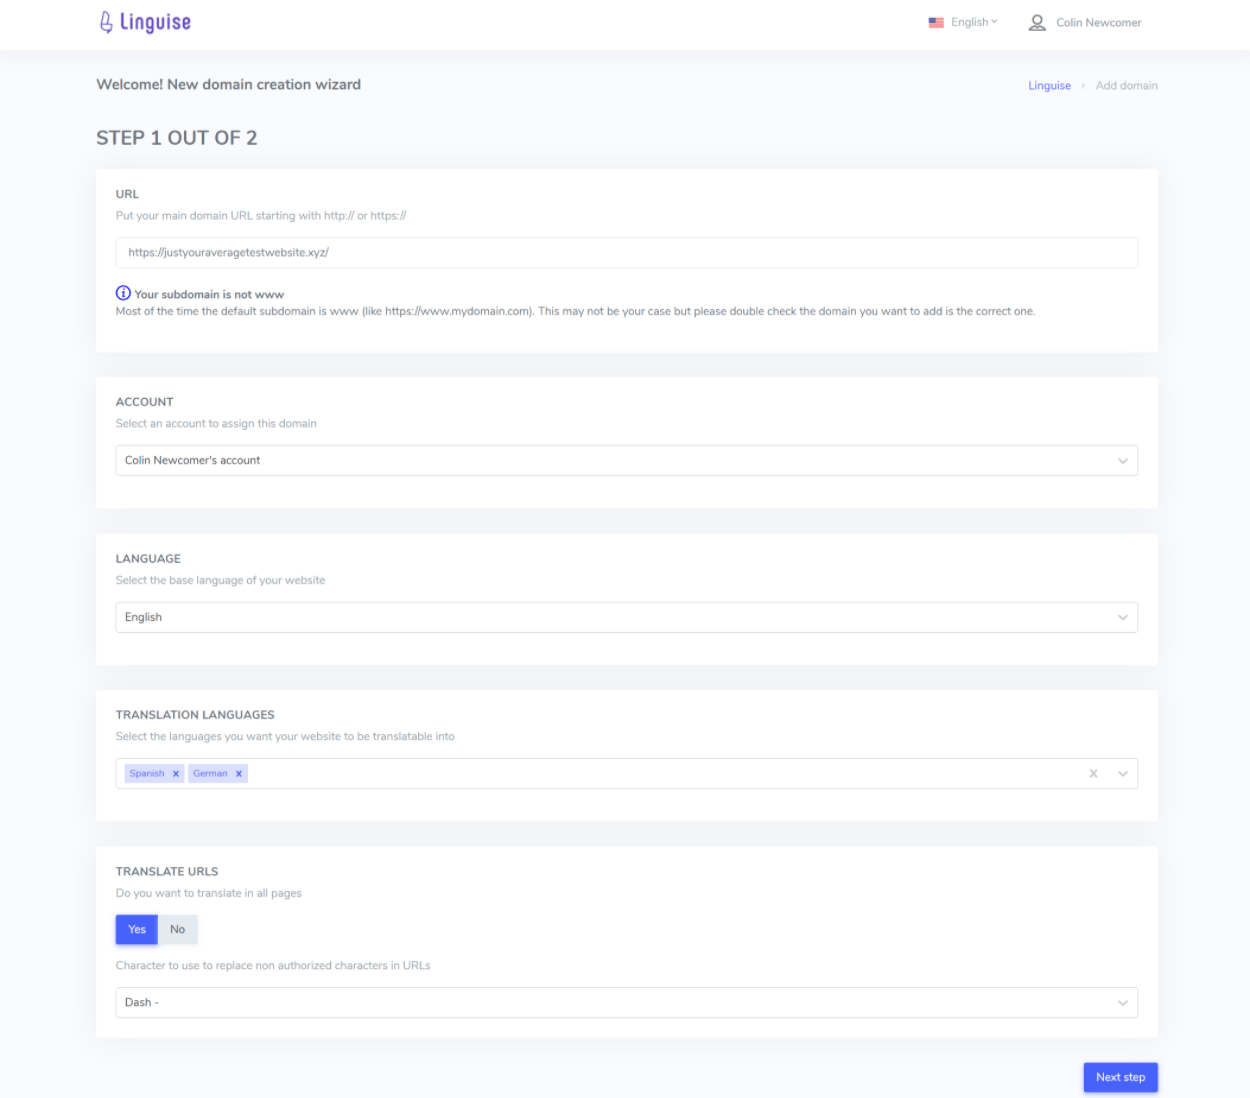
Once you answer the wizard’s questions, Linguise will present you with your API key. Keep this handy because you’ll need it:

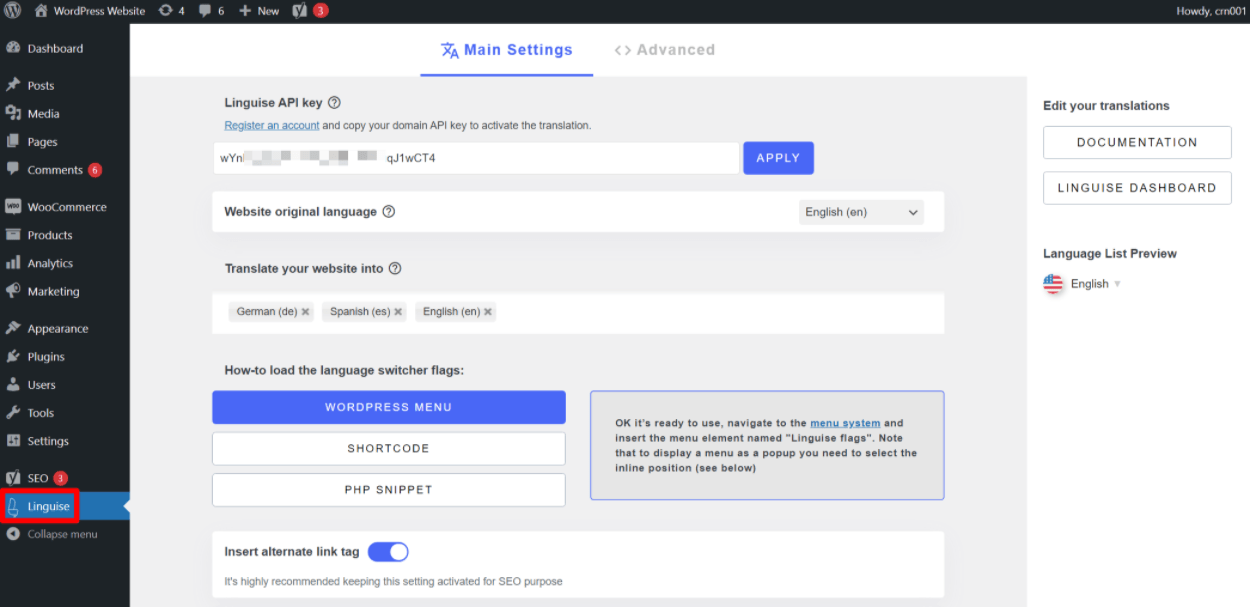
Once you have the API key, you can go ahead and install the free Linguise plugin from WordPress.org on your site. Then, go to the new Linguise tab in your WordPress dashboard.
Here, you can add the API key and click Apply to connect your site to Linguise:
Note – if you’re using Nginx on your server instead of Apache, you’ll need to manually add a code snippet to your nginx.conf to handle URLs. If your host uses Apache (which most do), you don’t need to do anything because Linguise will automatically configure your .htaccess file. Most Nginx-based hosts will happily have their support add this snippet for you.
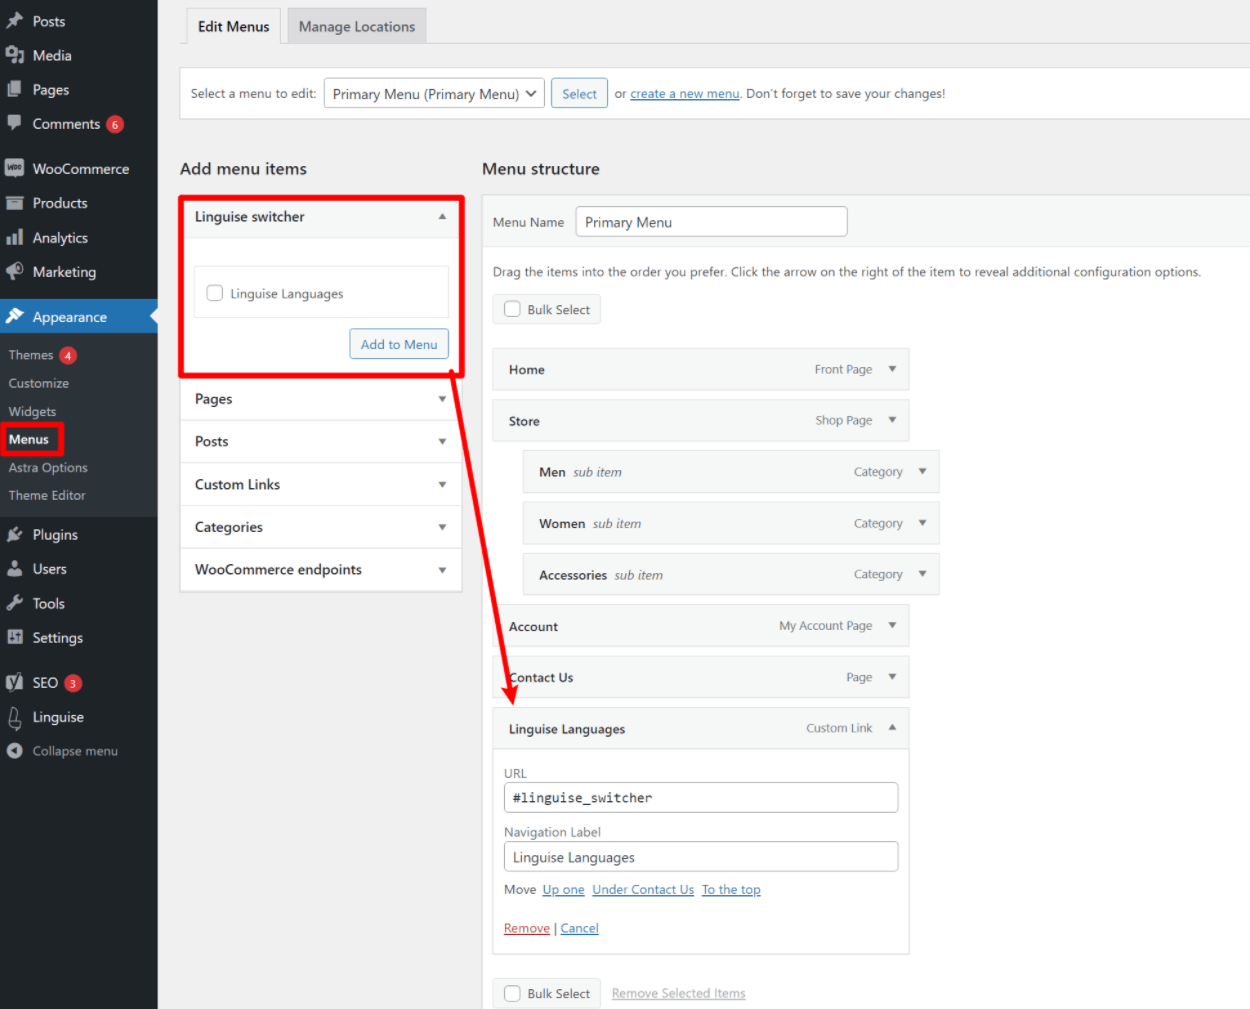
You can also configure your language switcher in this interface, which is what your site’s visitors will use to choose their preferred languages. You have three options for placing it:
- WordPress menu item
- Shortcode
- PHP snippet
You also get a lot of options for configuring the design and layout, which is nice. For example, you can choose between showing languages in a drop-down or a popup. The popup is a unique option as I haven’t seen this layout in any other WordPress translation plugin.
You’ll also get an interactive live preview of your language switcher:

For example, to add it as a menu item, you’d go to Appearance → Menus and add the Linguise languages menu item:
And that’s literally it! You now have a working multilingual WordPress site. Visitors can use the language switcher to choose a language and Linguise will have already translated your site’s content using its automatic neural translation:

Pretty easy, right? Again, this is one of the big advantages of Linguise’s approach – you have a working multilingual site within literally minutes.
However, you might have situations where you want to edit/manage those translations. To do that, you’ll need to use the Linguise cloud dashboard – let’s look at that next.
Using the Linguise Cloud Dashboard
The main Linguise dashboard looks like this:

It gives you a summary of your usage and stats from the last 30 days. To access other areas, you can use the menu items at the top.
Setting Up Translation Rules
You might have certain words or phrases that you don’t want to translate or you always want to translate in a specific way. For example, a brand name or a product name.
If we were translating the WP Mayor site, we wouldn’t want to translate “mayor” into each local language – we’d want “WP Mayor” to be the same for every single language.
To handle this, Linguise lets you set up translation rules, which let you control or exclude translations across some/all of your site.
Overall, these rules are quite flexible, which I think is a strong point of Linguise.
When you set up a rule, you get four “types”:
- Text ignore – ignore certain text.
- Text replace – replace certain text.
- Content exclusion – exclude content by CSS selector.
- Exclusion by URL – exclude entire URLs from translation.
Each rule type has slightly different settings. But in general, you’ll get additional options to target your rules to specific URLs, languages, and so on, which gives you a lot of flexibility:

Editing Translations
To edit your site’s translations, you can choose from two different interfaces:
- Backend side-by-side interface – you can use a backend interface that shows the original text and the translated version side-by-side.
- Live visual editor – you can edit translations on a live preview of your site.
You can access the backend interface from the Translations tab. To find specific translations, you can filter by language or search by keyword in any language:

To edit any translation, you can click the pencil icon, which opens a new screen where you can edit the translation:

I think it would be more convenient if you could edit the translation from the main list without needing to open a new page. However, it works totally fine for targeted edits.
If you want to make broader changes, you might like the live editor. In the live editor, you’ll see a live preview of your site:

You can open and edit any translation just by clicking on it:
One thing you can’t do yet, though, is translate images or other media files to display different media files based on a user’s language. You probably won’t need to do this for most images, but it can be handy if you need to localize an image. Many other translation tools do let you translate media content, so I think Linguise should add this feature for people who need it.
Translating Backend SEO Metadata
If you want to benefit from multilingual SEO, you’ll also want to translate backend SEO details such as the SEO title and meta description, along with social media graph information.
Thankfully, Linguise does this automatically just like it does for the rest of your content. If you want to edit these translations, you can do so from both translation interfaces.
In the backend, you can find these strings by searching for them by keyword in the original language. For example, here’s what it looks like to manage my homepage’s meta description:

In the live editor, you get a special Meta option on the toolbar that lets you translate backend metadata:

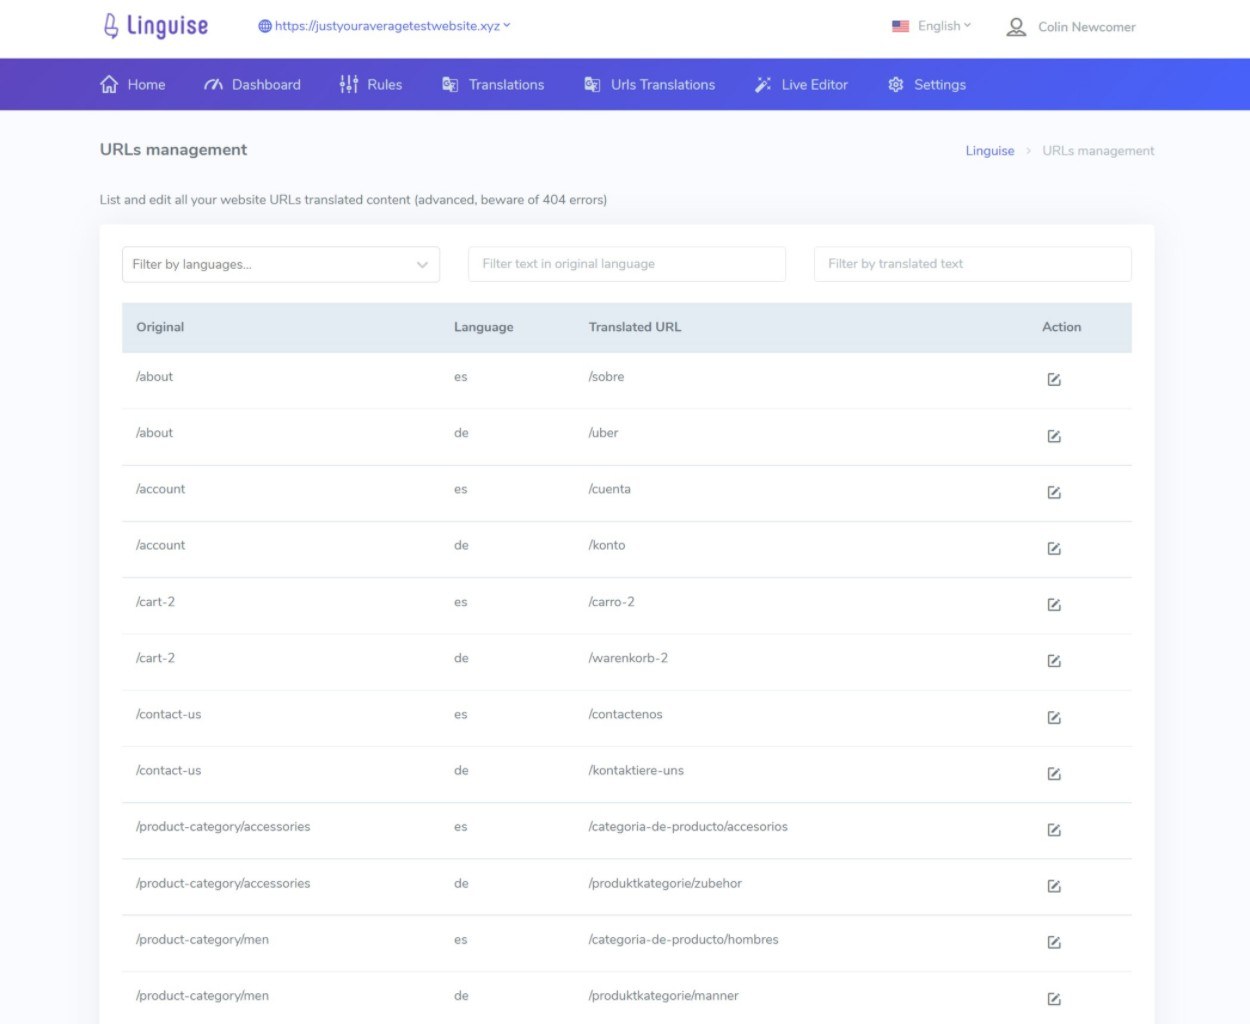
Editing URL SLugs
Linguise will automatically translate URL slugs for you, but you also have the option to manually edit the translated URL slugs from the URLs Translations tab:
Linguise Pricing
To start, Linguise offers a one-month free trial with no credit card required, so you can try out everything that you saw above at no risk.
However, once that free month ends, you’ll need to pay for a plan as there’s no forever free plan.
Here are the prices for month-to-month billing. If you pay for a year upfront, you can get one month free:

I’d say those prices are pretty competitive. For example, I looked at the pricing for another popular translation service that uses a similar approach and it charges €19 per month for up to 50,000 words, max three languages, and ~50,000 monthly API requests (roughly equivalent to monthly page views, though cached pages don’t count).
That makes Linguise seem like a pretty good deal as you get double the words, unlimited languages, and unlimited page views for a slightly lower price.
What’s more, we also have a special Linguise coupon code that will get you 20% off, which makes the prices even more competitive:

Final Thoughts on Linguise
Overall, Linguise makes it very easy to create a multilingual WordPress site (and it works on other platforms, too).
It’s not the first plugin/service to use this approach, but it does it well and at a lower price than most of the other popular options in this space.
You can literally be up and running with a fully multilingual site in under five minutes. What’s more, you don’t need to worry about compatibility issues because of Linguise’s approach – it should work with pretty much any plugins and themes that you’re using, including WooCommerce, Elementor, Divi, and so on.
One thing I’d like to see added is the ability to translate media content such as images and videos to more fully localize a site. But in general, I think that Linguise has all of the translation functionality that most sites need.
If you’re interested, I think the best thing to do is just test it. The setup process only takes a few minutes and you get a one-month free trial with no credit card required, so you’re really not risking anything. You can click the buttons below to get started:

One Response
Hey, I’m Tristan from Linguise, don’t hesitate to post your comment, if I can help… that’ll be my pleasure 🙂