


Did you know that, on average, images account for about half of the file size of the average web page?
That means that, if you’re using unoptimized images, those images could be having a huge negative effect on your website’s load times.
Quicq is a service from Afosto that lets you fully optimize your site’s images in real-time and serve them up from a Google Cloud-powered content delivery network (CDN). Beyond performance, you can also use it to easily manipulate images, such as cropping them, adding watermarks, and more.
It works with WordPress via a dedicated integration plugin as well as other platforms such as Magento and PrestaShop.
In our hands-on Quicq review, we’ll show you how Quicq works and how you can use it to optimize your WordPress site’s images.
Let’s dig in…

Quicq Review: What the Plugin Does
At a high level, Quicq is focused on offering a complete solution for WordPress image optimization. It’s basically a plug-and-play tool that lets you benefit from all of the important image optimization tactics – more on those below.
There are two “main” tactics that most people think of when it comes to image optimization:
- Resizing – resizing the actual dimensions of the image to match how you’re going to use it on your site. Smaller dimensions mean less data which means a smaller image size.
- Compression – using a compression algorithm to shrink the file size of the image without changing its dimensions, either through a lossless algorithm (no change in quality) or a lossy algorithm (maybe a small reduction in quality).
Quicq can certainly implement those tactics for you, but it’s also one of the new breeds of image optimization plugins that go beyond just statically resizing and compressing your images.
Instead, it automatically serves your images from its Google Cloud-powered CDN and then optimizes them in real-time for visitors.
As soon as you activate Quicq on your site, it will automatically optimize all of your images with the following optimizations:
- Serve them via the Quicq CDN, which is powered by Google Cloud. This lets visitors download your images from the CDN location that’s nearest to them.
- Resize them to the optimal size based on each visitor’s device.
- Compress them to reduce their file size.
- Convert them to an optimized image format that offers smaller sizes than JPEG and PNG. Quicq supports both WebP and AVIF, a newer image format that can offer even smaller file sizes than WebP. The AVIF support is notable as not all services are supporting this newer image format yet.
All these changes will lead to much faster image load times (and, consequently, website load times).
Why Use Dynamic Real-Time Image Optimization?

As I mentioned above, Quicq uses a dynamic optimization approach that optimizes images in real-time.
That is, rather than optimizing the original version of the image on your WordPress site’s server like a traditional optimization plugin, Quicq doesn’t touch the original image but instead performs its operations in “the cloud”.
There are a few advantages to this dynamic optimization approach.
The big one is you can make sure that every visitor sees an optimized image based on their actual device dimensions.
For example, if a visitor is browsing on a low-resolution smartphone screen, you can serve an image with small dimensions without affecting their experience.
But if a visitor is browsing on a huge 4K screen, your site can seamlessly serve a larger version of the image to make sure they have a great user experience too.
Because Quicq uses a dynamic, on-the-fly optimization approach, it’s able to serve the optimal image size and format for each individual user.
This dynamic approach is also very useful if you want to manipulate your images because you can make changes to the image without needing to edit the original image file or upload a new version of the image.
For example, just by manipulating the URL of an image, you can perform the following manipulations:
- Crop the image in different ways.
- Add a watermark.
- Blur the image.
- Change the image dimensions.
- Adjust the image quality. For example, maybe you want to use a high-resolution, uncompressed image in some spots. You can easily do that.
- Use a different image format. For example, WebP or AVIF.
With Quicq, all you do is upload the original image one time. Then, you can perform all of these manipulations by adding some extra query parameters to the URL.
For example, here’s the link to the original image:
And here’s a link that crops the image to a 1,000×1,000 square:
I’ll show you some real examples in the next section.
Hands-On With Quicq: How to Optimize WordPress Images
Now that you know what Quicq does, let’s go hands-on and I’ll show you how it works on WordPress.
Again, it’s not limited to WordPress, but it does offer a dedicated WordPress plugin that makes it very easy to use with your WordPress site.
1. Register for a Free Quicq Account
To get started, you’ll need to register for a free Quicq/Afosto account. I’ll talk about pricing next, but there’s a generous forever free plan and you also get a 14-day unlimited free trial (with no credit card required).
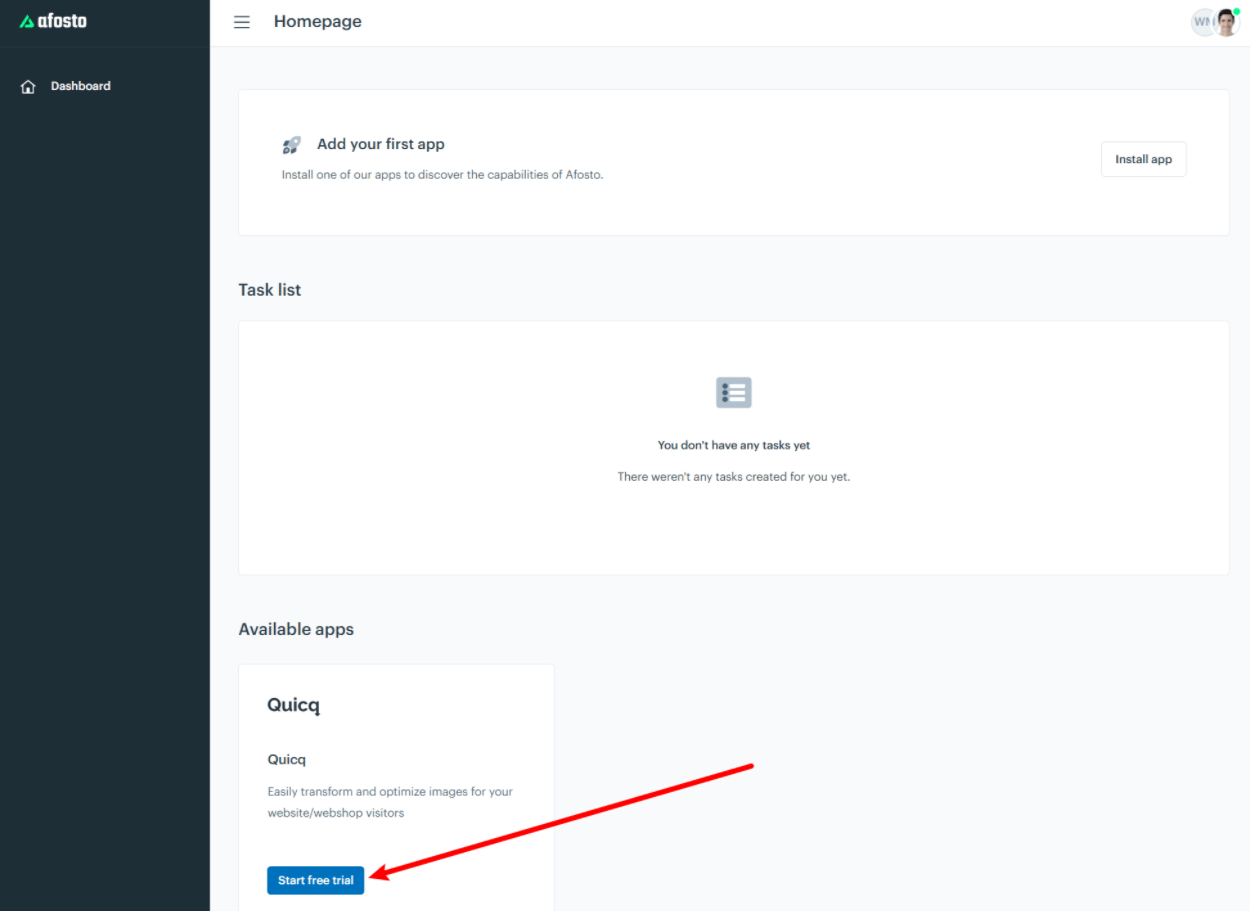
Once you register for your account, click the Start free trial button next to Quicq in the Afosto dashboard:
2. Create a Quicq CDN
Next, you need to create a Quicq CDN, which is essentially what will serve and optimize the images for your site.
Once you start your Quicq trial, a task to do this should automatically appear in the task list of the main Afosto dashboard. If you don’t see it, you can also access this interface by clicking the gear icon next to Quicq:

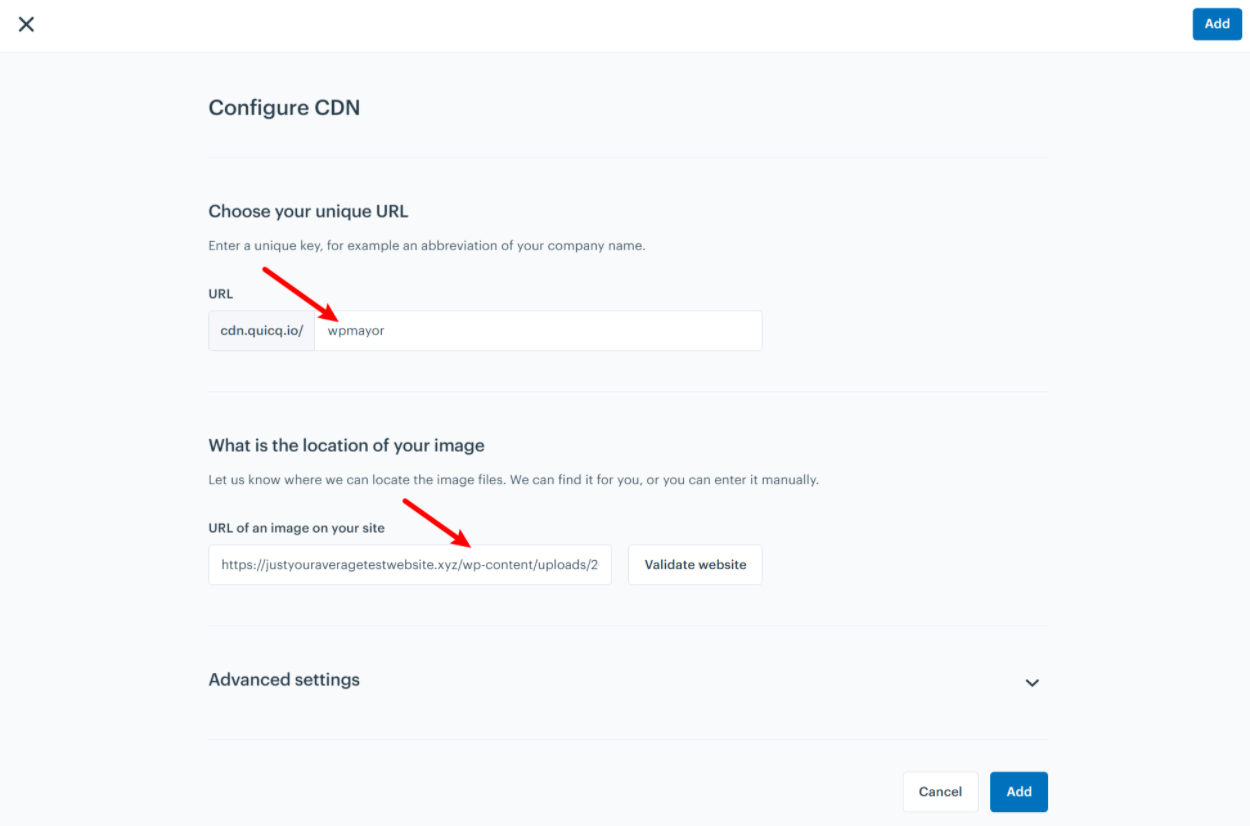
First, you’ll need to enter the URL that you want to use for your Quicq CDN. Your images will load from this URL, so you’ll want to make them related to your website.
For example, if I were creating one for WP Mayor, I would make the URL wpmayor.
Then, enter the direct URL to an existing image on your site and click Validate website:
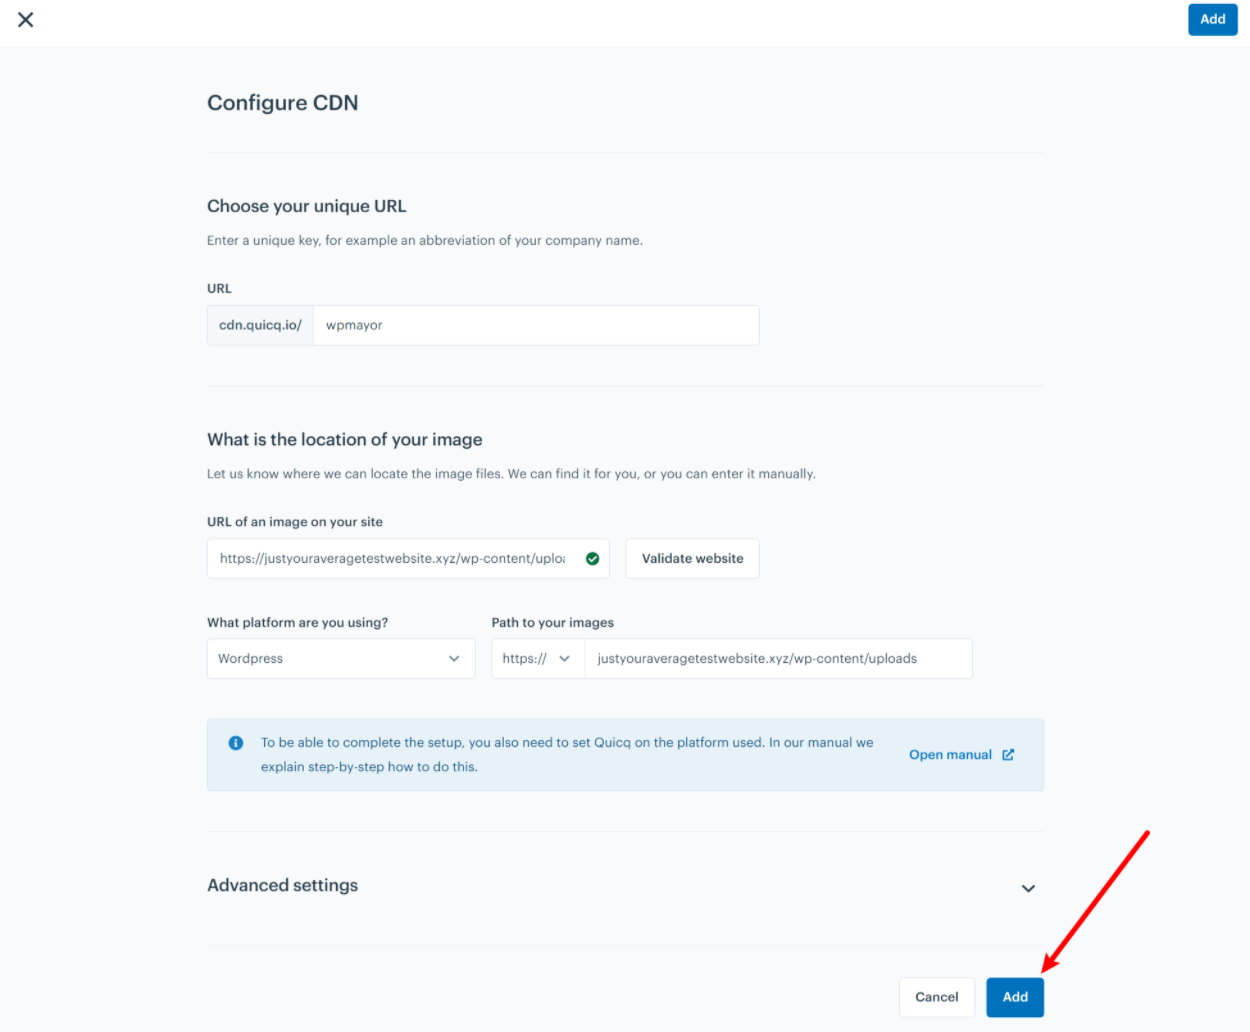
Quicq should then automatically detect that you’re using WordPress and generate the path to your images, which should be the uploads folder inside the wp-content folder.
You also have the option to expand the Advanced settings, which let you control cache behavior for your images. The default is 365 days, which should be fine. But you can change this if desired.
To finish things out, click the Add button:
3. Install the Quicq Plugin and Add URL Key
Once you’ve created your account and set up your CDN, you can install the free Quicq plugin from WordPress.org on your site. This will let you integrate your WordPress site with the image CDN that you just created.
Once you’ve activated the plugin, go to the new Quicq area in your WordPress dashboard and add the URL key that you entered in the setup process. That is, the portion of the CDN URL that you were able to customize.
For my example, that’s wpmayor.
Then, select the Active Quicq toggle and then Save Changes to make it live:

And that’s it! Your WordPress site should now start loading its images via the Quicq CDN, which includes real-time image optimizations.
One minor thing I’d note here is that I don’t think the Quicq plugin area should be a top-level menu area in the WordPress dashboard. Since it’s just a one-time setup process, I think it would be nicer to move it to a sub-menu such as Settings → Quicq to help users have a cleaner admin area.
4. Manipulate Images With URL Parameters (When Needed)
For most WordPress sites, you don’t need to do anything else to have optimized images. At this point, Quicq is already automatically performing the following optimizations:
- Compressing/resizing the images in an optimal way based on each user’s device.
- Converting the images to the WebP or AVIF format depending on what works best.
- Serving the images via Quicq’s Google Cloud CDN.
However, as I mentioned earlier, one of the cool things about Quicq’s real-time approach is that you can also manipulate your images just by adding some query parameters to the URL.
You can check out the documentation page here for a detailed look, but let’s go over some quick examples of how this works.
Let’s say that you have a wide image that you use on one part of your site. Now, you want to use that same image, but crop it into a square image.
Without Quicq, you would need to open up your favorite image editing tool, crop the image, and then upload a new copy of the cropped image to use.
With Quicq’s real-time image processing, you can perform the crop just by adding a URL parameter (and without affecting the original image).
Here’s the original image and URL:

And then here’s what the image looks like when cropped to a 1000×1000 px square by adding this URL parameter – ?w=1000&h=1000&c=1:

Here’s another example…
Let’s say you want to go one step further and blur the image, in addition to cropping it into a square.
All you need to do is add the blur parameter and set how much blur you want to use (from 0 to 3) and your image will be blurred:

Quicq Pricing
Quicq has a pretty generous forever free plan and then paid plans for users who need more features.
The free plan lets you optimize up to 100,000 images per month* and serve 25 GB of CDN bandwidth per month forever, which should be more than enough for a small site. For example, if you have a basic brochure/portfolio site or a small blog, I don’t think you’ll ever exceed that.
*Remember, image optimizations happen dynamically rather than one time like a traditional plugin, so an image counts as one optimization every time it loads.
If you need the paid plans, you’re billed based on two metrics:
- Optimizations – the number of image optimizations you have per month.
- Data transfer – the amount of bandwidth that your images consume when being served via the CDN.
This billing strategy is a little more complex than some other real-time image optimization plugins, which typically just bill you based on the number of visits your site has per month.
However, I actually like this billing model better because I think it’s a more fair way of billing, even if it does make it a little harder to estimate your usage.
With this approach, you’ll only be billed based on your actual usage, which will probably help you save money.
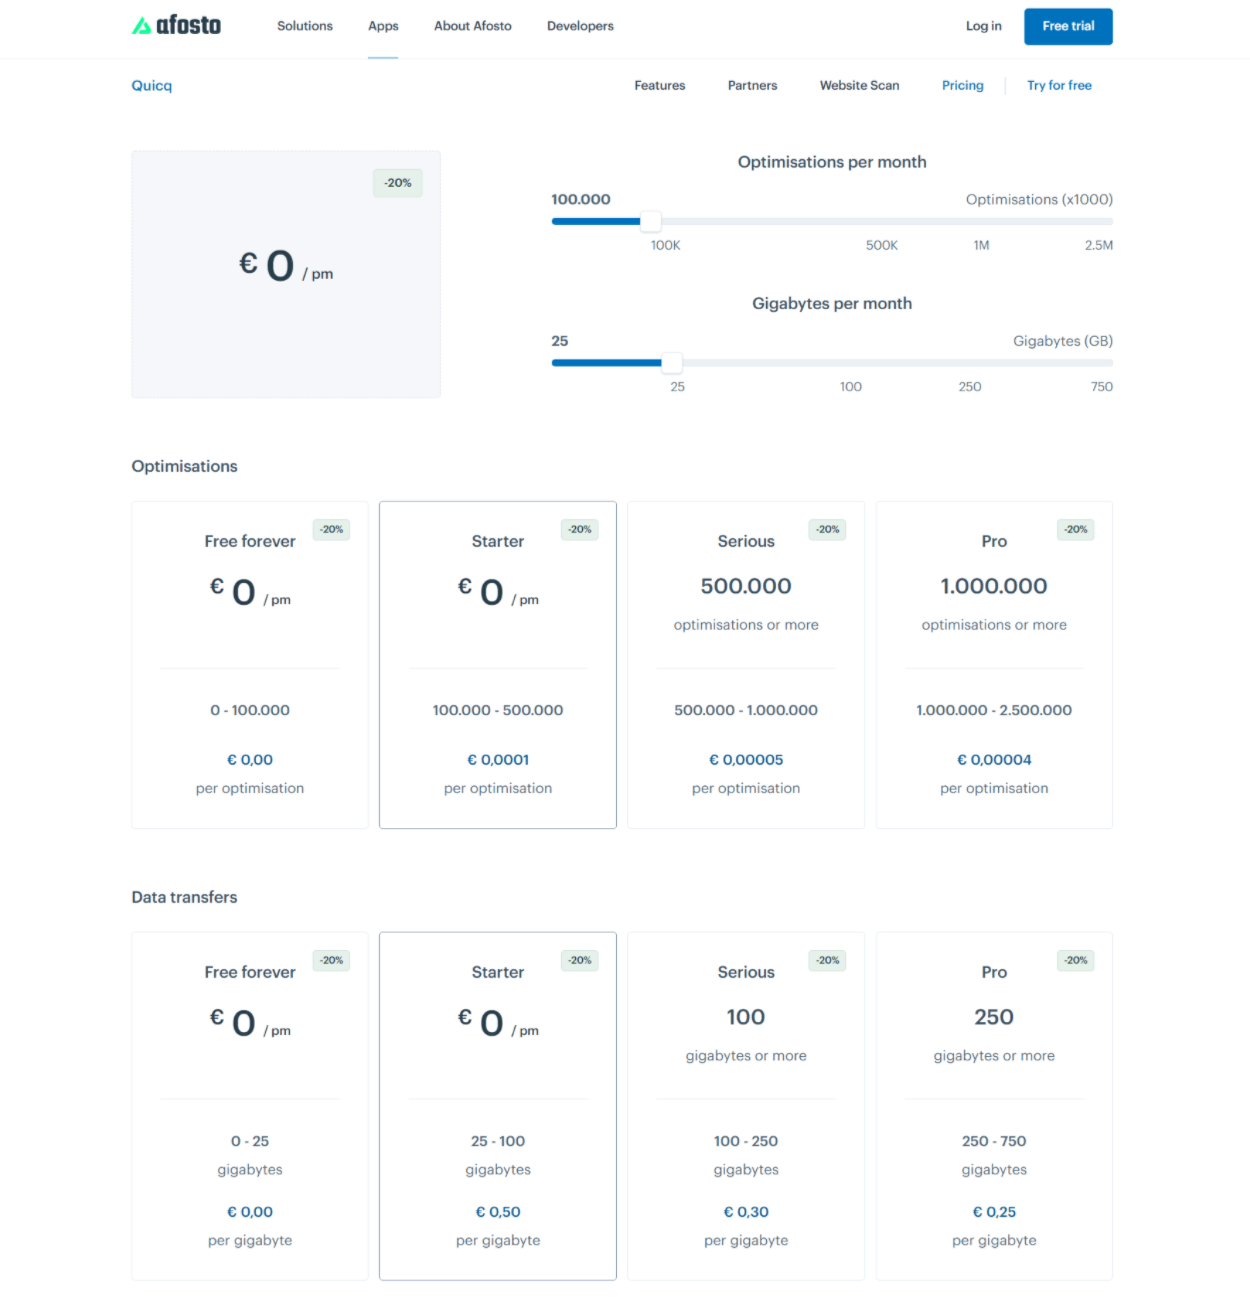
To find out what you’ll pay, you can use the calculator on the pricing page.
If you’re not sure about your site’s usage, you can just use the free tier to start or there’s also a 14-day free trial of the higher-usage plans, which should give you a good understanding of your site’s usage:
If you need the premium plans, you can get 20% off your first two months on all packages with our exclusive coupon code:
Final Thoughts on Quicq
Overall, I know that a lot of sites are moving to this real-time image optimization approach.
I do think this approach has a lot to offer because of the flexibility that it gives you in terms of manipulating your images and making sure that each visitor sees an image that’s optimized for their unique situation.
Quicq isn’t the first plugin to bring this to WordPress, but it does have a few things going for it:
- It has a very generous free tier. It has the highest free tier that I’ve seen.
- I like its pricing model for the premium options because you only pay based on your actual usage. While it does make pricing a little more complicated, I think it’s a “fairer” way to bill. Plus, you can always use the 14-day unlimited trial to figure out your site’s actual usage if you’re not sure what you’ll pay.
- It still lets you perform other image manipulations like cropping, blurring, and so on. Most of the other WordPress plugins that I’m aware of are only focused on performance or only give you access to watermarking, so it’s cool that Quicq goes beyond that. Most casual users probably won’t use these, but it’s nice for advanced users and developers.
If you want to try it out, Quicq has a generous forever free plan as well as a 14-day unlimited free trial to help you figure out your usage. You can click the buttons below to get started:
