Want to offer local deliveries for your WooCommerce store? You could be using WooCommerce for a restaurant or food delivery business or you could just need to deliver products locally on a tight schedule.
No matter what your reasons are, you’re going to want to read our hands-on Shipday review.
Shipday makes it easy to manage your drivers and quickly dispatch orders for local delivery. Drivers will be able to manage their deliveries via a dedicated smartphone app and customers can get real-time tracking updates via SMS or email so they know exactly when to expect their orders.
In a way, Shipday kind of lets you build your own Uber-like local delivery setup with your own fleet of delivery drivers (or it also lets you integrate with Postmates or DoorDash if you’re in the USA).
If any of that sounds interesting to you, I encourage you to keep reading our full Shipday review to see it in action.
We’ll focus on using Shipday for a WooCommerce store, but it also works for Shopify and a number of standalone restaurant ordering systems including GloriaFood.
Let’s dig in…
Shipday for WooCommerce: A Quick Look at the Features
Shipday is full-service software designed to handle all aspects of local delivery management.
It has a dedicated WordPress plugin so that you can easily integrate Shipday with your WooCommerce store, but it also works with other platforms including Shopify, GloriaFood, Square, and a number of other restaurant order systems.
If you’re using WooCommerce as a multi-vendor marketplace, Shipday is also compatible with the Dokan and WCFM multi-vendor plugins so that vendors can handle their fulfillment needs.
When you get a new order via your eCommerce platform (e.g. WooCommerce), that order will automatically show up in your Shipday dashboard so that you can dispatch it for delivery:
You can also manually create orders or create your own order forms if needed.
You can then manually dispatch the order to one of your active drivers or you can set up auto-dispatch to have Shipday automatically assign orders for you.
Where do those delivery drivers come from?
Well, one of the cool things about Shipday is that it works with both your own delivery drivers and popular third-party delivery services including DoorDash and Uber (though these third-party integrations are only available if you’re in the USA).
If you have your own drivers, you can set up calculations to pay them a flat rate, a per-mile/KM rate, or a combination of both. Or, you can disable payments if you pay them hourly or have some other arrangements.
For your own drivers, drivers will be able to accept the order assignment via the Shipday smartphone app. That is, drivers can install an app on their smartphone to manage orders that are assigned to them (think driving for Uber):
Once a driver accepts the order, they’ll be able to update the status for key actions such as:
- Order picked up
- On the way
- Order completed
You’ll be able to track these statuses from your dashboard and customers can also get real-time status updates via email or SMS. With the paid version of Shipday, you can even share live delivery tracking so that customers can see the actual driver movement, which is really nice for creating a better user experience for your customers.
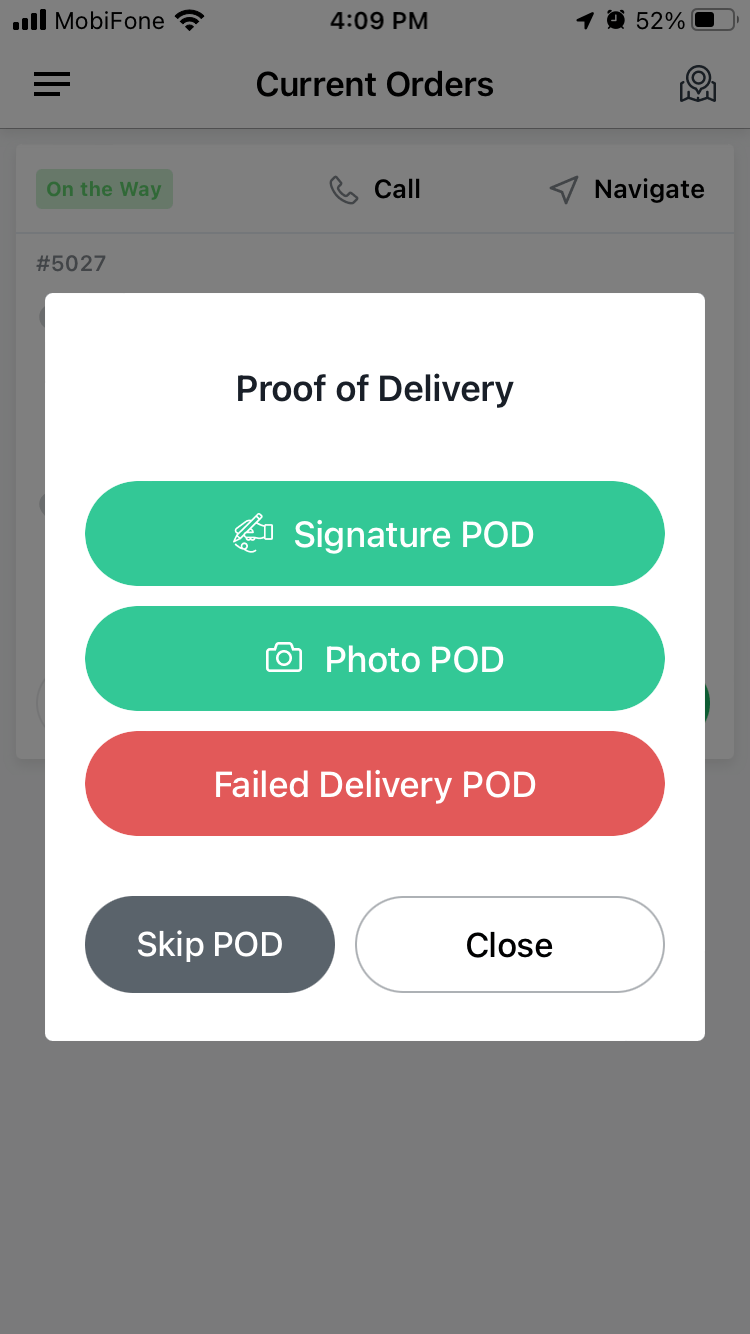
When a driver actually delivers the order, they can provide proof of delivery via a photo or a signature so that you can be confident your customer actually got the order:
You’ll also get a reporting dashboard where you can keep track of driver earnings, delivery times, customer satisfaction, and more.
That’s just a quick summary of the core Shipday features. If you want to see all the nitty-gritty details, click the button below to go to the Shipday features page:
Use Cases for Shipday
Shipday works for any local delivery situation, but here are a few example use cases for where it excels:
- Restaurant delivery, including ghost kitchens
- Meal prep delivery services
- Grocery delivery
- Quick commerce for local stores
- Flower delivery
- Courier service
For example, let’s say you’re using WooCommerce as your restaurant ordering system. While WooCommerce can handle taking orders and processing payments, WooCommerce is pretty much finished once you have the order in hand.
With Shipday, you’ll be able to dispatch those orders via drivers and provide a much better experience for customers by letting them know exactly where their orders are at all times. Your customers will even be able to track the couriers in real-time.
Trust me, as someone who’s been hungry and waiting for delivery, being able to watch the delivery drive move toward your house is really nice!
Hands-On With Shipday on WooCommerce
Now that you know what Shipday offers, let’s go hands-on and I’ll show you how it works on WooCommerce.
Creating a Shipday Account
In order to use the Shipday plugin, you’ll need to have a Shipday account. I’ll talk about pricing more later on, but there is a forever-free plan that gives you access to most of the features and there’s also a 30-day free trial with all of the premium features, so you won’t need to pay anything to sign up.
Click the button below to register for an account:
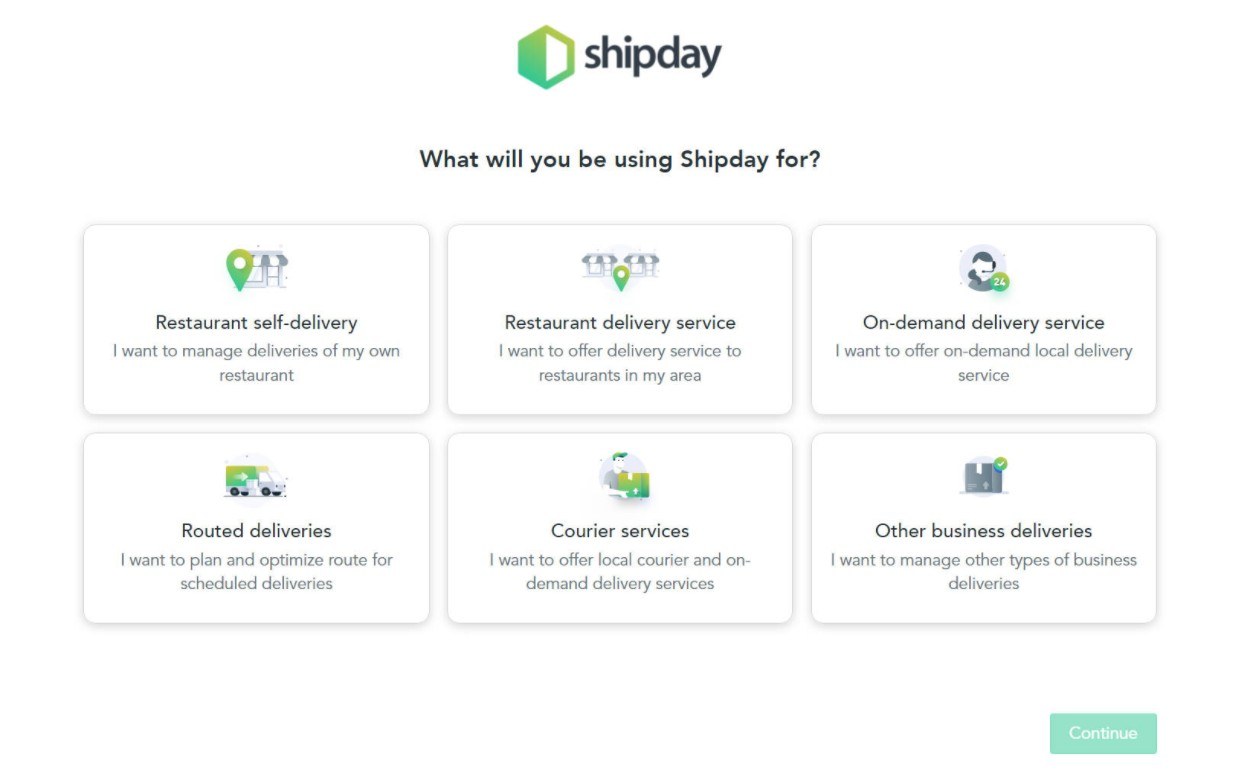
Once you enter your account details, Shipday will launch a short onboarding wizard:
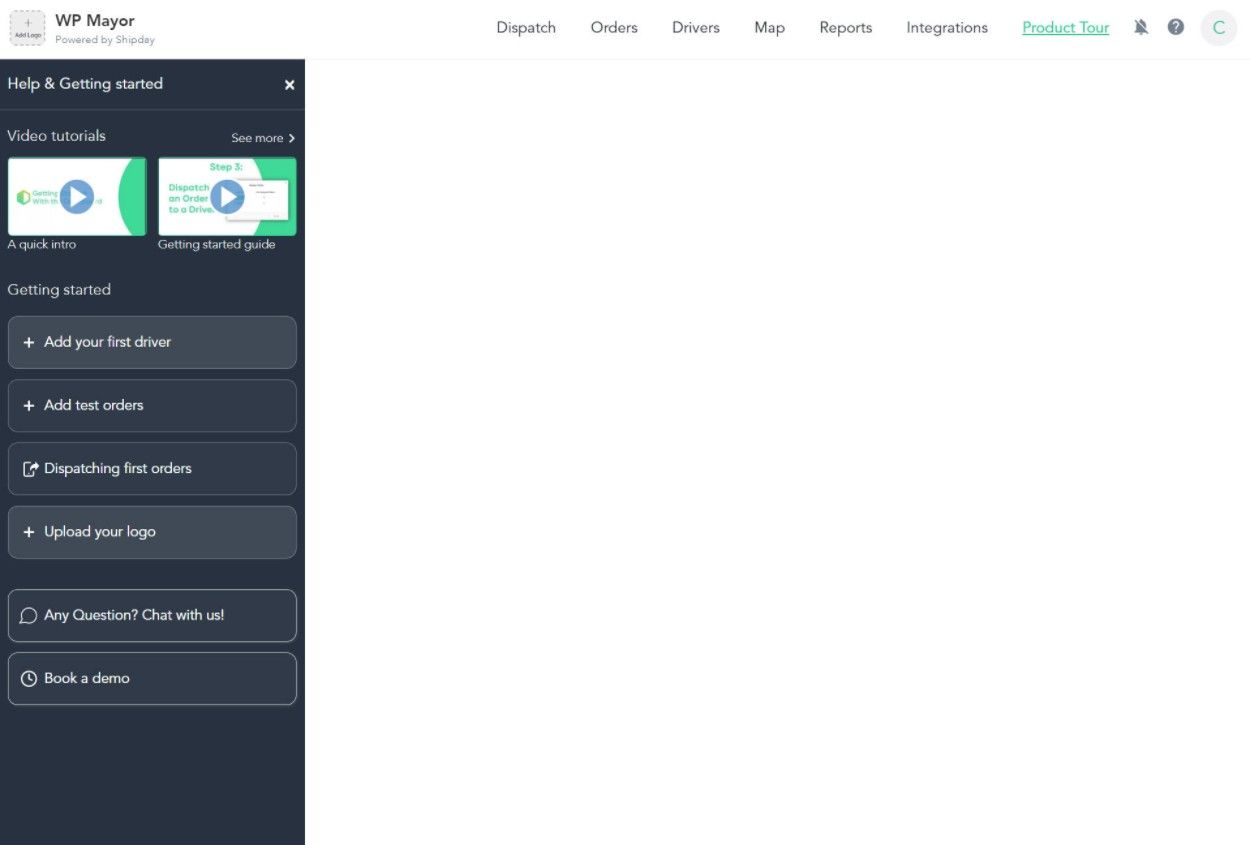
At the end of the wizard, you’ll get an option to start your 30-day free trial and then you’ll be in the Shipday dashboard:
Let’s come back to the Shipday dashboard in a second…
Setting Up the Plugin
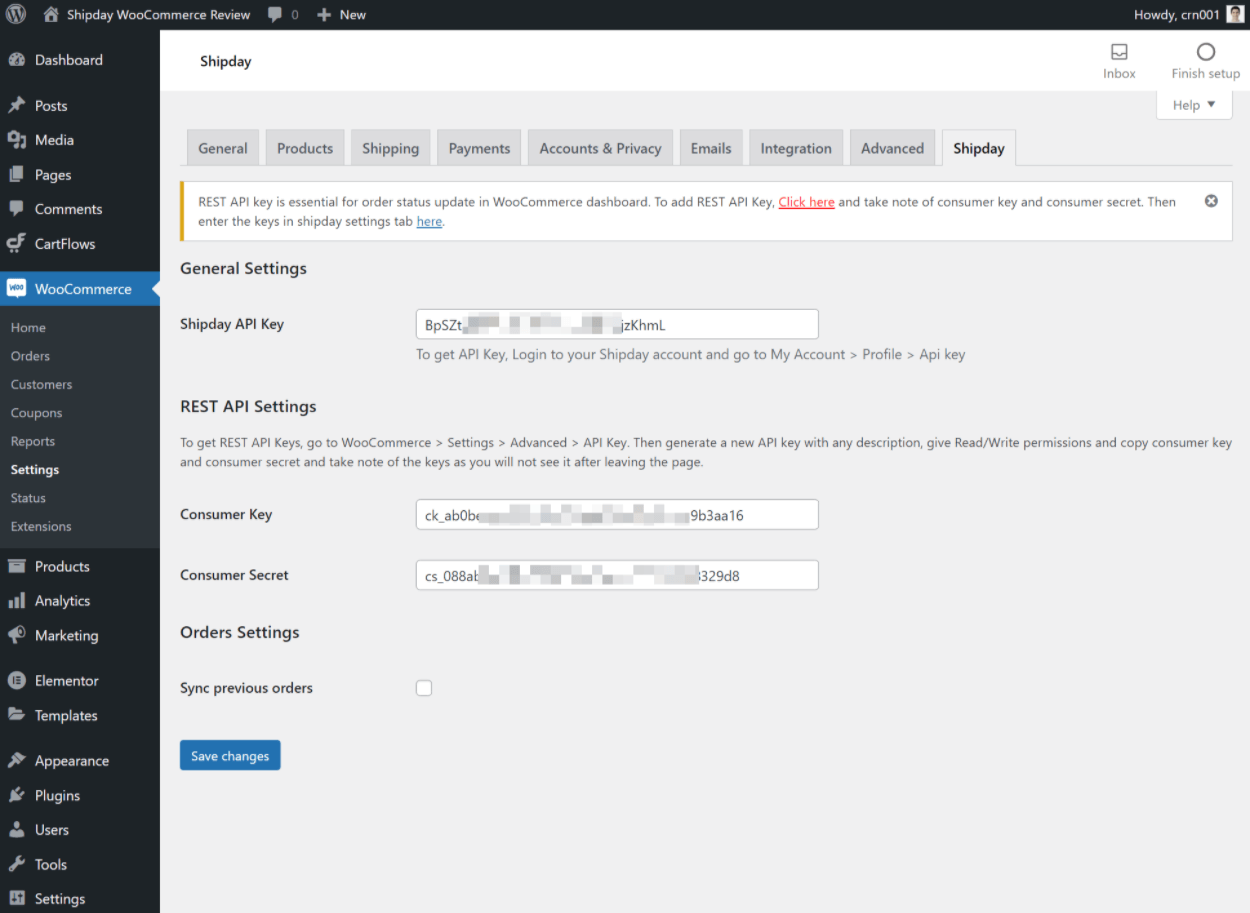
Once you have your Shipday account, you can install the official Shipday plugin on your site. Then, head to WooCommerce → Settings → Shipday to add the API key from your Shipday account to the plugin’s settings.
You’ll also need to generate a new WooCommerce API key so that Shipday can connect to your WooCommerce store and sync orders:
Now, you’ll do pretty much everything else from the Shipday dashboard, so let’s head back to that for some examples.
Configuring Settings
Before you start adding drivers, you might want to configure some of Shipday’s settings. The defaults work fine as a starting point, but here are some of the things that you can configure if needed:
- Choose the maximum time allowed for delivery.
- Configure how customers should get estimated time of arrival notifications – you can do email, SMS, or both.
- Set up automatic dispatching to assign orders to drivers or leave it as manual. This will make more sense in a second.
- Sync with DoorDash or Postmates for third-party delivery if you want to use those services. This is only available in the USA. If you enable these integrations, you’ll be able to use these services directly from Shipday without needing to have an account with the service itself, which makes things a lot more convenient.
- Enable route planning for delivery drivers. If enabled, you can choose to optimize the route by travel time or distance.
- Choose how to pay drivers. You can pay them per delivery and/or per distance. For example, you could pay $5 plus $0.25 per mile. Or, you can disable the payment calculations if you want to work out an in-person payment structure.
- Adjust the Shipday branding to match your branding.
Adding Drivers
Next up, you’ll want to add your drivers via the Shipday dashboard. These are the people who will actually be delivering new orders to your customers.
When you add a driver, you’ll enter the following information:
- Name
- Phone number
- Temporary password (drivers can then update with their own password)
- Internal note (optional)
Once you add a driver, you’ll be able to see their status right in your dashboard. If they marked themselves as “On Duty” in their app, you’ll see that. When they end their shift, they’ll be greyed out (you can also manually end their shift for them).
Here’s what it looks like when the driver is online:
Assigning Orders to Drivers
Thanks to the dedicated WooCommerce integration plugin, Shipday will automatically import new orders as they come in (using the WooCommerce REST API, which is why you had to give the Shipday plugin API access).
You can also manually create orders if needed, which might be useful if you want to accept orders via different methods, such as over the phone.
When I tested it, the order from my WooCommerce store showed up instantly – there was literally zero delay. This is important for local delivery as every minute matters.
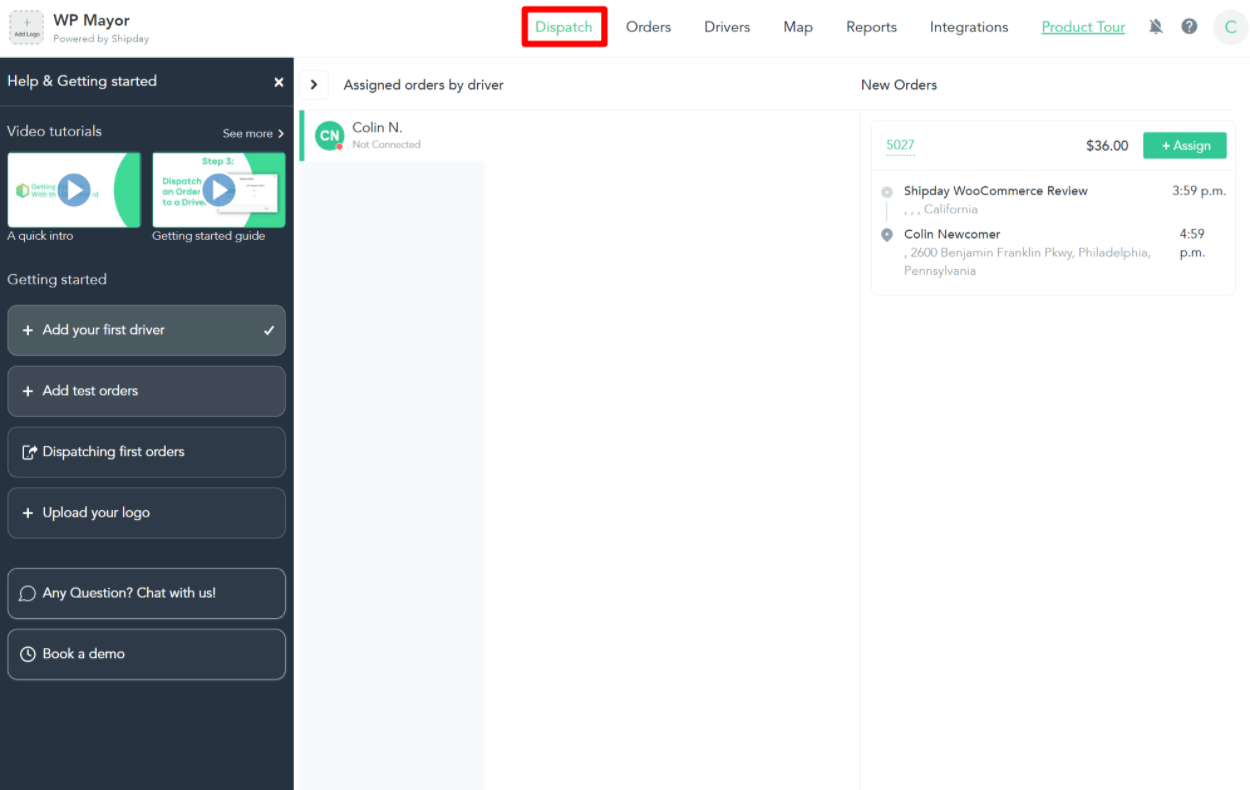
To assign the order to a driver, you can click the Unassigned button in the Orders interface. Or, you can go to the Dispatch tab, which gives you a more comprehensive look at your new orders and your drivers and assigned orders:
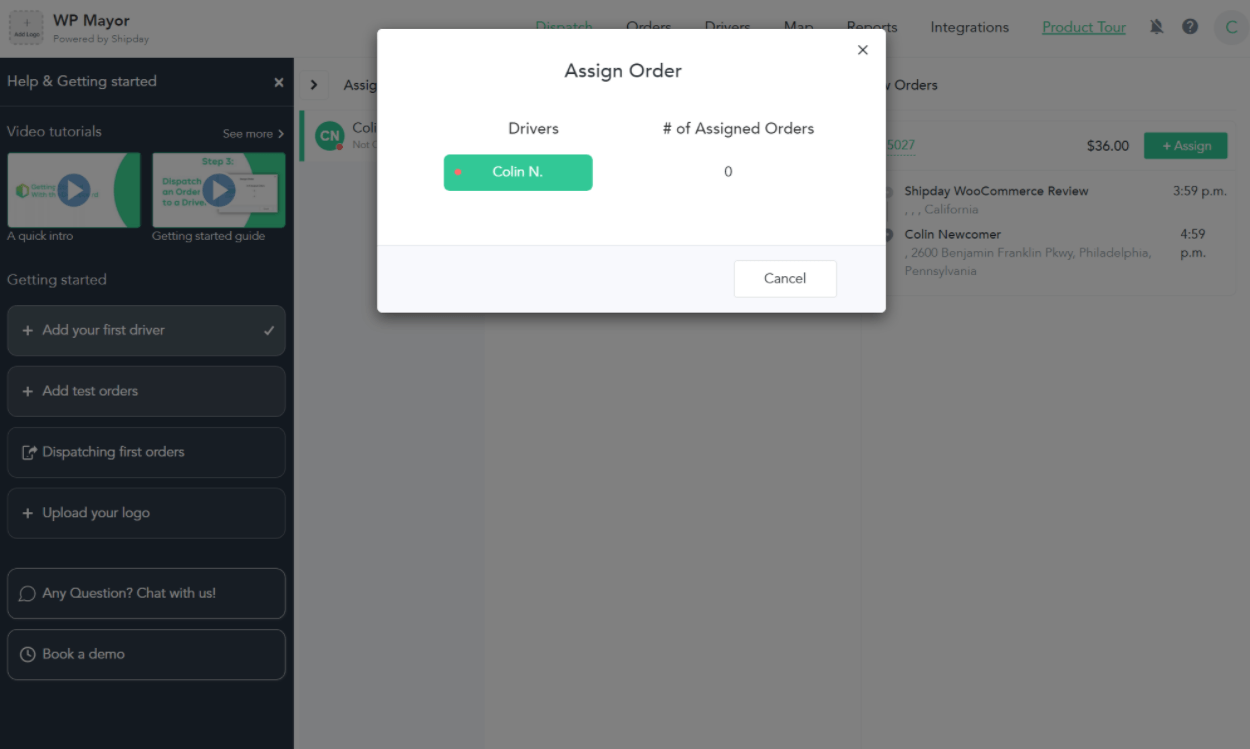
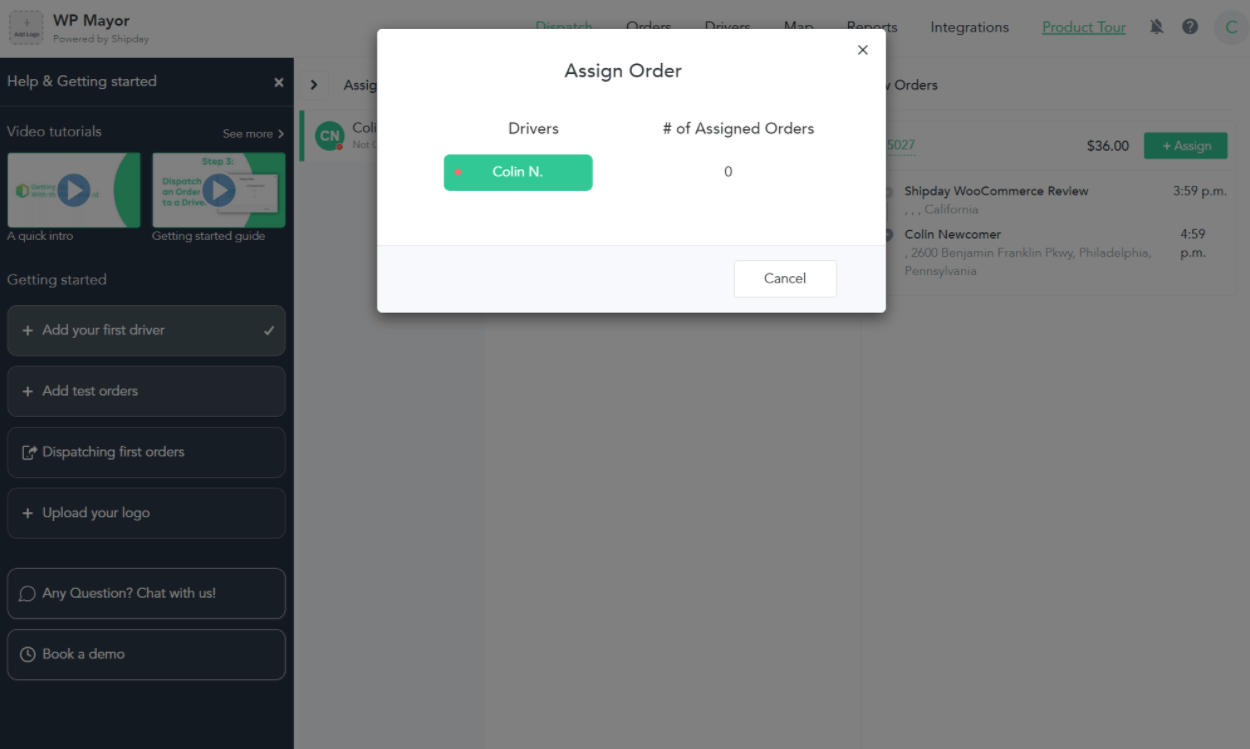
With just a few clicks, you can assign the order to one of your drivers – it’s super easy:
You can also set up automatic dispatch in the Shipday settings, as I noted earlier.
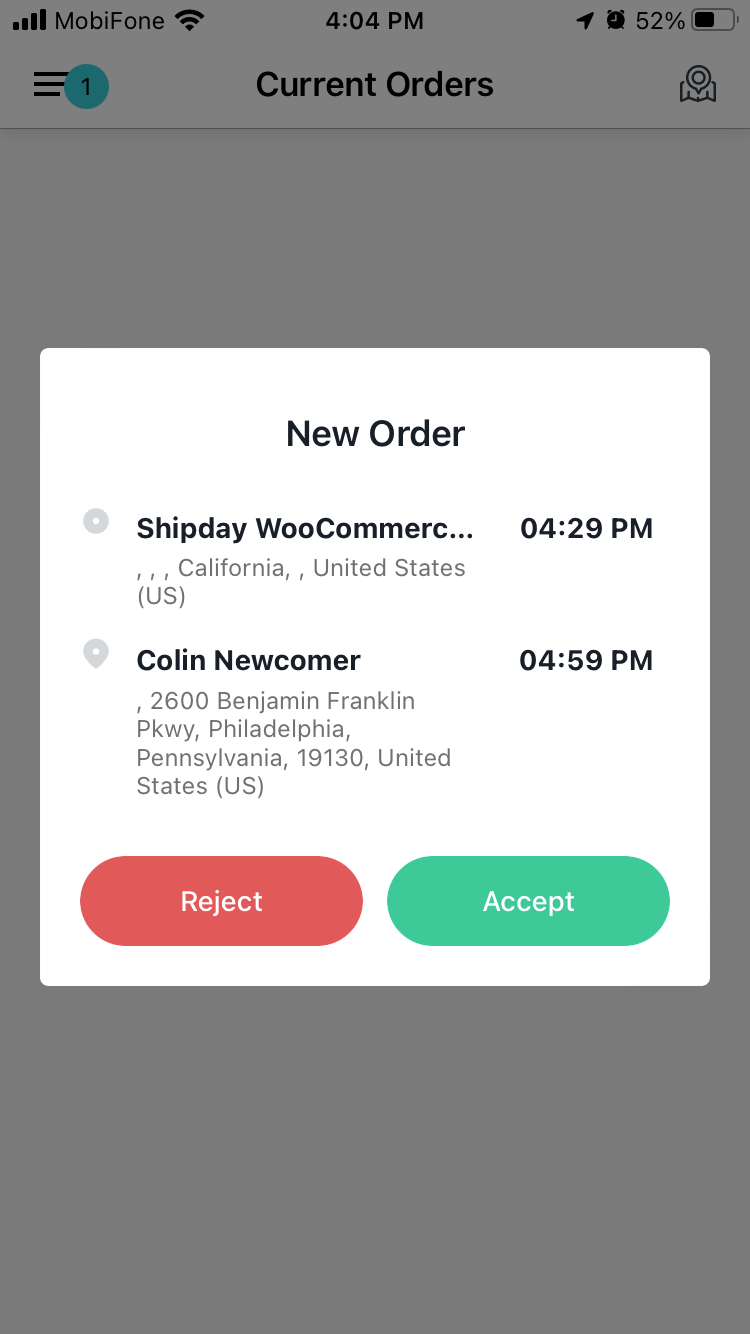
The driver will then get a notification in the app – they’ll need to actually accept the order before the assignment is complete:
Once they do, you’ll see the order show up assigned in the Dispatch area:
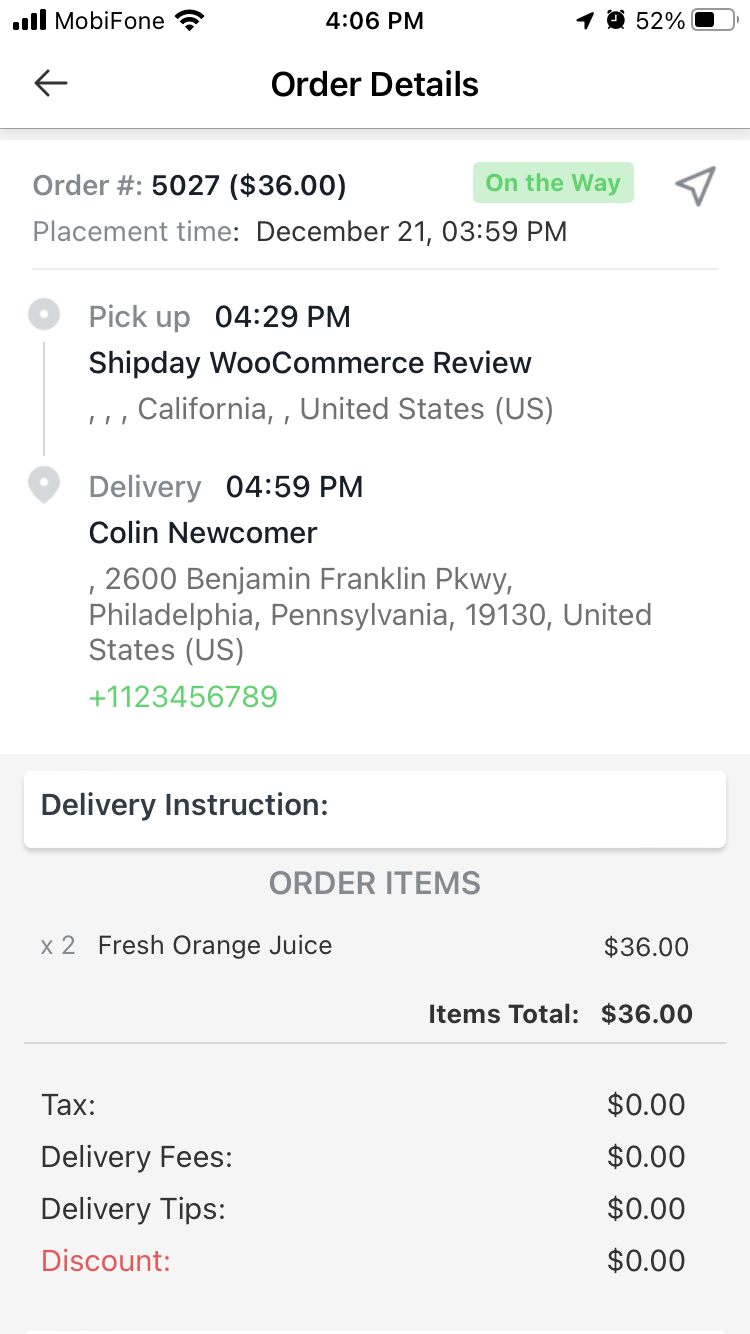
Drivers will then be able to update the order status as they go through the process. For example, when they pick up the order, they can click a button in the app to mark it as picked up.
In the dashboard, you also get a map view so that you can see a visual representation of exactly where every order and driver is.
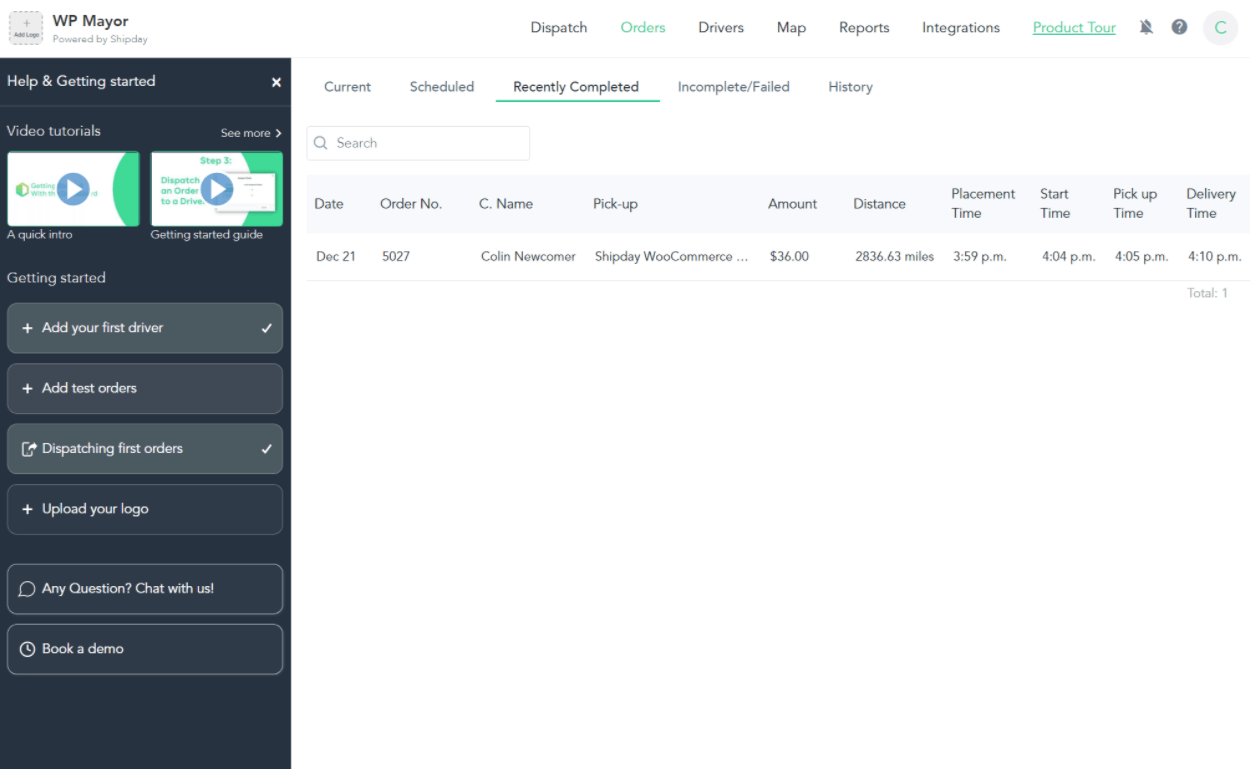
When the driver finishes the order, they can provide proof of delivery via a photo or signature. It will then show up in the Recently Completed tab of the orders area:
Viewing Reports
Finally, you get a detailed Reports tab that lets you keep track of all your important statistics.
First off, you get four types of basic reports:
- Driver Payment – see how much you’ve paid each driver.
- Sales Report – track orders and sales. This one probably won’t be that useful because your eCommerce platform will offer more detailed reporting with respect to this.
- Custom Service – see how many on-time and late deliveries you’ve had, as well as the average customer satisfaction rating.
- Driver Performance – see each driver’s performance when it comes to timing, late deliveries, customer feedback, and so on.
You also get an Extended Report tab that lets you dig into more detailed reporting. If you’re using third-party delivery via Postmates or DoorDash, you’ll also get a reporting area to keep track of that.
Finally, you can export all of this data as a spreadsheet, which is useful for more in-depth analysis.
Shipday Pricing
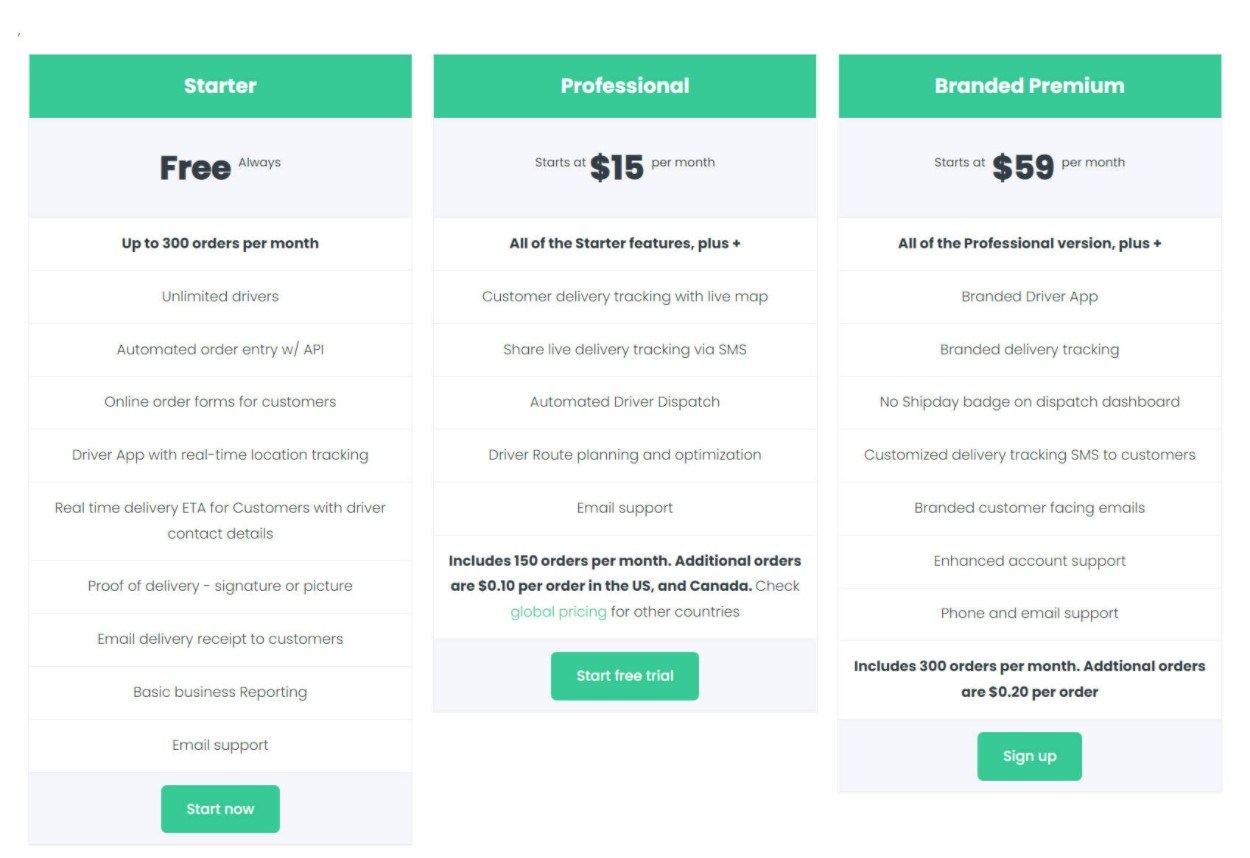
If you’re on a tight budget, you’ll be happy to know that Shipday has a forever-free plan that’s pretty generous with its features.
With the free plan, you can process up to 300 orders per month with most features – you’ll see the full list in a second.
Then, there are two paid plans that give you additional features like the option to share live delivery tracking via SMS, automatic driver dispatch, self-branded driver apps (instead of having drivers use the Shipday app), and more.
These paid plans offer a certain number of deliveries per month for free. After that, you’ll pay $0.10 or $0.20 per extra order, depending on the plan:
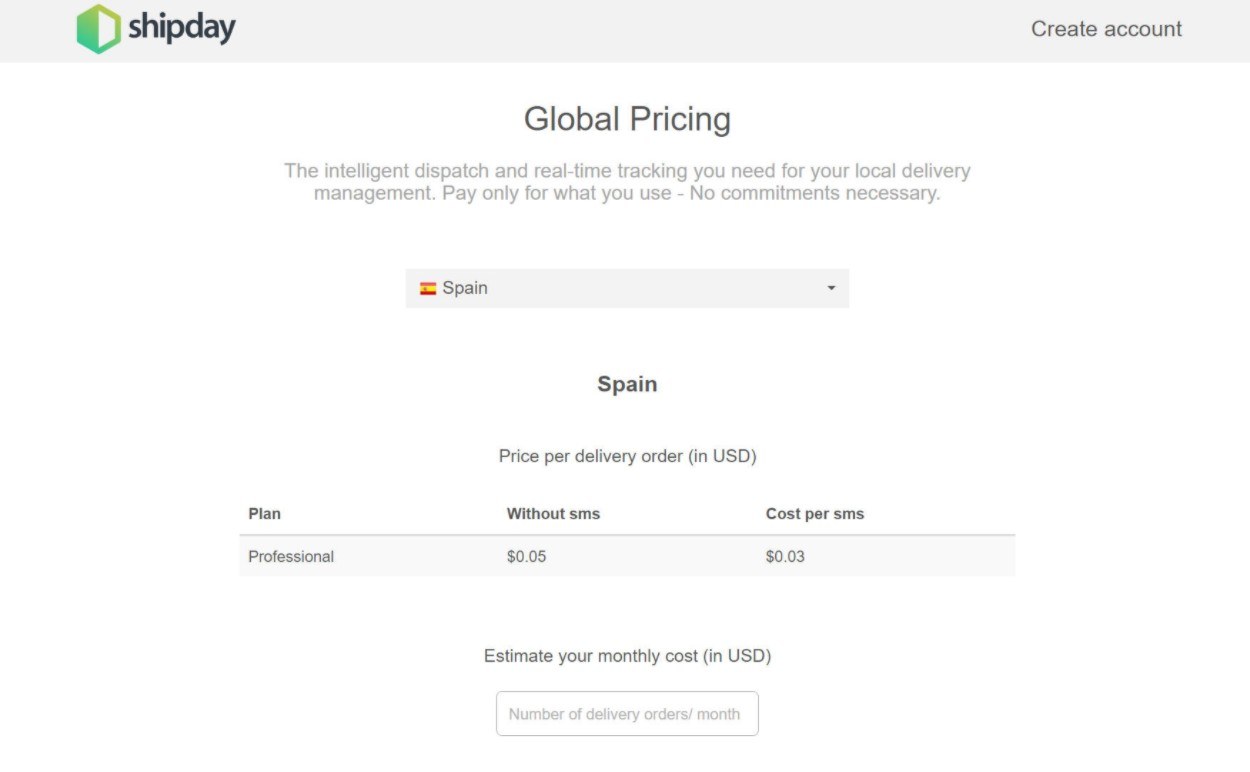
The prices in the screenshot above are for the USA and Canada. If you’re in a different country, you might be able to pay a bit less. Click the button below to view the global pricing calculator to get an exact price:
Final Thoughts on Shipday
Let’s start at the beginning…
One of the biggest things about Shipday that impressed me was how incredibly simple it is to get started. I was literally up and running with a sample order in minutes.
All of the integrations and data syncs were also seamless between my WooCommerce store, the Shipday dashboard, and the Shipday driver app.
Overall, it was just a really frictionless way of getting started, which I think is especially great if you’re not a very technical person. The most technical part of the entire process is copying and pasting the API key from the Shipday dashboard into the WooCommerce plugin’s settings.
In terms of the features that are important, it seems to have everything that you need, including apps for both drivers and store owners to manage things on the go.
If I switch hats from reviewer to consumer, I’ll end by saying that I think the features in Shipday are a massive improvement over just manually handling your own deliveries.
For example, one of the things that annoys me most about ordering directly from a restaurant instead of using something like Uber Eats is that I don’t get real-time order status notifications and I can’t track the driver.
With Shipday, you can solve that pain point for your customers and offer a better experience without paying a commission.
Overall, if you use WooCommerce (or another supported platform) and rely on local deliveries, I think you should definitely give Shipday a look.
There’s a forever-free plan as well as a 30-day free trial of the premium features, so there’s no cost to try it out. As I mentioned earlier, the setup process is also very simple, so you won’t need to invest much time to give it a go:


