


If you have a WooCommerce store, your goal should always be to make it as easy as possible for your visitors to browse your products so that they can quickly find the items they’re interested in (and make a purchase!).
If you have a lot of products, one of the best ways to do that is with product filters. You’ve probably experienced these when shopping online – you can filter by category, price, size, attributes, etc. Basically, filters let you take a whole big list of products and filter it down to only the items you’re interested in.
WooCommerce does include a few built-in product filter widgets to help you add this feature to your store, but they’re pretty limited and you can’t customize them to your store.
In our WooCommerce Product Filter review, we’re going to take a look at freemium WordPress plugin that lets you set up your own customizable filter system. You’ll be able to add filters for categories, tags, attributes, prices, keywords, custom taxonomies/fields, and lots more. What’s more, you can create different groups of filters and display them in different scenarios, so you can make sure that your filters are always optimized for specific products/users.
There’s also a special goodie for Elementor users – thanks to a dedicated integration, you’ll be able to do all of this directly from the Elementor interface, which is really convenient if you’re using Elementor to design your WooCommerce store. You don’t need to use Elementor, though.
Keep reading to learn more about what this plugin offers and see a hands-on look at how it works.
Note – we originally wrote our first WooCommerce Product Filter review in December 2020. However, we completely rewrote this review in November 2021 to account for changes and updates to the plugin.

WooCommerce Product Filter Review: The Feature List
At a high level, WooCommerce Product Filter helps you add customizable product filters to your WooCommerce store.
One of the details about the plugin that stands out is just how flexible it is when it comes to controlling the behavior of your product filters.
To start, you can choose from a range of different filter types including the following:
- Keyword search
- Product categories
- Product tags
- Custom taxonomies – fully compatible with the Custom Post Type UI plugin
- Product attributes
- Custom fields – fully compatible with the Advanced Custom Fields plugin
- Price – a slider with min/max prices
- Price range – choose from predetermined (and customizable) price ranges
- Product author
- On-sale products
- Featured products
- Product rating
- Product stock status
For each filter, you’ll get an array of different options, including being able to choose from a range of different input types. The exact input options depend on the filter in question, but the total list includes the following options:
- Checkbox list (multiple select)
- Radio buttons (single select)
- Dropdown
- Multiple dropdown (the dropdown will show all of the options and shoppers can use checkboxes to select multiple options in the dropdown)
- Colors
- Buttons
- Text
- Switch
- Slider
To display your filters, you can then choose from four different methods:
- WordPress widget
- Shortcode
- PHP function
- Elementor widget
You can also use targeting rules to display different filters to certain devices (desktop vs mobile) and on certain WooCommerce content (e.g. a specific category of products). This lets you customize your filters to optimize them to the user and/or the products that a user is browsing.
Finally, you also get a number of other useful features including the following:
- You/shoppers can link directly to a specific filter configuration using query parameters (which the plugin can automatically generate).
- Filters can inherit your theme’s style or you can customize them yourself.
- Shoppers can easily reset filters.
WooCommerce Product Filter Plugin Integrations
In addition to all of the features above, WooCommerce Product Filter also integrates with a lot of the other plugins that you might be using including WC Vendors (for multi-vendor stores) and YITH WooCommerce Quick View.
WooCommerce Product Filter also has a deep integration with the Elementor plugin. You can set up product filters directly from the Elementor interface and you’ll also get dedicated Elementor widgets to include filters in your designs.
This can be especially useful if you’re using Elementor Pro’s WooCommerce Builder feature to design your shop and single product theme templates.
An Example of WooCommerce Product Filter in Action
To give you an idea of the types of product filters that you can create, let’s look at a real example of WooCommerce Product Filter in action on the frontend of a store. Then, in the next section, I’ll show you how things work on the backend.

If you want to see a live version of this demo to play around with the filters, just click the button below and scroll down:
Hands-On With the WooCommerce Product Filter Plugin
Now, let’s go hands-on with the plugin and I’ll show you what it’s like to use the plugin and set up filters on your store.
But first, a quick note. If you want to play around with the plugin yourself, the developer hosts a fully functional demo site that gives you access to all of the frontend and backend features. So, if you want to experience all of this for yourself, you can just click the button below:
With that out of the way, let’s dig in and I’ll show you how it works.
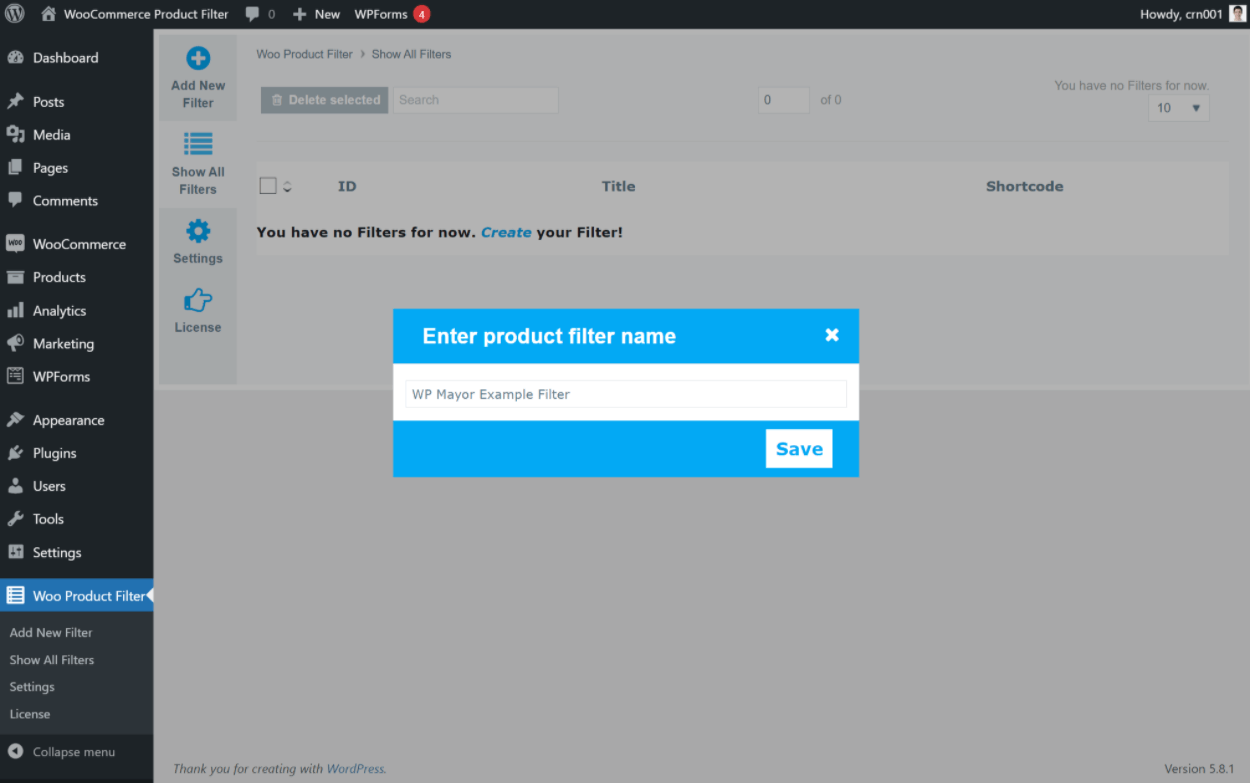
Creating a New Filter Group
To get started with the plugin, you’ll want to create a new “filter”. Each “filter” can contain multiple filters, so I think it’s better to think of these as “filter groups”. I’m going to call them filter groups for this review to make things clearer, but you’ll just see the term “filter” when you’re working in the interface.
One useful thing about the plugin is that you can create unlimited filter groups and display them on different parts of your site or for different users. For example, you could create one filter group for a certain category of products or create a separate filter group for mobile users. This gives you the flexibility to optimize your product filters for every situation.
Adding New Filters to Your Filter Group
Once you’ve created a filter group, you can choose the individual filters that you want to include with this group. Each filter group can include as many or as few filters as you want.
Again, you can choose from the following options:
- Price
- Price range
- Sort by
- Product categories
- Product tags
- Attribute
- Custom fields (if you have custom fields)
- Author
- Featured
- On sale
- Stock status
- Rating
- Search by text
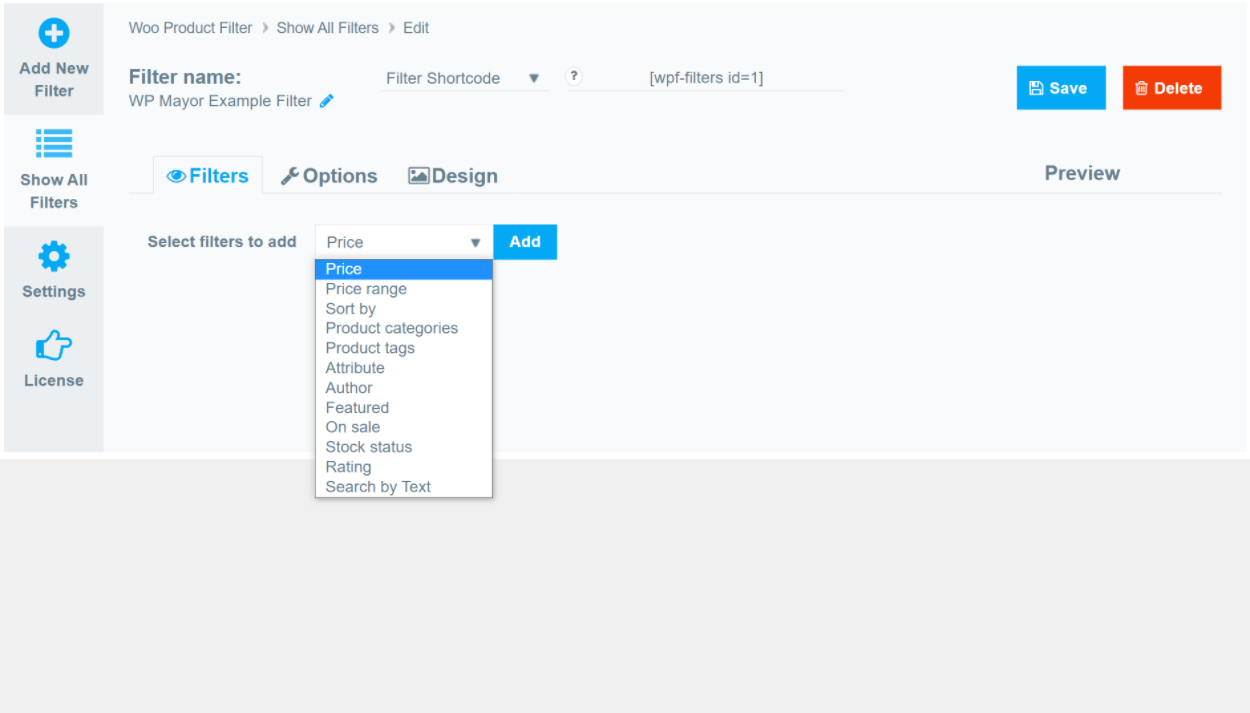
Once you add a filter, two things will happen:
- You’ll get additional settings for that filter.
- You’ll see a live preview of your filter group.
Having the live preview is nice as you can see how each filter will work. Don’t worry too much about the actual style/design, though, as you can customize that later (including making it match your WooCommerce theme).
You can also use drag and drop to change the order of the filters if needed.
To expand an individual filter’s settings, you can click on it. Here, you’ll be able to make key choices such as the type of input field, min/max, labels, and lots more.
Overall, this area is really the “meat” of the WooCommerce Product Filter plugin, so I’m going to spend a lot of time here.
One of the things that really stands out to me is how flexible the plugin is and how many choices you get for customizing input types, behavior, logic, and more.
The settings that you get for each filter will be unique for that type of filter, so let’s look at a few different examples…
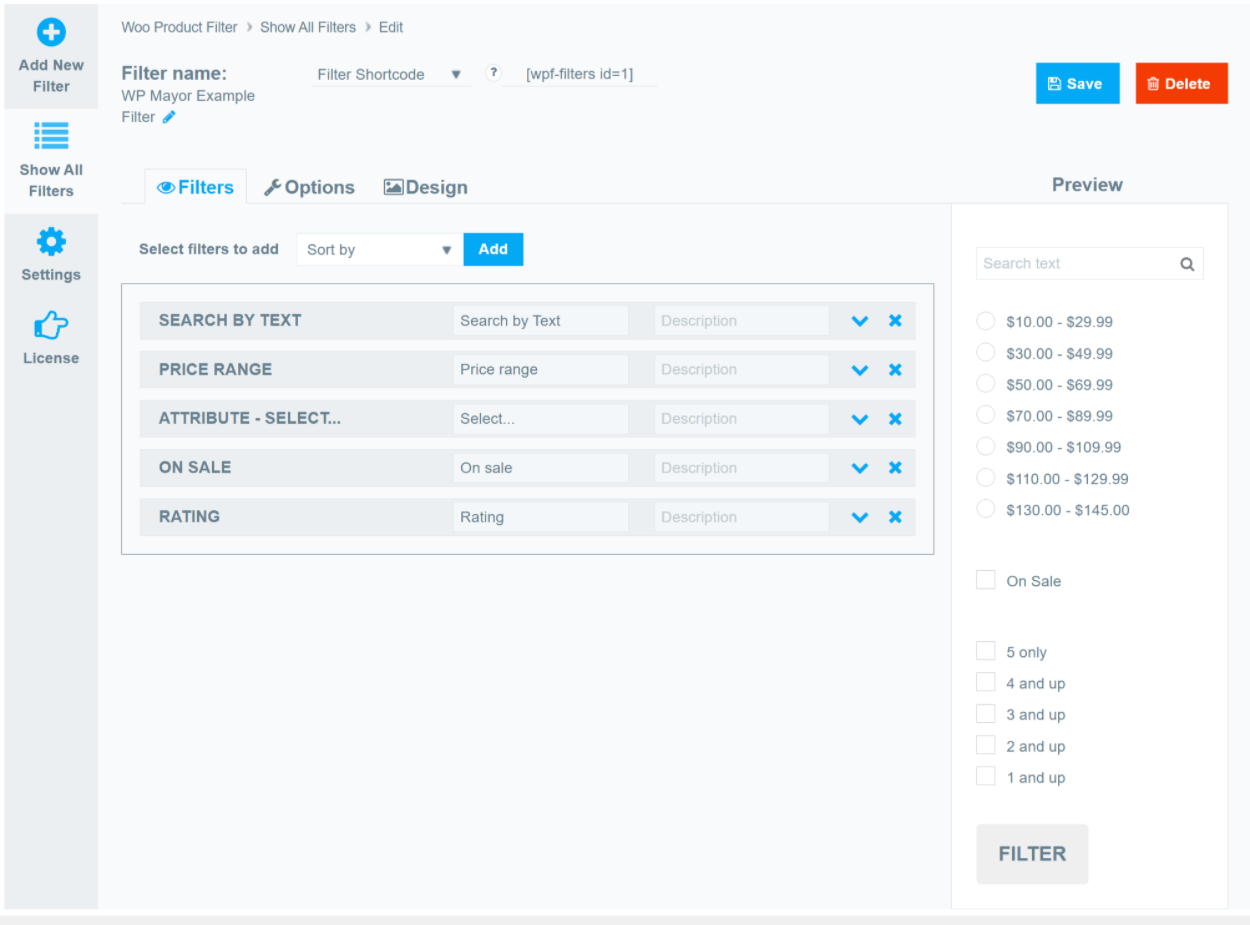
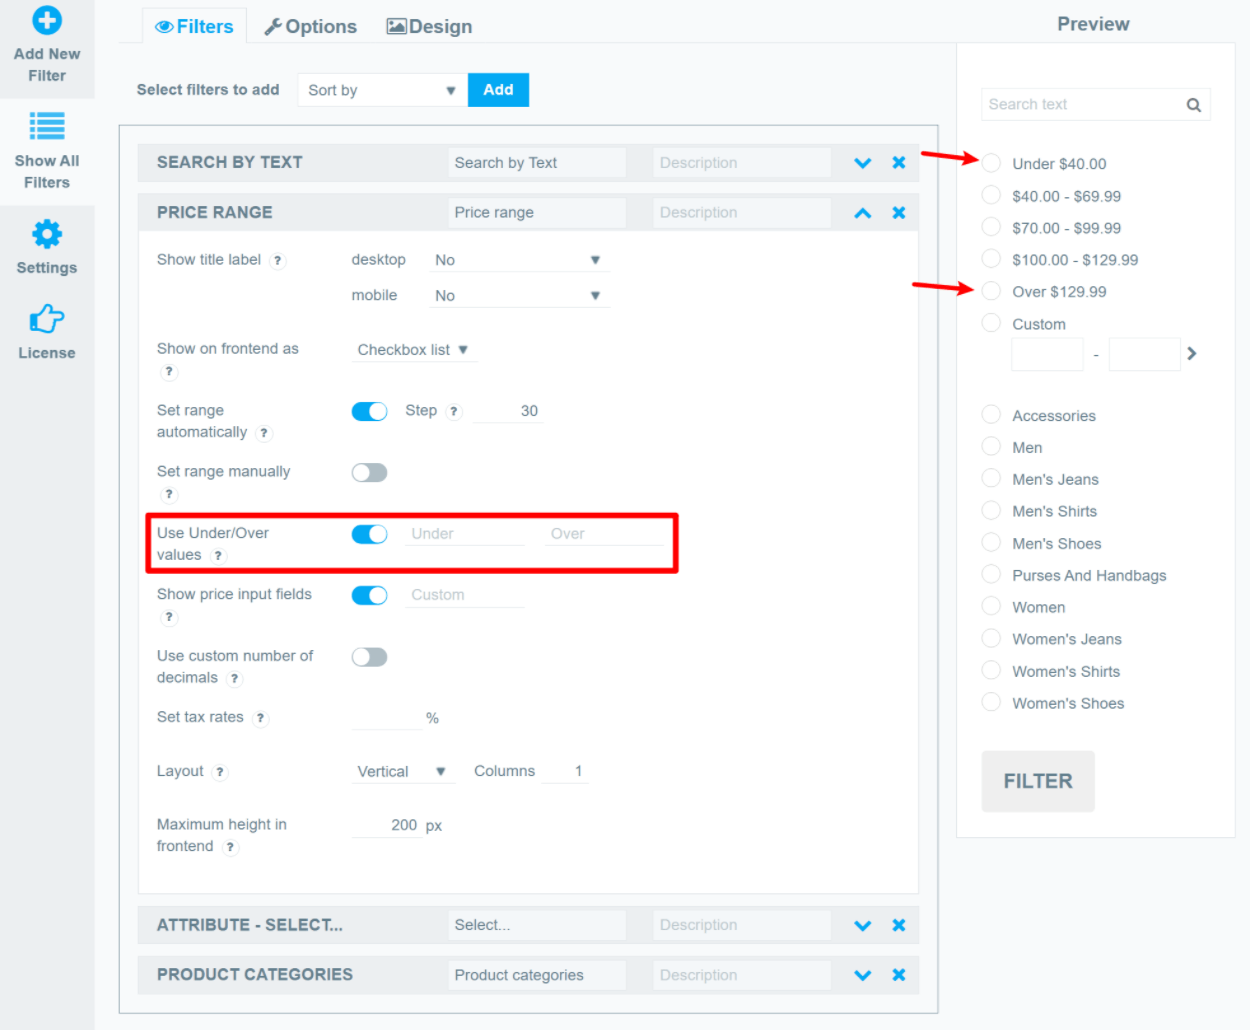
Price Range
The price range filter lets shoppers find all products that are priced between a certain minimum/maximum. One of the things that I like about this filter is that you have a lot of flexibility for controlling what your price ranges are. You can choose from three options:
- Have the plugin automatically generate the ranges based on your products. You can choose your desired step and let the plugin work its magic.
- Manually set the range yourself.
- Add frontend input fields so that shoppers can enter their own custom ranges. This will show up as a “Custom” price range in addition to the default ranges.
Instead of showing the top/bottom range, you also have the option to add an over/under value at the bounds of your range filters. Here’s an example of what that looks like:
Attributes
One of the most flexible filter types is the attribute filter as it lets you add filters for any product attribute – e.g. color, size, etc.
First, you’ll select the attribute that you want to let people filter by. Then, you can choose from a huge selection of input types including:
- Checkbox list (multiple select)
- Radio buttons (single select)
- Dropdown
- Multiple dropdown
- Colors
- Buttons
- Text
- Switch
- Slider

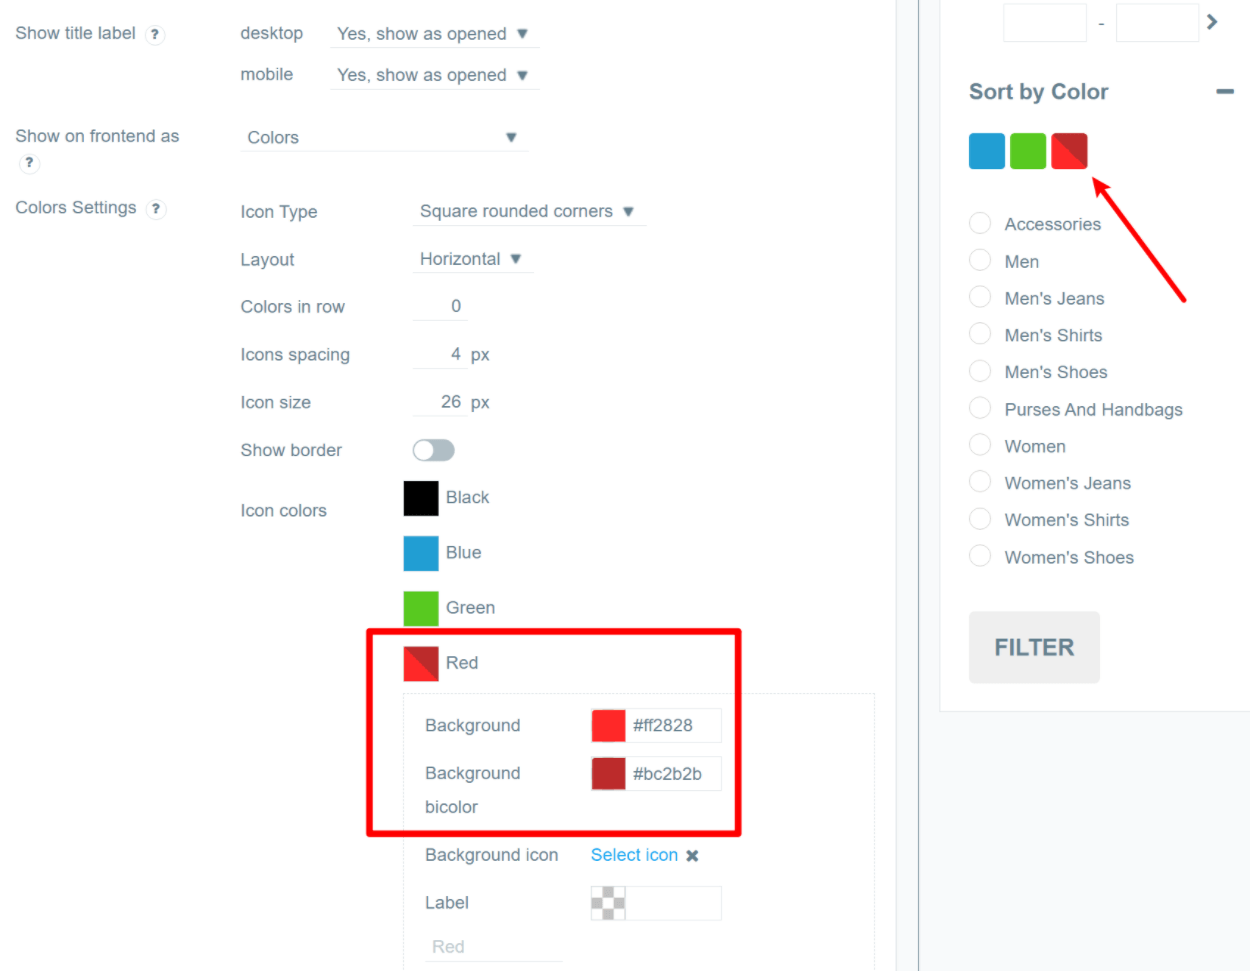
For example, let’s say you’re filtering by the color attribute, which I’m doing for this example. Rather than just displaying text for each color, you could display actual color swatches for people to choose from. Choosing this would open a number of new settings to control the icon, colors, and more:

You can even choose multiple colors for the background, which lets you create an effect like this:
You also get a range of other options such as:
- Using custom tags
- Showing the count for each attribute
- Only adding specific attributes as options
- Changing sorting logic
Overall, it’s just generally really flexible, which makes it a good example of the flexibility that WooCommerce Product Filter gives you.
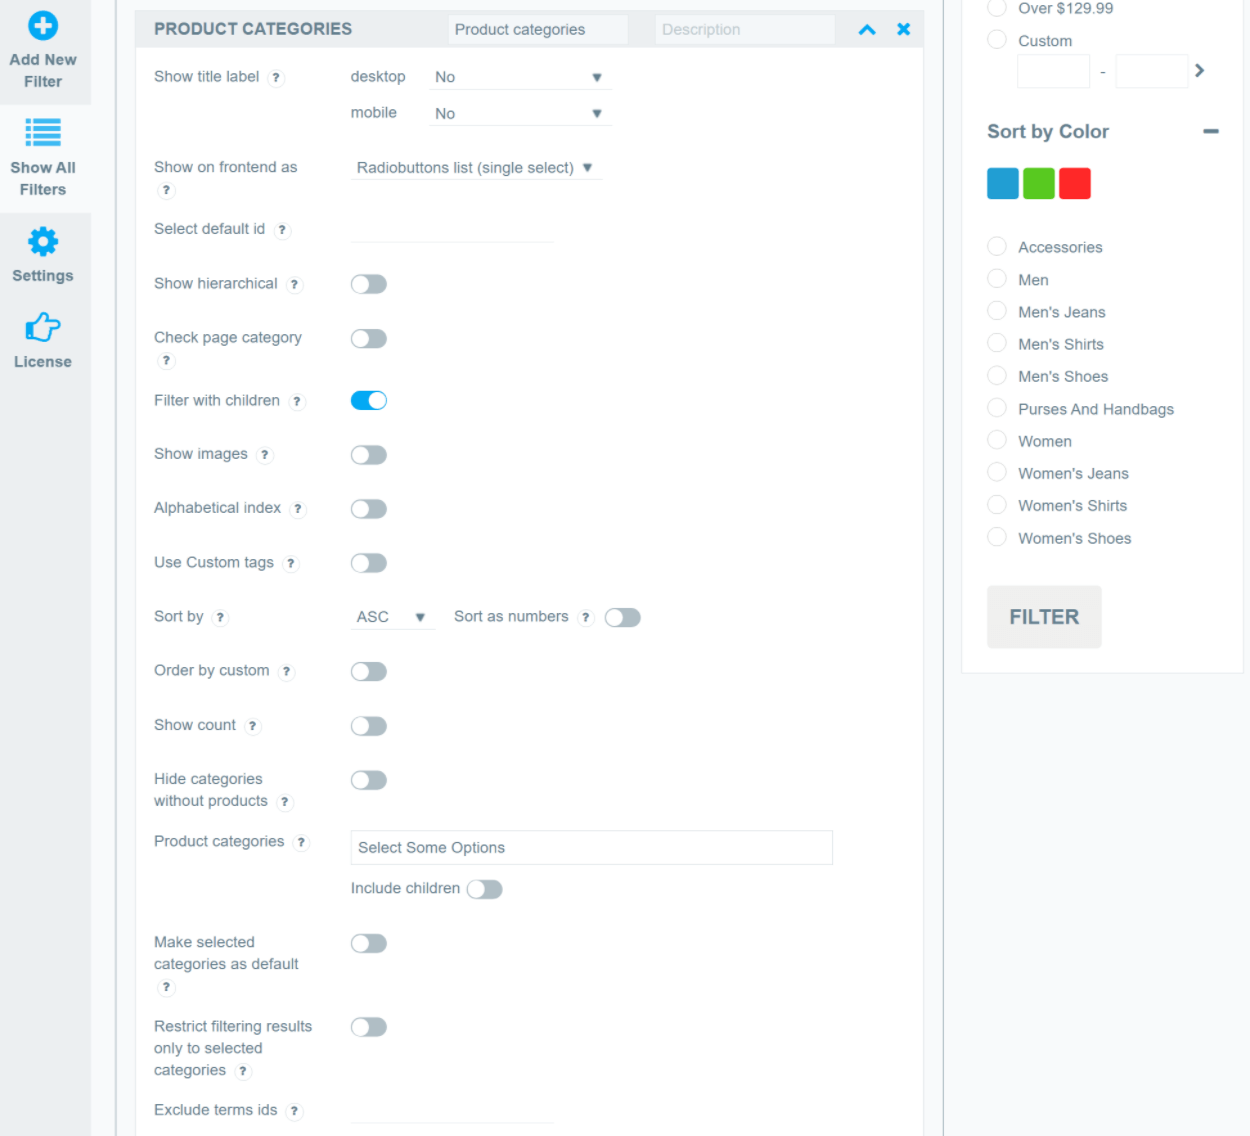
Product Categories
The product categories filter is another good example of WooCommerce Product Filter’s flexibility when it comes to input types.
For this filter, you can choose from six different ways of displaying the filter options on the frontend of your store:
- Radio buttons (single select)
- Dropdown (single select)
- Multiple dropdown
- Checkbox list (multiple select)
- Buttons
- Text
You’ll also get tons of other options such as…
- Showing categories hierarchically
- Including child categories in the filter when a shopper selects a parent category
- Showing images
- …lots more
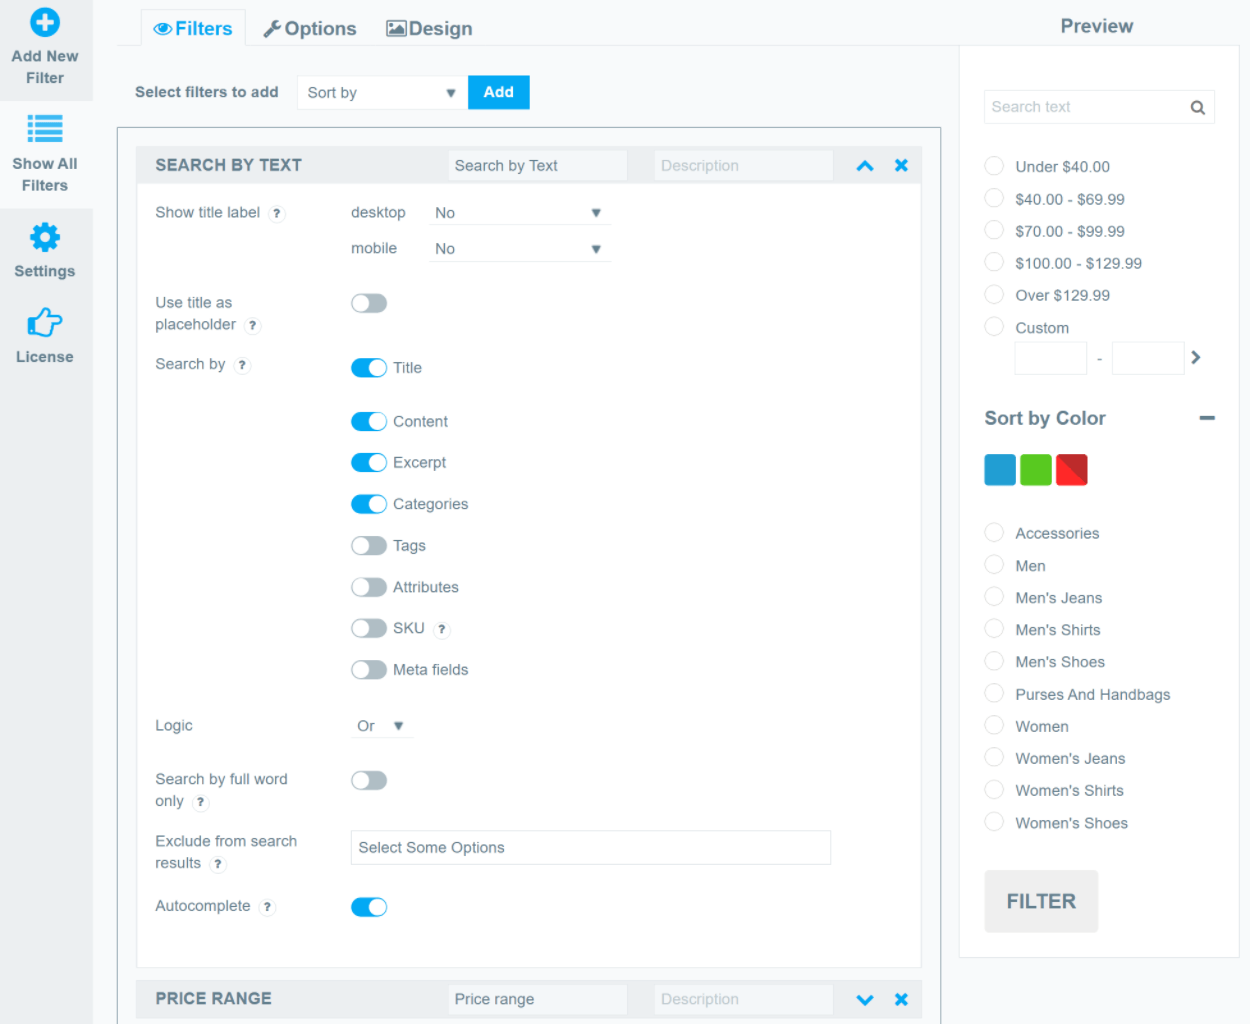
Search by Text
Lastly, let’s look at the search by text filter, as this is another unique option.
This filter adds a search box that shoppers can use to filter products by a keyword.
One nice thing here is that you can choose exactly which information shoppers can search by including the…
- Title
- Content
- Excerpt
- Categories
- Tags
- Attributes
- SKU
- Meta fields
You can also add autocomplete (though this only works based on a product’s title, categories, or tags):
Configuring Other Options
Once you’ve added all of your filters, you can go to the Options tab to control some important behavior for your filter group as a whole.
Here are some of the choices that you can make:
- Ajax filters – if you enable Ajax, users can search/filter without reloading the page. If you disable it, users will need to reload the page to apply their filters.
- Content targeting – you can display your filter group on all WooCommerce pages or specific pages, categories, tags, etc. For example, you could create a special filter group for a specific category of products.
- Device targeting – you can show your filter group to all visitors or only users on a desktop or mobile device. For example, you could display different filters and/or input types for desktop vs mobile visitors.
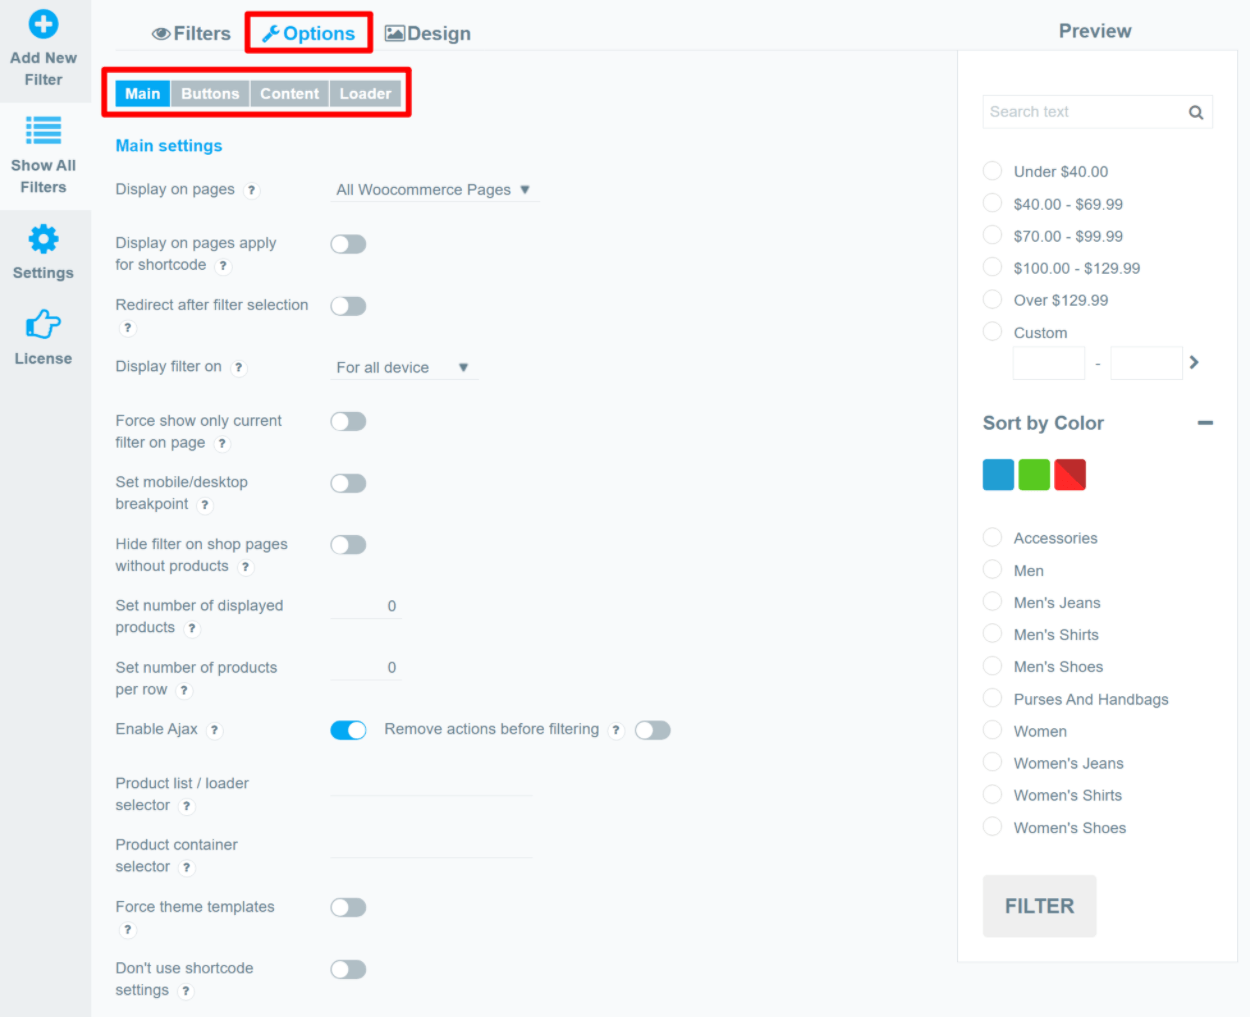
There are also other sub-tabs with important settings. For example, in the Buttons tab, you can choose whether to automatically apply filters as a user selects them or wait for users to click the button.
Controlling the Design
Finally, the Design tab lets you control the style/design of your filters, as well as the spacing (i.e. width and height).
For most stores, you’ll probably just want to check the Use theme styles box. This will have the plugin automatically match your filters to your theme’s design:
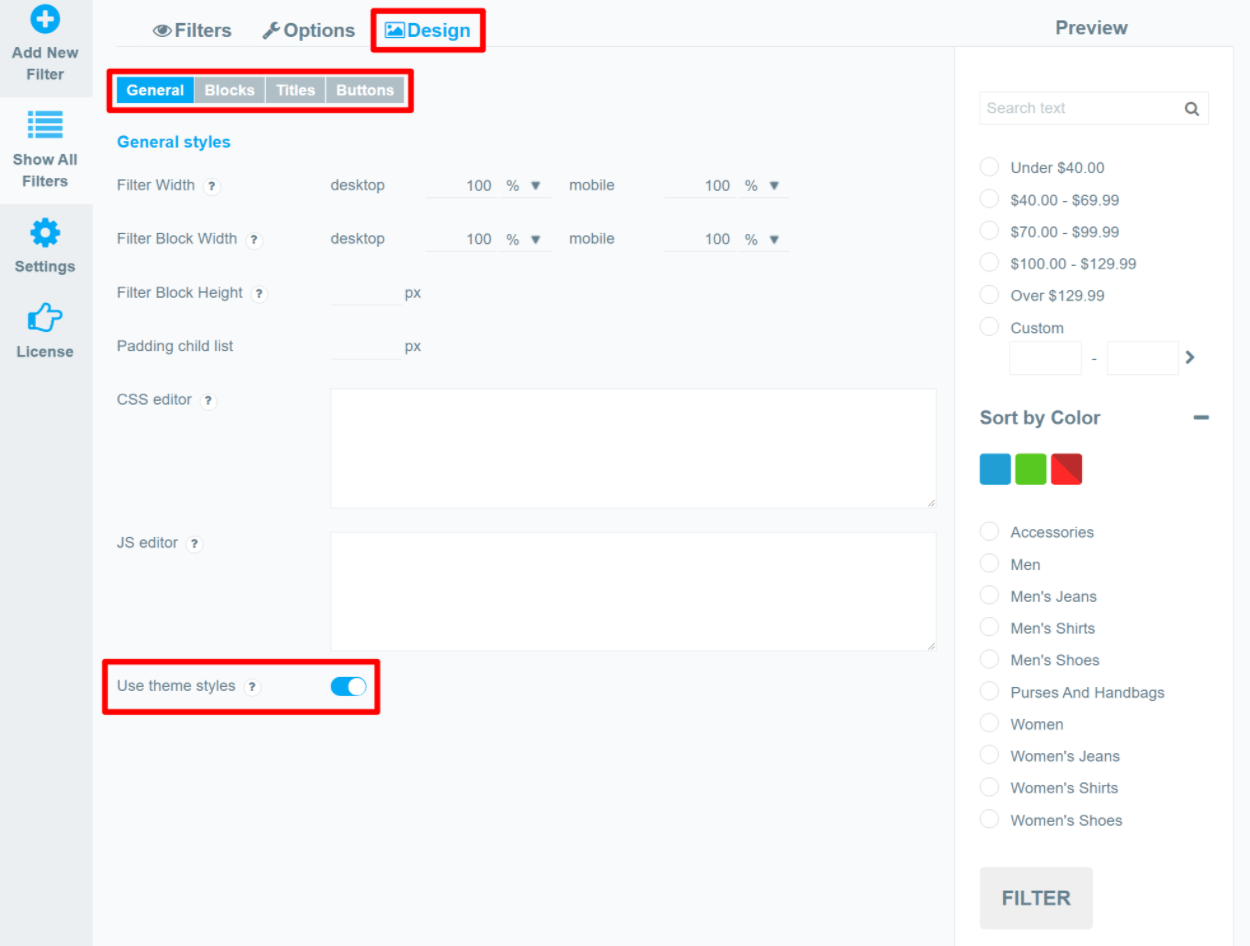
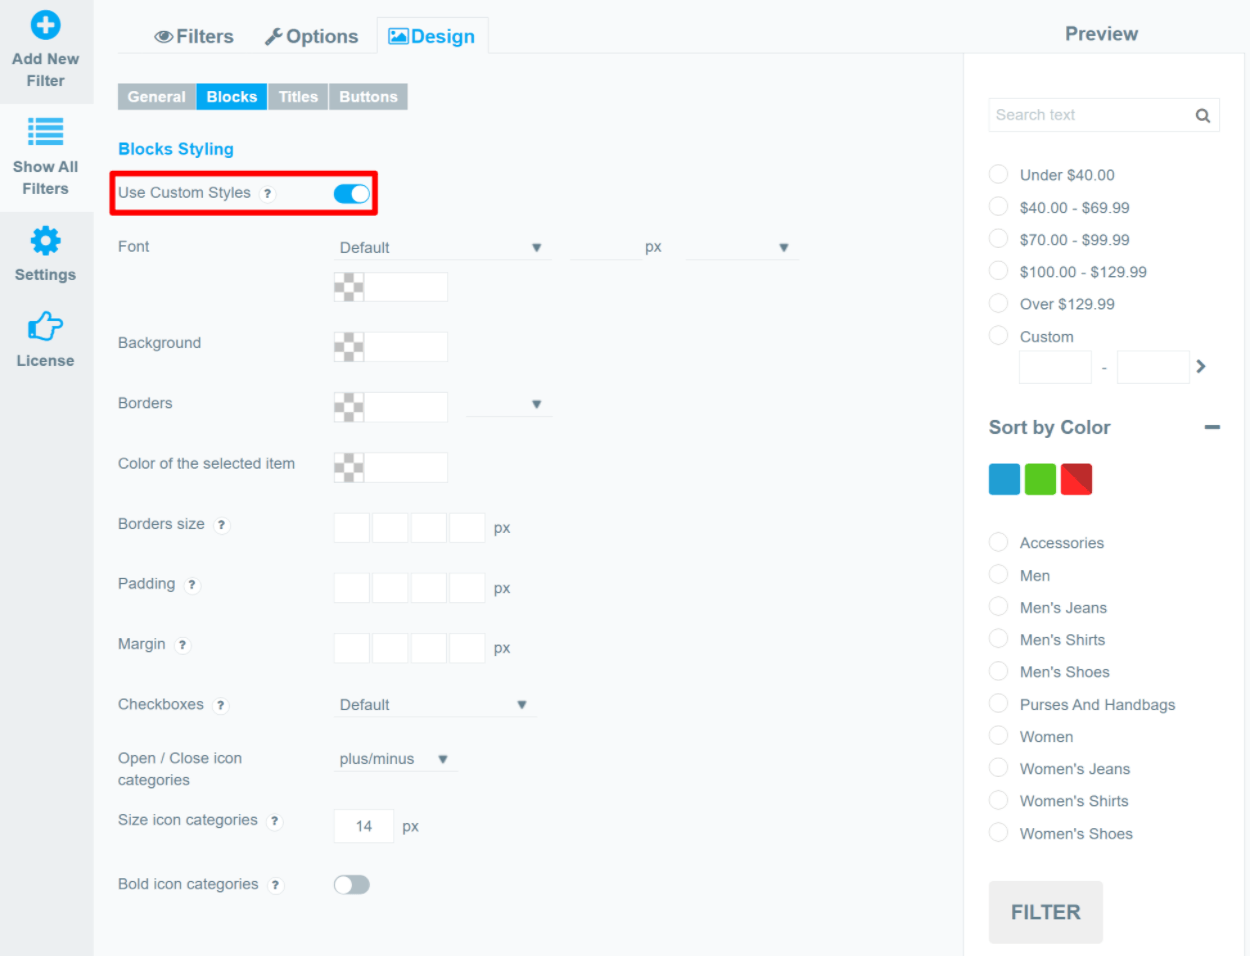
However, if you want more control, you also have the ability to use your own custom styles and/or add custom CSS and JavaScript.
If you do want to use custom styles, you can set most of them up via the interface:
Displaying the Filters On Your Store
To control where to display filters on your store, you get a few options:
- WordPress widget (add it by going to Appearance → Widgets)
- Shortcode
- PHP function
- Elementor widget (add it via Elementor’s interface)
For example, when you add the widget, you can select your desired filter group using a drop-down:

One thing to note is that you can add multiple filter groups and each will display according to its targeting rules.
For example, if you have one filter group targeting Category A and another filter group targeting Category B, you could add both filters, but you’d only see the relevant filter for each category.
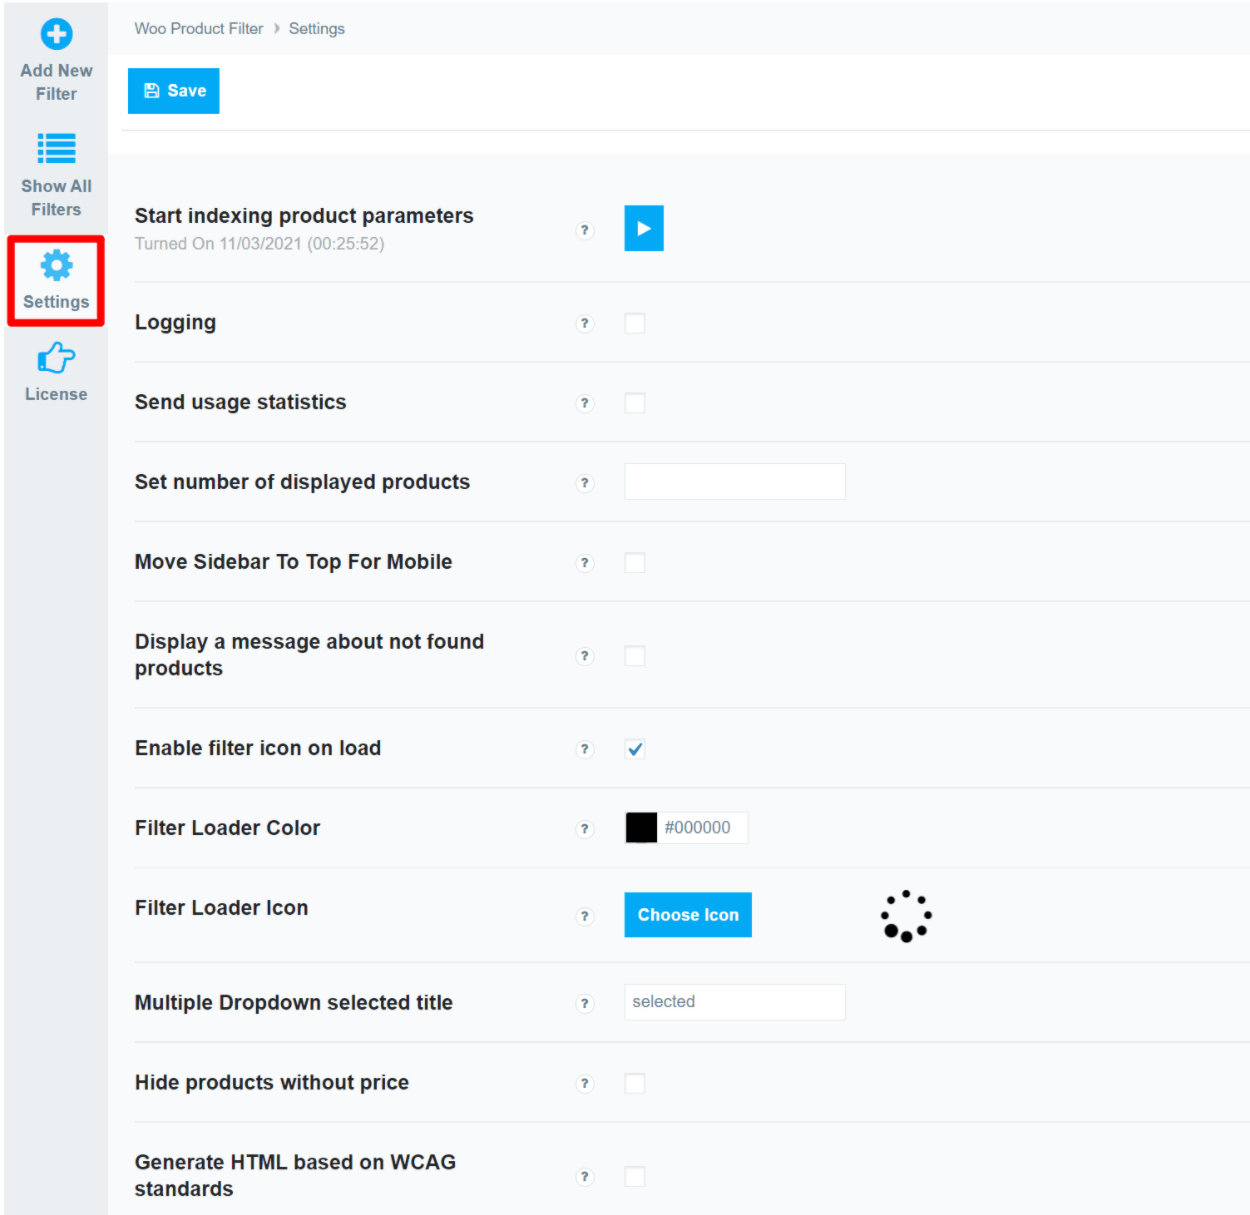
Exploring the Plugin’s Settings
While you’ll mostly interact with the plugin when creating filters, there is also a small settings area that includes some useful options, such as the ability to generate HTML based on WCAG standards for improved accessibility:
WooCommerce Product Filter Pricing
WooCommerce Product Filter comes in both a free version at WordPress.org as well as a premium version with more features.
Here’s a partial feature comparison between the free vs premium versions:

If you need the premium version, there are three pricing plans. All of the paid licenses unlock all of the features; the only difference is the number of sites that you can activate the plugin on:
- One site – $49
- Five sites – $99
- Unlimited sites – $199
I think that price is pretty standard for a WooCommerce extension and offers good value for the functionality that you get.
Final Thoughts on WooCommerce Product Filter
Overall, I was impressed by the depth of functionality that WooCommerce Product Filter gives you.
In addition to just generally giving you a lot of different filter types, you also get so many options for controlling how each filter functions. For example, choosing from different input types, controlling behavior, and more.
It’s also nice that you get support for creating filters based on attributes, custom fields, and custom taxonomies. This can let you create some really useful filter sets that are unique to the products that you sell.
Finally, I think it’s really useful that you can display different groups of filters on different parts of your store or for users on different devices, as this lets you make sure you’re always offering an optimal filter experience.
If you want to give it a test run, you can try it out with the free version at WordPress.org. Then, if you like what you see, consider upgrading to the premium version to unlock the more advanced features and filter types. You can also test a full-featured demo of the premium version by clicking here.
Have any questions about WooCommerce Product Filter? Ask away in the comments section!
