


Spare parts are ideal products to sell online with WooCommerce. Whether you’re selling automotive parts for cars and other vehicles, domestic appliance spares for washing machines used spare parts, or electronics parts, customers are happy to buy online without inspecting the product in person.
In this tutorial, you’ll learn how to create a WooCommerce auto parts website. You can use it to sell any type of spare parts with WooCommerce. It’s completely non-technical and you won’t need to write any code.
I’ll take you through the process of setting up WooCommerce to sell online, and show you how to create user-friendly table layouts suitable for selling spare parts. I’ll even share some top tips on how to get more sales and make your store a success!
So let’s get started…
Why is a WooCommerce auto parts store such a great idea?
Some products are more suitable than others for being sold online. Any type of spare parts – new and used automobile parts included – are perfect e-commerce products because customers can get all the information they need to buy from your website. If your WooCommerce store sells the spare auto part they’re looking for, they will be happy to buy online.
You’ll have a lower returns rate than other types of products, for example clothes which customers need to try on. So long as you provide sufficient information about the spare parts and what sort of automobile they’re suitable for, you can safely sell them online with WooCommerce. Even if you’re selling used parts, you can provide the right information to sell unseen.
As the world’s leading e-commerce plugin, WooCommerce is the perfect platform for selling spare parts online. The core WooCommerce plugin is free of charge, and you can create suitable product layouts using an affordable WooCommerce auto parts plugin. This will provide all the features that most spare parts e-commerce stores need, for almost no cost.
Of course, your website has to look professional and the auto parts must be priced competitively, just like any WooCommerce site. However, if you get your website right, then spare parts are much more suitable for online sales than many types of product. This immediately puts you at an advantage compared to other sectors, giving you a greater chance of success for the same amount of work. That’s a good position to be in!
What will my WooCommerce auto parts website cost?
Selling spare parts with WooCommerce is an incredibly cheap way to make money with e-commerce. Here’s a list of everything you’ll need, and why you need it to sell used or new auto parts in WooCommerce:
- WordPress – this is the open source content management system that will power your overall website.
- A good quality hosting account to host your website and keep it online.
- A domain name (e.g. spareautoparts.com) – this is the address for your website. Domain names are fairly cheap and you can buy them from companies such as 123-Reg.
- A WordPress theme – this is the ‘template’ or ‘skin’ that provides the design for your website. There are plenty of free themes that work with WooCommerce, or you can pay approx. $65 for a premium theme. The official Storefront theme is a great starting point and is free. Or if you don’t like the design, you can pay for one of its child themes.
- WooCommerce – this is the free e-commerce plugin that will enable you to sell auto spares online.
- WooCommerce Product Table by Barn2 – this plugin lists your auto parts in a user-friendly tabular layout or grid. It costs $75 and is essential for selling spare parts online. (I’ll explain why later.)
- WooCommerce Product Filters by Barn2 – this plugin will provide additional filtering options. It costs $79 or $129 when purchased bundled with WooCommerce Product Table.
- Payment processor fees – if you take payment online (which most WooCommerce auto parts stores do), then you will have to pay a percentage of your income to a payment processor. This tutorial will teach you how to take payment online with PayPal, as this is the easiest method to set up. PayPal charges a few percent in fees. This is generally the cheapest option for new e-commerce stores. If you’re already established and have a high turnover, then you might want to research other options such as Stripe. Whichever payment provider you use, if it’s compatible with WooCommerce then you can use it alongside this tutorial.
Total cost for WooCommerce spare parts website
So in total, you should budget approx. $80-$240 for website setup costs, plus up to about $20/month for hosting. Your payment processor will also take a percentage of your earnings, but if you use PayPal or Stripe then this will only happen once you start making sales.
I think that’s a pretty fantastic deal for a professional website that will make you money. Compare it to the cost of starting any other type of business!
Pre-requisites for this tutorial
This tutorial will show you how to use WooCommerce to sell auto parts on your website. It doesn’t matter whether they’re new or used auto parts or a different type of spare parts (e.g. electronics).
Before you start, I expect you to have the following:
- A WordPress website set up on your hosting account, with all the basic content already in place (home, about page, contact, etc.). If you don’t already have this, there are plenty of great resources for getting started with WordPress. The WPMayor Beginner’s Handbook is a good starting point.
- A WordPress theme already installed on your website.
Once you’ve got those essentials, you can continue reading this tutorial. You’ll learn how to install WooCommerce, add your auto parts, and list them in a customer-friendly product table layout.
Step 1 – Install WooCommerce
Ok, so you’ve got a WordPress website and you’ve installed a theme. Now it’s time to transform it into an e-commerce online store, where you can sell auto parts online:
- Log into the WordPress admin for your website.
- Click on Plugins > Add New.
- Type ‘WooCommerce’ into the search box. Find the official WooCommerce plugin – it’s easy to find, just look for the one with millions of downloads!
- Install and activate the plugin.
- The WooCommerce Setup Wizard will appear. Follow the onscreen prompts to set up your e-commerce store. The Wizard will help you create your main store pages (cart, checkout, etc.), choose your currency, add tax and shipping rates, set up PayPal payments, and other essential tasks.
Once you’ve done that, you can start adding products straight away. Of if you want more fine-grained control, go to WooCommerce > Settings in the WordPress admin. Look at the full range of settings and make any changes as required. It’s pretty self-explanatory and the official WooCommerce documentation includes details of all the options.
Step 2 – Add your auto parts products to WooCommerce
So far, you’ve installed WooCommerce but you don’t have anything to sell yet. Next, you need to add your auto spares as WooCommerce Products. There are 2 easy ways to do this:
#2a – Add the auto parts individually
The easiest option is to add each auto part product to WooCommerce individually:
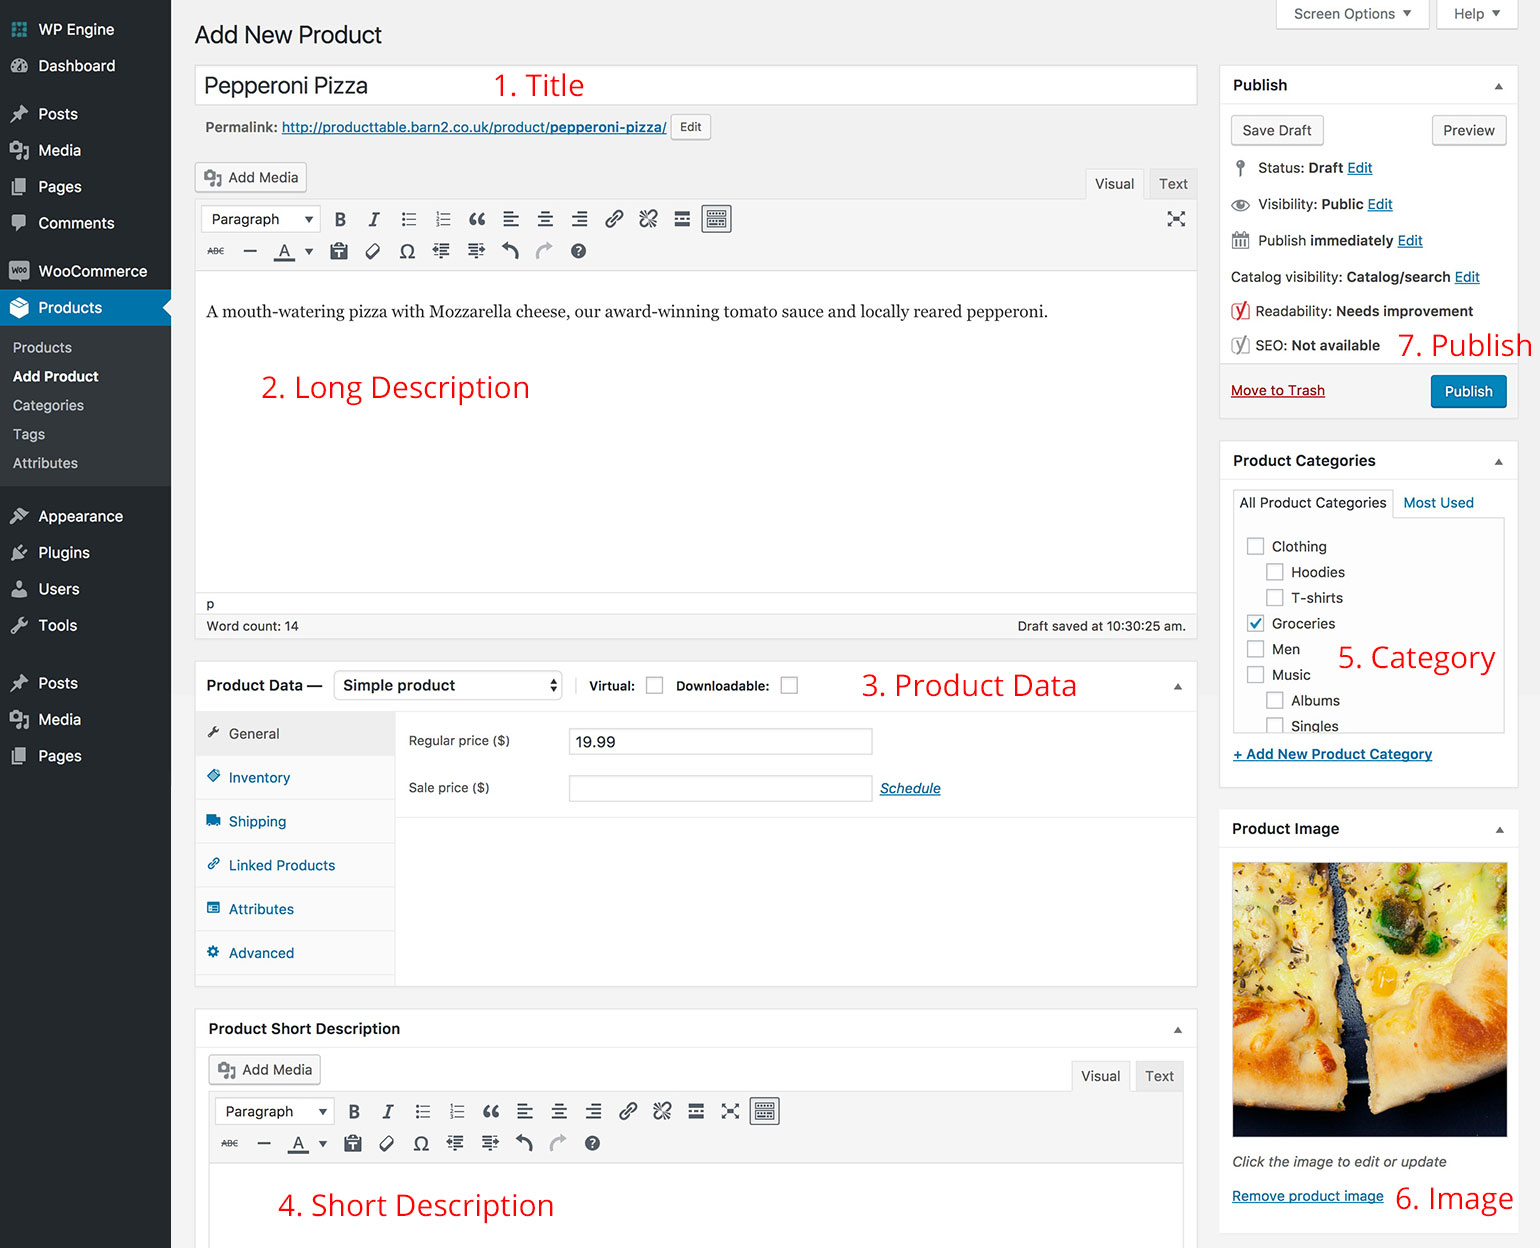
- In the WordPress admin, go to Products > Add New.
- Add the product title, long description, short description, featured image, and any other product data such as the price and stock status.
- If you only sell 1 version of each auto part, then keep ‘Simple product’ selected in the Product Data section. Or, if you want customers to choose between several product options, select ‘Variable product’. If you do this, you need to add some attributes in the ‘Attributes’ tab, make them available for variations, and then add the variations and their respective pricing in the ‘Variations’ tab which appears. This is a great if option if, for example, you sell a specific car part which comes in different versions depending on the type of car.
- Click the blue ‘Publish’ button to add the auto part to your website.
#2a – Bulk upload multiple auto parts
If you’re planning to add lots of auto spare products in one go, you can save time by using WooCommerce’s bulk product import feature.
Whichever method you use to add your auto parts as WooCommerce products, the end result is that your store inventory will be listed in the ‘Products’ section of the WordPress admin.
Next, I’ll show you how to structure the products in your auto parts store to make them easier to find.
Step 3 – Categorize & tag your auto parts
Most WooCommerce auto parts stores contain 100’s or even thousands of products. To make your store a success, you need to make it easy for customers to navigate. If they can’t find the right product quickly, they’ll give up and look elsewhere – so this can make a big difference to your sales and conversion rates.
There are several ways to structure your spare parts products:
- WooCommerce product categories. Like all types of WordPress content, WooCommerce comes with hierarchical categories. This means that you can structure products into categories and subcategories (or even sub-subcategories, and so on). Use WooCommerce categories to divide your auto parts into major groupings. For example, if you sell automobile spares for different car manufacturers then you might create a category for each manufacturer (Ford, VW, Renault, etc.). The Ford category might contain subcategories for Fiesta, Focus, Mondeo, etc.
- Tags – Tags are a neat way to label products so that customers can quickly view all products with a specific label. Tag your products with labels that customers might want to sort by. (e.g. you might add tags for Engine Parts, Mirror Parts, Air Conditioning Parts, New, Used, etc.)
- Attributes – Product attributes are a way of storing specific data about your products. You can create as many attribute groups as you like, each with 1 or more values. Always use attributes if you want to create options for customers to select, as these are used for product variations. For example, there might be an attribute group called ‘Color’ with values of Black, White, and Red.
- Custom Fields – WooCommerce custom fields are a way of storing extra custom data about the spare parts you are selling. You should normally only use these for unique information that only applies to one product. For example, you might create 2 custom fields – 1 for the unique part number, and 1 for recording notes on the item’s condition (if you’re selling used car parts).
- Taxonomies – These are similar to categories as they let you structure products hierarchically. Use them to structure your auto parts differently from standard categories and subcategories. For example, if you’re using standard WooCommerce categories for make and model, then you might use a custom taxonomy to store hierarchical data about the type of vehicle. (e.g. you might have a top-level custom taxonomy term of ‘Car’ with sub-terms of ‘Supermini’, ‘Medium’, and ‘Family’; with another top-level term for ‘Van’, and so on.)
How to structure WooCommerce auto parts – an example
Let’s imagine that you’re building a WooCommerce automobile parts website. You might create a product and categorize it like this:
- WooCommerce Categories – VW > Golf.
- Tags – Used Car Parts, Engine Parts.
- Attributes – Color: Black.
- Custom Fields – Part #19586B; Scratched but in perfect working order.
- Taxonomies – Car > Medium.
As you can see, there are some great opportunities to create a logical product structure for your WooCommerce auto parts. Next, you’ll learn how to list auto parts in a searchable, sortable table view that makes it easy for customers to find and buy online.
Step 4 – Use a WooCommerce auto parts plugin to list products in a table layout
By now, you’ve set up WooCommerce and added and structured your auto parts as products you can sell online. If you view your website at this stage, you’ll see the spare parts listed in a default e-commerce style layout. There will probably be a few products per row with large images – maybe about 9 products per page.
This is all well and good, but it’s not really an appropriate layout for selling spare parts. If you were selling something visual such as clothes, that’s great. However, you’ll sell more auto parts by listing them in a more structured grid layout, with more emphasis on data rather than what your products look like.
That’s where WooCommerce Product Table comes in!
What is WooCommerce Product Table?
WooCommerce Product Table is a WordPress plugin that adds extra product layout options to any WooCommerce store.
It’s popular as a WooCommerce auto parts plugin because it provides a much more suitable layout for selling spare parts online.
The auto parts are listed in a structured table view, with more data about each product than you can fit into the default store layout. The images are smaller (or you can remove them completely), making more space for product information.

Why will product tables help me to sell more auto parts in WooCommerce?
When a customer is shopping for auto parts (or any type of spare part, e.g. an electronics part), they will only decide to buy if your website meets these 2 conditions:
- They can find the spare part they’re looking for – probably within a few seconds.
- When they find the part they need, they can see clear information which informs and reassures them that it’s correct. Buying auto parts can be confusing with many options, so customers need to know they will fit their vehicle.
If you satisfy these conditions and don’t fall down in other areas (e.g. price), you’ve made the sale! If you fail, then you’ve lost the customer.
Product table layouts are essential to selling auto parts with WooCommerce because customers buy based on information rather than visuals. By putting the right product data at customers’ fingertips, they’re more likely to buy and you will get more sales.
The other benefit of listing WooCommerce auto parts in a product table is that customers can find the parts they need more quickly. There are several ways to sort and filter the table, including a keyword search, sorting by any column, filter dropdowns, and filter widgets. These interact with the various ways you used to categorize and tag your products, so customers can quickly refine the list of products and find what they need.
Get started creating your auto parts list with WooCommerce Product Table.
Buy NowHow to list auto parts in a WooCommerce table
It only takes a few minutes to create the perfect product layout for selling spare auto parts:
- Get WooCommerce Product Table.
- Install and activate the plugin by following the instructions in your confirmation email.
- Go to the page where you want to list your auto parts. This can be any page or post in WordPress.
- Add the following shortcode:
[product_table]. This will list all your WooCommerce products in a neat table view.
The basic product table comes with some standard column headings and various other default settings. The columns are sortable and there is a search box but no filter options.
Step 5 – Add WooCommerce Product Filters
You can also create custom filters using the Filter Presets Editor that comes built-in with the plugin.
- Get WooCommerce Product Filters
- Install and activate by following the instructions in your confirmation email.
- Go to the “Product Filter” settings page and configure the plugin according to your preferences.
Product filters are essential for an auto parts store website setup as they allow customers to quickly and easily narrow down their search for the exact product they need based on various criteria such as make, model, year, price range, and more.
If you like the way your WooCommerce auto parts are listed, then you can launch your store and stop reading this tutorial. Read on if you’d like to continue configuring your store layouts.
Step 6 – Configure your WooCommerce spare parts layouts
Decide how to structure your store
The WooCommerce auto parts plugin comes with several options for displaying your products in the table. The 2 main options are:
- Create a single WooCommerce table listing all your auto parts. If you do this, then you’ll need to add plenty of search and filter options to help customers refine the list and find the spares they need.
- Add multiple tables to your site, each listing different auto parts. For example, you might create a separate page for each automobile manufacturer. Each page would contain a different product table listing the auto parts for that manufacturer. Customers can then navigate to the appropriate manufacturer using your navigation menu and other links. Alternatively, you might divide up a single page with multiple headings. Each section of the page would contain a table listing different auto parts.
Think about what you’re selling and how you can make the process easier for customers. Choose the method that will be most user-friendly given the number of products, number of categories, and other information about your WooCommerce auto parts store.
Choose what spare parts data to display
As we’ve discussed, customers will only buy automobile parts online if they’re certain that it’s the right part for their vehicle. This will only happen if you provide the right data in the product table.
The auto parts plugin supports most of the standard WooCommerce data, plus extras such as custom fields and taxonomies. Read the full list in the plugin knowledge base.
Think about which information about your auto parts products customers need in order to make a buying decision. Plan your columns carefully, and choose the ones that will help people to buy.
Make it easy to find spare parts
There are 4 ways for customers to find a specific auto part in the table:
- Click on any column to sort by that column. (This is enabled automatically, so you don’t need to do anything.)
- Perform a keyword search by typing into the search box above the product grid.
- Select a category, tag, attribute, or custom taxonomy from dropdown lists above the table.
- Use WooCommerce Product Filters to refine the list of parts by attribute, price, or reviews/ratings.
Try to think from your customer’s perspective. What will they be searching for to find the auto parts they want? Make sure you’ve activated the search options and filters that will help them to find the right part quickly and easily.
Product Quick View
Now that you know how to display your auto parts in a table, you can also add a feature that allows customers to quickly view more information about the item using the WooCommerce Quick View Pro.
This plugin is designed to allow shoppers to click on a button to view the purchase options in a quick-view lightbox popup. This saves having to visit the separate product page making it a much more user-friendly experience.
Store owners are able to choose what information to display in the WooCommerce quick view – for example, you can show extra images of each product, add a short description with all of the features and let customers choose variations and product options. You can also use it as a separate WooCommerce gallery lightbox plugin, showcasing the full product image gallery in a popup with zoom features.
A note about SEO
Search engines can index your table of auto parts. Unless you choose to disable links in the product table, customers can also click through to view the single product page for each part.
I recommend keeping these links active because a lot of customers search for specific auto parts directly on Google. If you keep these links active, then Google will index the individual product pages as well as the more structured data in the table. Realistically, you’re more likely to rank for specific keywords this way, as each product page focuses on a specific auto part.
This lets customers find your auto parts by browsing your site, and by searching for a specific part in Google – so you win both ways!
Make your WooCommerce auto parts store mobile-friendly
WooCommerce Product Table is 100% responsive straight out of the box. This means that it adapts to fit all screen sizes, including mobiles and tablets.
If your table of auto parts contains a lot of data, then it probably won’t fit onto small screen sizes. If this happens, nothing will break – but certain columns will be hidden so that customers need to click to view them.
The auto parts plugin comes with several options to let you control how the table works on mobiles. For example, you might want to change what happens when the data won’t fit onto a single row. You might also want to choose which columns are hidden on smaller screen sizes, to ensure the most important data is always visible. Play around with these to make it even easier to find spare parts and buy on mobile.
Lots of automobile parts? Activate lazy load
By default, your table of WooCommerce auto parts will load ALL the products straight away. This works well if you have a fairly small inventory of parts. However, if you have more than about 100 products then it’s best to activate lazy load, which loads 1 page of parts at a time.
Lazy load is a good way to avoid performance issues and keep your store loading quickly.
Start selling auto parts with WooCommerce
I hope this tutorial has given you all the information you need to start selling auto parts online using WordPress and WooCommerce. You’ve learned how to set up WooCommerce to sell parts online, and how to list products in a structured table layout that will increase your sales.
I’d love to hear how you get on. Is there anything I’ve missed that would be useful for your auto parts store? Please let me know in the comments below.
Get started creating your auto parts list with WooCommerce Product Table.
Buy Now
8 Responses
Hi Katie Keith, this is the best post. I am going to follow your suggestions and building a website for my auto part shop.
Hi Stephanie, unfortunately we don’t offer development work. I recommend posting a job on Codeable to find a good developer for your website. Codeable have several developers who are experienced in customizing our plugins – to request a quote from them, select Domagoj Kovacevic, Domenico Nusca, Krasen Slavov, Onur Demir, Liam Bailey, Nitin Yawalkar and Felipe Elia as your preferred experts.
Ups, the firts was in spanish
Hello from Spain!
Thanks for your article Katie, was a great help for my project, this article solve my problem.
You have a new Fan 🙂
Hola desde españa
Gracias por tu artículo Katie, fue de gran ayuda para mi proyecto, este artículo resuelve mi problema.
Tienes un nuevo fan 🙂
Hi Gary, yes you can do this. You need to create a custom taxonomy (instructions here) for example, you might create 3 taxonomies called Vehicle 1, Vehicle 2, and Vehicle 3.
On the ‘Edit Product’ screen for each product (i.e. part), you would use these taxonomies to add the appropriate number for each diagram.
You would then use the WooCommerce Product Table plugin to create a separate table listing the parts for each diagram. Include a column in the table listing the taxonomy for that diagram. This will add the correct part number for that diagram alongside each product.
Does that make sense?
Lovely instruction guide, however I have a bit of a problem.
Our parts are used across multiple vehicles and appear on the parts diagram labelled as different numbered items, for example:
Vehicle 1
Part A is number 1 on the diagram
Part B is number 2 on the diagram
Part C is number 3 on the diagram
Vehicle 2
Part A is number 3 on the diagram
Part B is number 1 on the diagram
Part C is number 2 on the diagram
Is there anyway you suggest I can do this?
Thanks!
We completed a vehicle-related parts WooCommerce site a while back, and I thought I’d share our experience. By far the biggest challenge was mapping product “fits” to aggregate vehicle make, model, and years. The hard part is that each part may fit multiple vehicles, potentially spanning across all three criteria, but it’s key to the industry. National auto parts chains, and even Amazon, prominently display the make, model, and year selection in their UI as the customers’ suggested first step, so it is critical. We chose to stick with the established practice of having three linked selects for the three fields. We used the WooCommerce Cascade Filters plugin which stores part “fits” to post meta. We found this to be much more manageable and extensible than the use of categories. Once the site functionality was completed, we had to deal with importing all of the data for thousands of parts and the vehicles each one would fit. We created a custom plugin for a batched import of CSV data that was mapped to the WooCommerce Cascade Filters plugin.
Thanks David B. for the insight!!