


Quickly, name three ways you automate tasks on a daily basis. You may have come up with a few off the top of your head, like:
- Using Task Scheduler to open apps
- Set up auto-responder emails
- Schedule posting to multiple social media platforms
These are all pretty common, and I’m sure you can name a lot more. But have you ever thought about WordPress automation?
Imagine if you could automatically add a customer to your mailing list. Or what if you could have WordPress create a new user when someone books an appointment with you? How about sending a frequent blog commenter a loyalty reward as soon as they comment?
These things are all possible with a plugin from Thrive Themes called Thrive Automator.
Thrive Automator
If you’re familiar with automation tools like Zapier, then you’ll understand right away what Thrive Automator can do. This plugin is a free tool for your WordPress site to help you set up automated tasks.
Thrive Automator allows you to connect the tools you’re already using to your WordPress site. For example, you can connect with WooCommerce to add new customers to your email list.
You can also connect to Mailchimp and trigger actions that occur when a subscriber comments on a blog post. Thrive Automator can also take advantage of webhooks, creating a new WordPress user when a new customer makes a purchase.
There are also multiple integrations you can set up for your WordPress site, including services like:
- MailPoet
- Zoho
- Zapier
- GoToWebinar
…and many more.
How to Use Thrive Automator
Let’s get Thrive Automator installed, and I’ll walk through some basic scenarios.
Install Thrive Automator
Start by downloading the Thrive Automator plugin directly from its WordPress.org page.
If you prefer, you can search for the core plugin right from your WordPress site. In the Admin Dashboard, select Plugins → Add New. In the search bar, look for “Thrive Automator,” and you’ll see it appear as an option.
After you’ve downloaded the plugin zip file, navigate to the Admin Dashboard of your WordPress site. Select Plugins → Add New. Click Upload Plugin and browse for the .zip file you saved. Click Install Now, then activate it.
Connect to Thrive Themes
As soon as you activate the plugin, you’ll see a welcome screen.

Thrive’s Basic Automator comes with some useful integrations, but in this step, you can add over 20 integrations at no extra cost. I highly recommend clicking the big Connect now for FREE button. The Connected Automator will give you so much more to work with.
Thrive will ask you to download their Product Manager, allowing you to add the integrations. Follow the steps to install that and create a free Thrive account.

Once you’ve gone through those steps to connect your Thrive account, you’ll see the Thrive Automator dashboard.

Create Your First Automation
Now comes the fun part. You can start creating automations right away. But first, it might be helpful to understand what an automation is and how it works. An automation is a sort of macro that runs in the background of your WordPress site. Once you set it in motion, you can go about your life while it works for you.
An automation is made up of a start trigger — an event that happens on your site, like a user submitting a form. You choose what actions should take place after the start trigger, such as having a new user created. You can also apply filters to the actions, such as the length of time since the last login or a specific email address.
Let’s walk through creating an Automation so you can see how it works. Let’s say we want WordPress to create a new user when a customer purchases a product. Here are the steps to make that happen.
Step 1: Add an Automation
In the Thrive Automator dashboard, click the Add New button. Give your automation a name, so it’s easier to find later.

Choose a trigger from the list of available ones that appears. In this case, we want to create a trigger when someone buys a product, so we’ll choose WooCommerce. From the dropdown that appears, we can see several options, such as order refunded, order status change, and more. However, we want to use WooCommerce order complete.

From here, we see another drop-down showing various conditional options for our trigger. We could select things like the last logged-in date, registration date, the grand total of the purchase, and much more. For our example, let’s make it easy and choose Always trigger. Click the Done button.
Now we have our trigger, but that’s not really going to do anything for us. We need to create an Action.
Step 2: Create an Action
Below the trigger we just created, we’ll see a plus sign. Click that to start adding actions. In the Choose next step menu, let’s select WordPress.
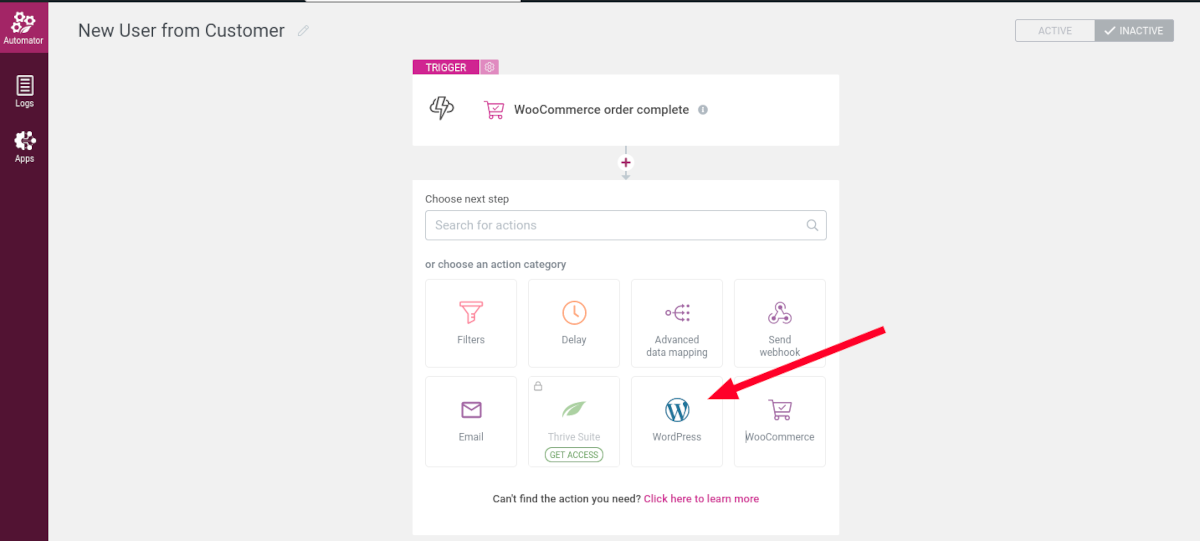
In the drop-down that appears, we’ll choose Add user role. From there, we can search in the field for the role we want to give the new user. For our purposes, the safest role for a new customer is a Subscriber. Click Done.
Step 3: Create a Filter
Now that’s pretty cool, and we could leave it at that. But let’s say we don’t want this customer to become a user unless they make a total purchase of $100 or more. We’ll need to create a filter for this action.
Click the plus sign underneath the DO THIS action block. Click Add another action, and in the following menu, choose Filters. Now we have an ONLY IF block where we can set the parameters for our filter. Because we want to make this about a purchase amount, we need to select Grand total from the drop-down.
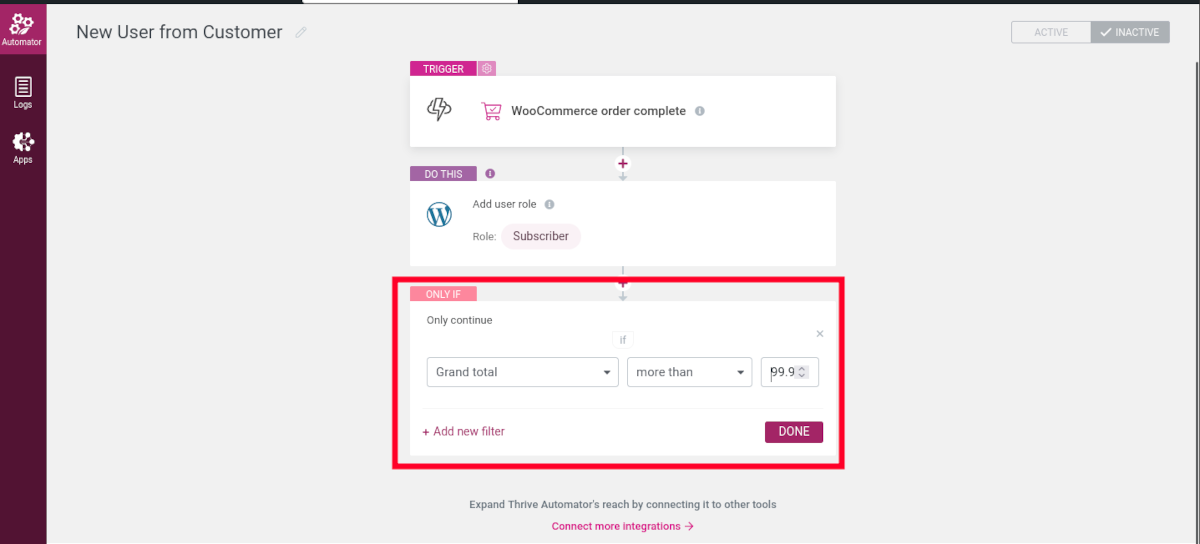
Because we want the grand total to be $100 or more, in the values fields, we need to select more than and enter a value of 99.99.
Step 4: Save and Finish
We’re done building our automation, so we need to activate and save it. Click Active at the top of the menu, then the Save and Finish button at the bottom.

That’s it! Now our automation will run anytime a customer makes a total purchase over $100.
Logs
The Logs section of Thrive Automator displays automations that have been triggered on your site. You can filter by specific automation and time period.
Apps
Under the Apps menu, you can see the apps you have enabled and add new Connections. When you add a new Connection, you can choose from the following types of apps:
- Email Marketing
- Webinars
- Recaptcha
- Social
- Sales
- Integration Services
- Email Delivery
- File Storage
- Collaboration
Slack
For example, under Collaboration, you can connect to a Slack workspace. Choose Add new Connection, then from the dropdown, select Slack. You’ll be redirected to a new window where you can allow Thrive to interact with your Slack workspace.

Now you can create an action that sends a notification in Slack when a new user role is added to your WordPress site.

You can even use dynamic data to welcome a new user by name. This automation opens up enormous opportunities for eLearning and community-based WordPress sites to welcome new users and send autoresponders in multiple formats.
Mailchimp
Here’s another super handy integration you can set up: Mailchimp. If you run Mailchimp email campaigns, you can tie them in so they trigger actions on your WordPress site. The steps to do this are easy:
- Under the Apps menu, add a new Connection for Mailchimp
- Connect Mailchimp to Thrive Automator using your API key
- Add a new action — say, start a trigger when a user leaves a comment
- Add a filter that adds the user in an autoresponder using Mailchimp
- Select the list you want to add them to
- Choose the Optin and Tags you want to use
Voilà!

There are many more examples of Connections and automations you can create out of them. For example, you can connect to your Twitter account and celebrate certain sales as they happen, prompting your followers to go check out an item in your store.
The possibilities are almost endless.
Pricing
With all the possibilities for automating your WordPress site available, you might be surprised that the Thrive Automator plugin is 100% free.
There is no Pro version of Thrive Automator. When you install the core plugin and create a free account at Thrive Themes, you get all the webhooks, delays, filtering options, dynamic values, and more. More than 20 email marketing integrations are available, plus the WooCommerce, Slack, and Mailchimp triggers and actions I outlined above. There are also no ads or limits on automations.
A Free, No-hassle WordPress Automation Tool
Imagine the power of automating tasks on your WordPress site. You can create actions that add new users, send auto-responders, interact with Slack and Twitter, and so much more in just a few clicks. If you’re looking for a way to connect with customers and subscribers without adding to your workload, you should be automating tasks on your website right now.
Using the Thrive Automator plugin, you can set up automated tasks in WordPress without limits.

One Response
Hey there, I am an avid reader of your website! I really agree with your point as I am currently employed as a social media manager for a full-service BPO company.