WooCommerce is arguably the best eCommerce solution for your WordPress website. It’s easy to set up and maintain — plus, WooCommerce can be extended in many ways. However, it’s not enough to simply set up shop and hope for the best. You need to get the word out! And a crucial part of marketing your shop is tracking results. The best way to do that is by setting up Google Analytics for WooCommerce.
One of the most significant advantages of hosting your store online is the ability to track your customers’ behavior. If you’re hosting ads on Google, Facebook, and other platforms, you can use the data they collect to track conversions. That means you can see how visitors interact with the ads, whether they click on your product or where they go next if they don’t click.
In this article, I’ll show you how to set up Google Analytics for your WooCommerce shop. First, let’s talk about how that’s different from the usual analytics tracking for your site.
Why Google Analytics for WooCommerce?
Sure, Google Analytics for your overall site is valuable. Setting it up to integrate with WooCommerce will give you even better data on specific products and ad conversions. That’s due to a little thing called a pixel.
A pixel is a bit of code that allows a platform like Google or Facebook to track a user’s behavior. For example, let’s say you run an ad for your product on Facebook. When someone clicks on the ad and arrives at your website, the code tells Facebook whether they bought the product, clicked on something else, or went away.
Analyzing all the data from pixels you have on various platforms can be tedious. You can make your job much easier by setting up Google Analytics using a pixel manager plugin.
Pixel Manager for WooCommerce is a WordPress plugin that allows you to connect your WooCommerce data to reports from platforms like Google, Meta (Facebook), Hotjar, and more. You’ll be able to track all your pixels from within your WordPress site.
Pixel Manager makes using Google Analytics more manageable and more powerful. Once your Google Analytics account is set up, you only need to enter your unique code in the plugin. You’ll start seeing results directly linked to your products.
How to Set it Up
Setting up Google Analytics to work with your WooCommerce store isn’t difficult. Still, you’ll need to ensure you set up your Analytics account properly, so everything works correctly on your site. Let’s walk through the steps!
Step 1: Create Your Google Analytics Account
Google Analytics can be a little confusing. Follow these steps, and it should be relatively pain-free.
Access Your Google Account
You should already have a Google Account. If not, create one, then come back here to finish this tutorial.
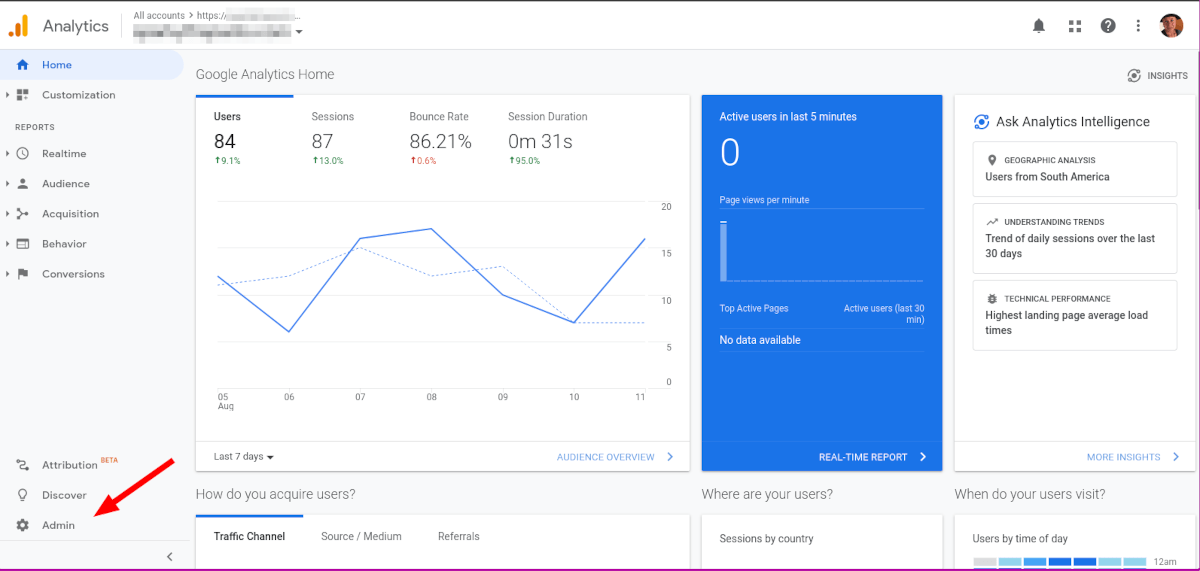
While logged into your account, visit https://analytics.google.com. At the bottom left of the page, there is a gear icon. Click that to go into your Admin area.
Create Your Account
On the next page, click the blue Create Account button. Follow the prompts and fill in your Account Name, Property Name, and Business Information.
Create a Property
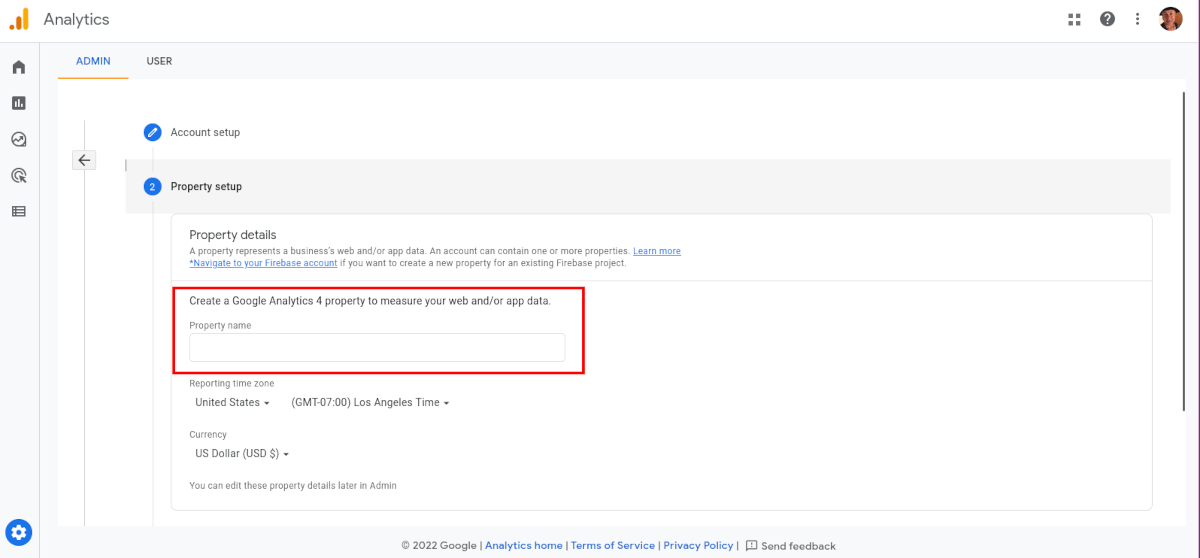
Next, under Property setup, fill in the Property name field. Then click Show Advanced Options.
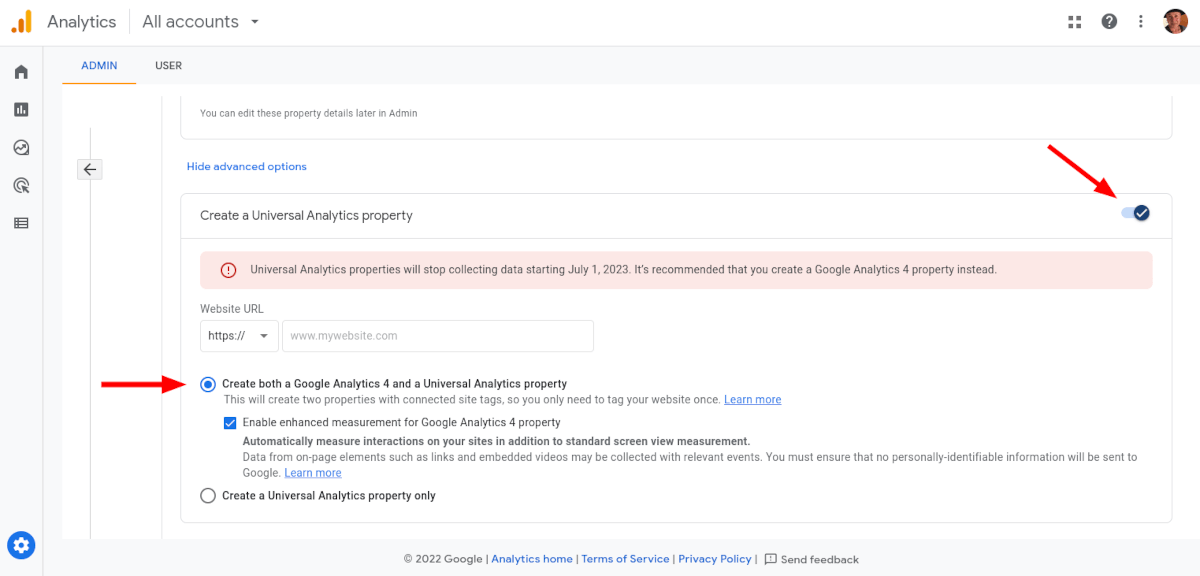
Toggle the option Create a Universal Analytics property button. Fill in your website URL, then select “Create both a Google Analytics 4 and a Universal Analytics property.” This will create both UA and GA4 IDs for the property.
Find Your Tracking ID
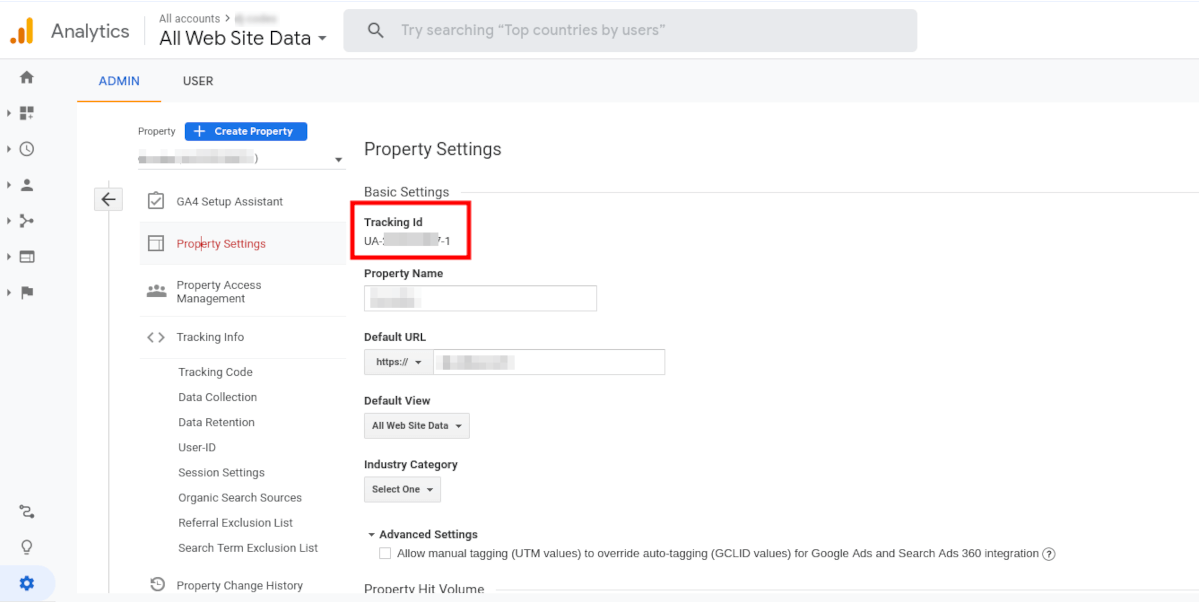
Now you can find your Universal property ID by clicking on Property Settings. You’ll see your tracking code at the top of the page:
The Google Analytics Universal property ID looks like this: UA-12345678-1. You’ll need your ID in the following steps, so keep it handy.
In a later step, we will cover using the GA4 property ID. First, we’ll cover setting things up with the UA ID.
Step 2: Ecommerce Settings
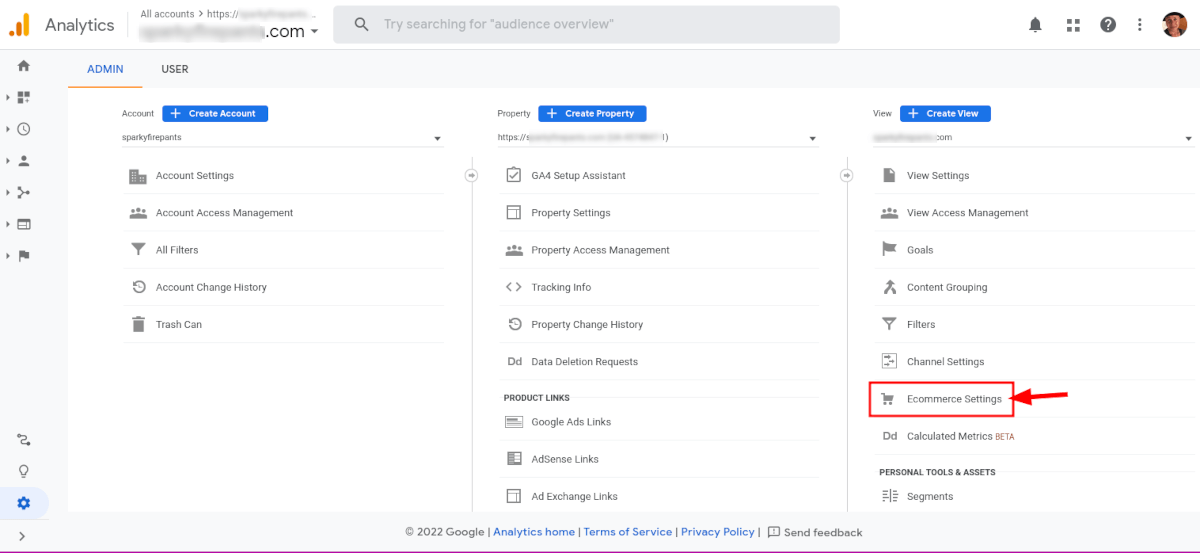
There’s one last step we need to do. Before you can configure your website, you’ll need to enable the Ecommerce setting in Google Analytics. Click the gear icon as you did previously. In the far right menu, you’ll see Ecommerce Settings.
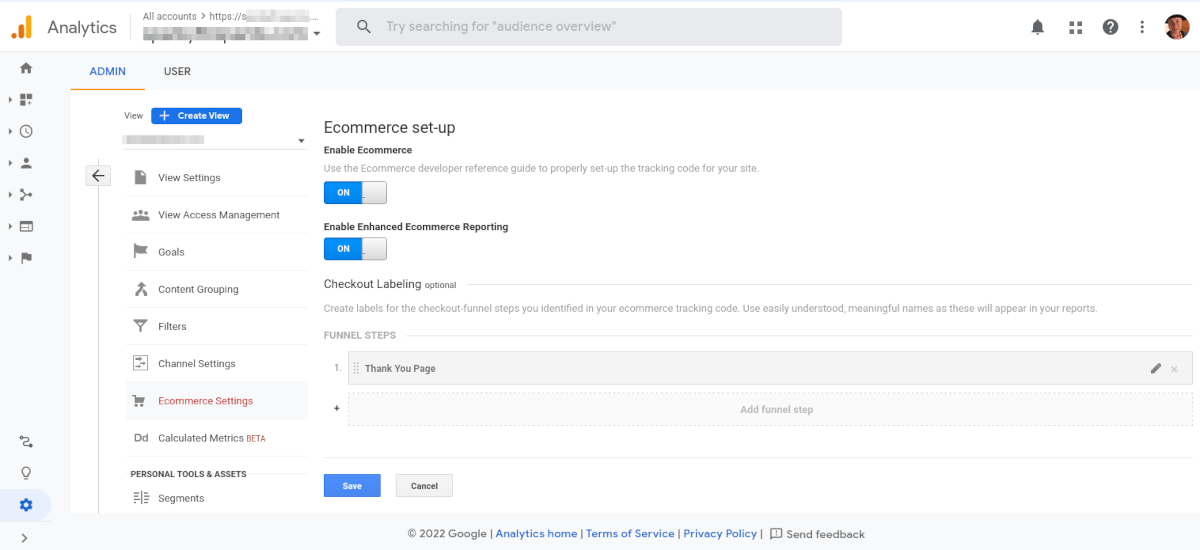
Once you’re in Ecommerce Settings, you just need to click both “Enable” buttons. You can also add optional checkout labelling to further track your checkout funnel activity.
Step 3: Install the Plugin
Now you need the Pixel Manager for WooCommerce plugin. You can download the plugin directly or search for it through your WordPress plugin menu.
Once you downloaded the plugin, head to the Admin Dashboard of your WordPress site. Select Plugins>Add New. Click Upload Plugin and browse for the .zip file you saved. Click Install Now and then activate it.
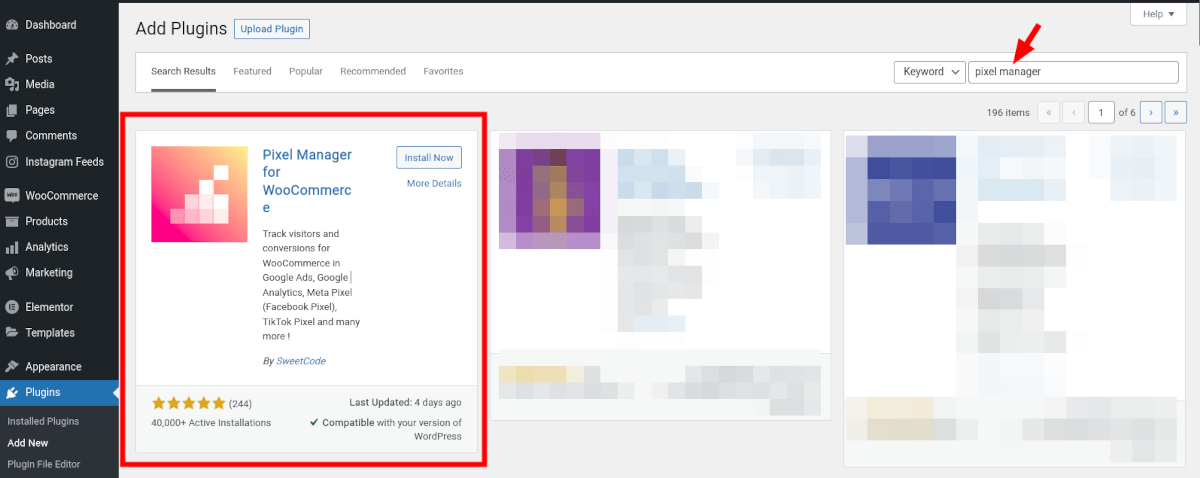
You can also search for the plugin if you’d rather. Again, in the Admin Dashboard, select Plugins>Add New. In the search bar, look for “Pixel Manager,” and you’ll see it appear as an option. Click Install Now and then activate it.
In your WooCommerce menu, you’ll see a new menu item called Pixel Manager. Click it, and you’ll be in the main menu for the plugin settings.
Step 4: Configuration
To start configuring Pixel Manager, you need to have that Google Analytics Property ID I mentioned earlier. Again, this code identifies your account specifically, and it looks like this: UA-1234567-1.
In your Pixel Manager menu, under the Main tab, you enter the code into the field for Google Analytics UA and click Save Changes.
Once you’ve saved and the code is active, Google Analytics will begin tracking the visitors. It may take time for Google to start showing results, but you’ll start to see conversion data specific to your WooCommerce shop.
Using the GA4 Property ID
First, go back to your Google Analytics admin page. This time, select the GA4 property for your site. Click on Data Streams, and in the next menu click the stream to open it.
Copy the Measurement ID in the upper right corner. This is what you’ll paste into the GA4 field of the Pixel Manager plugin later.
At the bottom of the menu, click Measurement Protocol API secrets. Click Create, and create a new API secret. Copy the Secret value code.
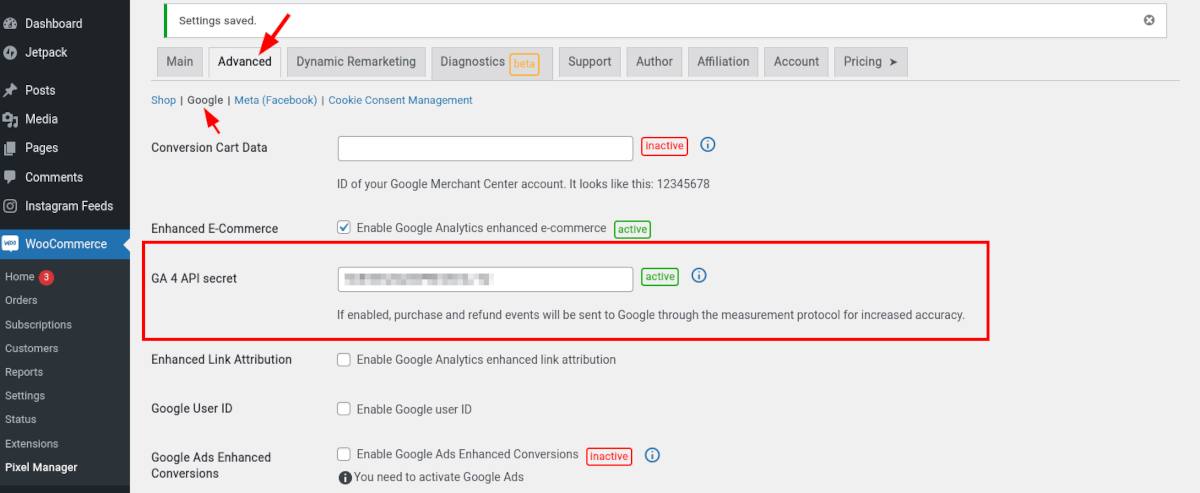
Back in the Pixel Manager plugin on your site, paste in the GA4 Measurement ID. Then, under Advanced tab, paste in the API secret in the appropriate field.
Tracking Other Pixels
While Google Analytics is a massive boon to your marketing strategy, it isn’t the only game in town. With Pixel Manager for WooCommerce, you can also track conversions from other ad platforms, such as:
- Meta (Facebook)
- Microsoft Advertising
- Snapchat
- TikTok
- Hotjar
Google Analytics for WooCommerce is a Powerful Marketing Tool
You can’t personally greet your customers as they “walk in” to your WooCommerce shop. However, you have more powerful tools to track leads and analyze customer data, which is unique to eCommerce stores. Take advantage of the opportunity to hone your ads and marketing to increase conversions.
While Google Analytics is a significant component of your tracking strategy, Pixel Manager for WooCommerce makes getting the specific data you need even easier.


