Sharing your WordPress articles through social media platforms like Twitter and Facebook is a sure-fire way to increase engagement.
Sharing new blog posts to social media platforms will boost your website traffic and grow your social media followers. What’s more, you can revive old posts by scheduling social media posts to keep your content alive and your followers engaged.
However, scheduling social media posts for all your articles can be a time-consuming job. In order to minimize editorial tasks, you’re better off investing in a solid plugin to help you out. In this article, we’ll see how Nelio Content can help solve this problem.
Want to automatically schedule social media posts for your WordPress blog posts while you focus on your content?
Yes please!Your Social Media Posts
I always like to start off by showing an example of what the final outcome would be. With Nelio Content, you’d be able to create social media posts similar to the ones below. Of course, styling will depend on the social media platform.
You can add a personalized message (just like I’ve done above), automatically show the title, excerpt, or tags, and most importantly add a link to your article.
Pricing
Nelio Content is a free plugin with a premium version for those seeking to improve their content management strategy.
I’ve used the free version for over a year now, and it’s a pretty good solution to start off with. One of the main restrictions is that social media posts can only be published on the publication day of the WordPress blog post.
If you want to publish multiple social media posts on specific days or at a particular time, you’ll have to upgrade to the premium plugin. Nelio Content’s Premium Plans start off at only €5/month and come with a 30-day money-back guarantee.
You can follow the rest of this tutorial with both versions of the plugin. I’ll point out the premium features as we go.
How to Schedule Social Media Posts with Nelio Content
Connect Your Account
Once you install Nelio Content, you need to connect your social media accounts by going to the settings page. The plugin lets you connect to the following social media platforms:
- Instagram (via Buffer)
- Pinterest – Pinterest has recently deprecated its old API in favor of a newer one. Nelio Content was still waiting for the social media platform to grant it access at the time of writing. For this reason, Pinterest is currently unavailable, through no fault of the plugin.
- Tumblr
- Google My Business
In this post, I’ll be showing you the steps to create Twitter and Facebook posts.
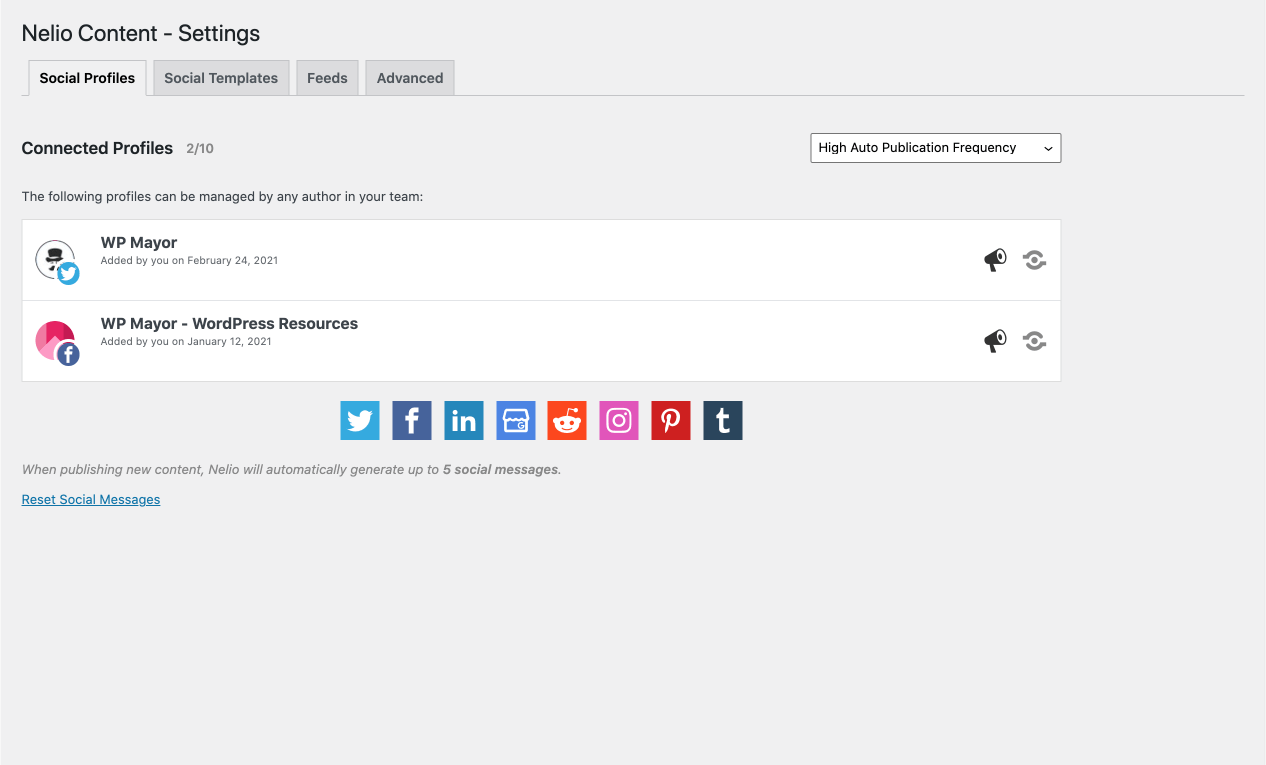
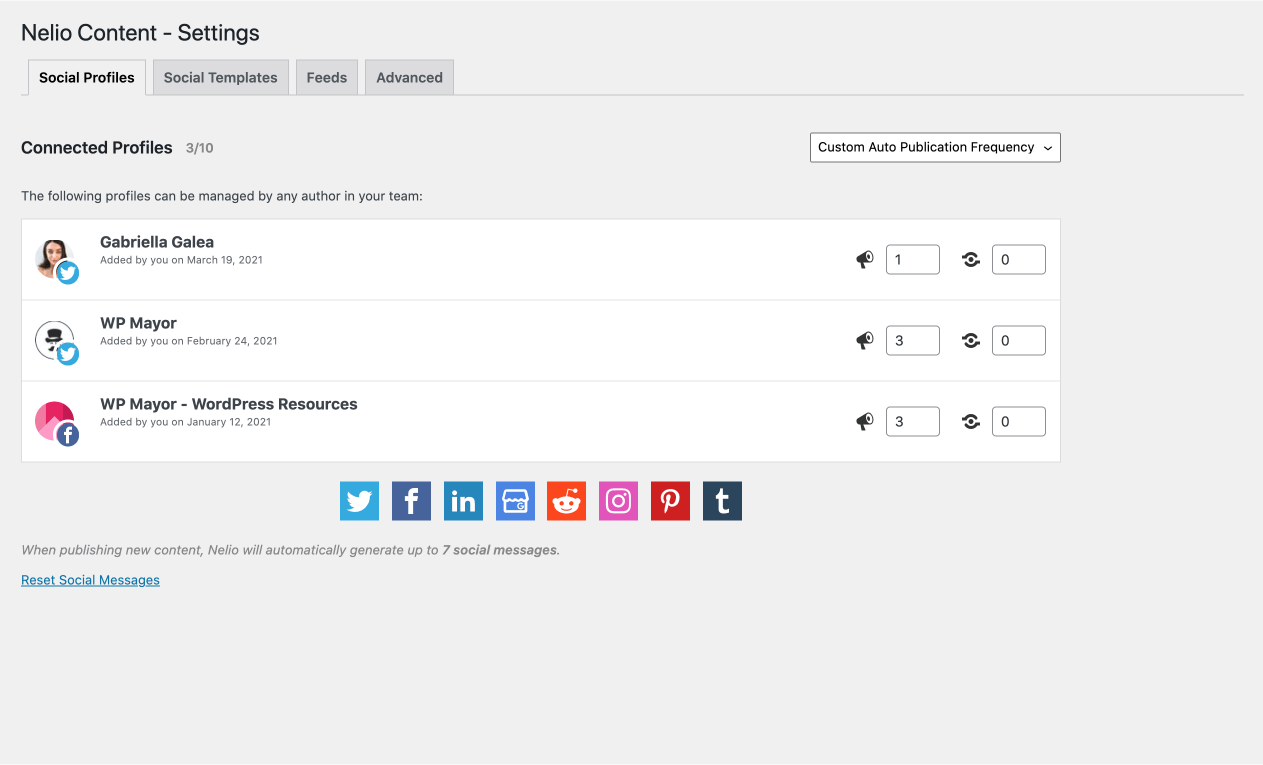
To start off, all you need to do is select the social media platform from the icon list under Social Profiles and grant the plugin access to your account. The free version of Nelio Content will allow you to connect 1 social profile per network, while Nelio Content Premium allows you to connect up to 10 social profiles.
Once the process is complete, your social media account will show up in the Connected Profiles list. Connecting an account only took a few minutes and the whole process was very straightforward.
Schedule Your Social Messages
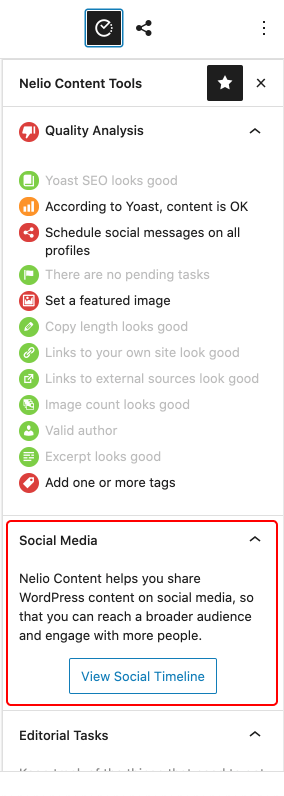
To customize your social media posts, head over to your blog post. In the Gutenberg Block editor, look out for the Nelio Content logo in the top toolbar. (It looks like a circle with a checkmark in it.)
Once you click it, the Nelio Content Tools sidebar will show up.
Scroll down to the Social Media section and click on View Social Timeline.
With both the free and premium versions, you’ll be able to add a social message and customize your tweet, Facebook post, etc. The premium version also lets you automatically generate a timeline – more on that later.

Start off by selecting Add Social Message. A popup box will appear, allowing you to type in your desired message (if required). Facebook posts allow hashtags, while tweets also allow mentions as shown below.

The plugin also provides you with placeholder items including:
{title} {excerpt} {tags} {permalink}
Once you’ve finished your message, select the account/s you wish to post the social media message to and Nelio Content will show you a preview of the finished result. You can easily switch between social media platforms by selecting the Twitter or Facebook logo above the input field.
Next, save your Social Messages. They will then automatically show up in the schedule in your post sidebar.
Add a Social Automation
With the premium version, you’ll also be able to automatically generate a timeline.
By selecting this option, Nelio Content Premium will populate your timeline with social media posts based on your social templates or with relevant sentences extracted from your content.
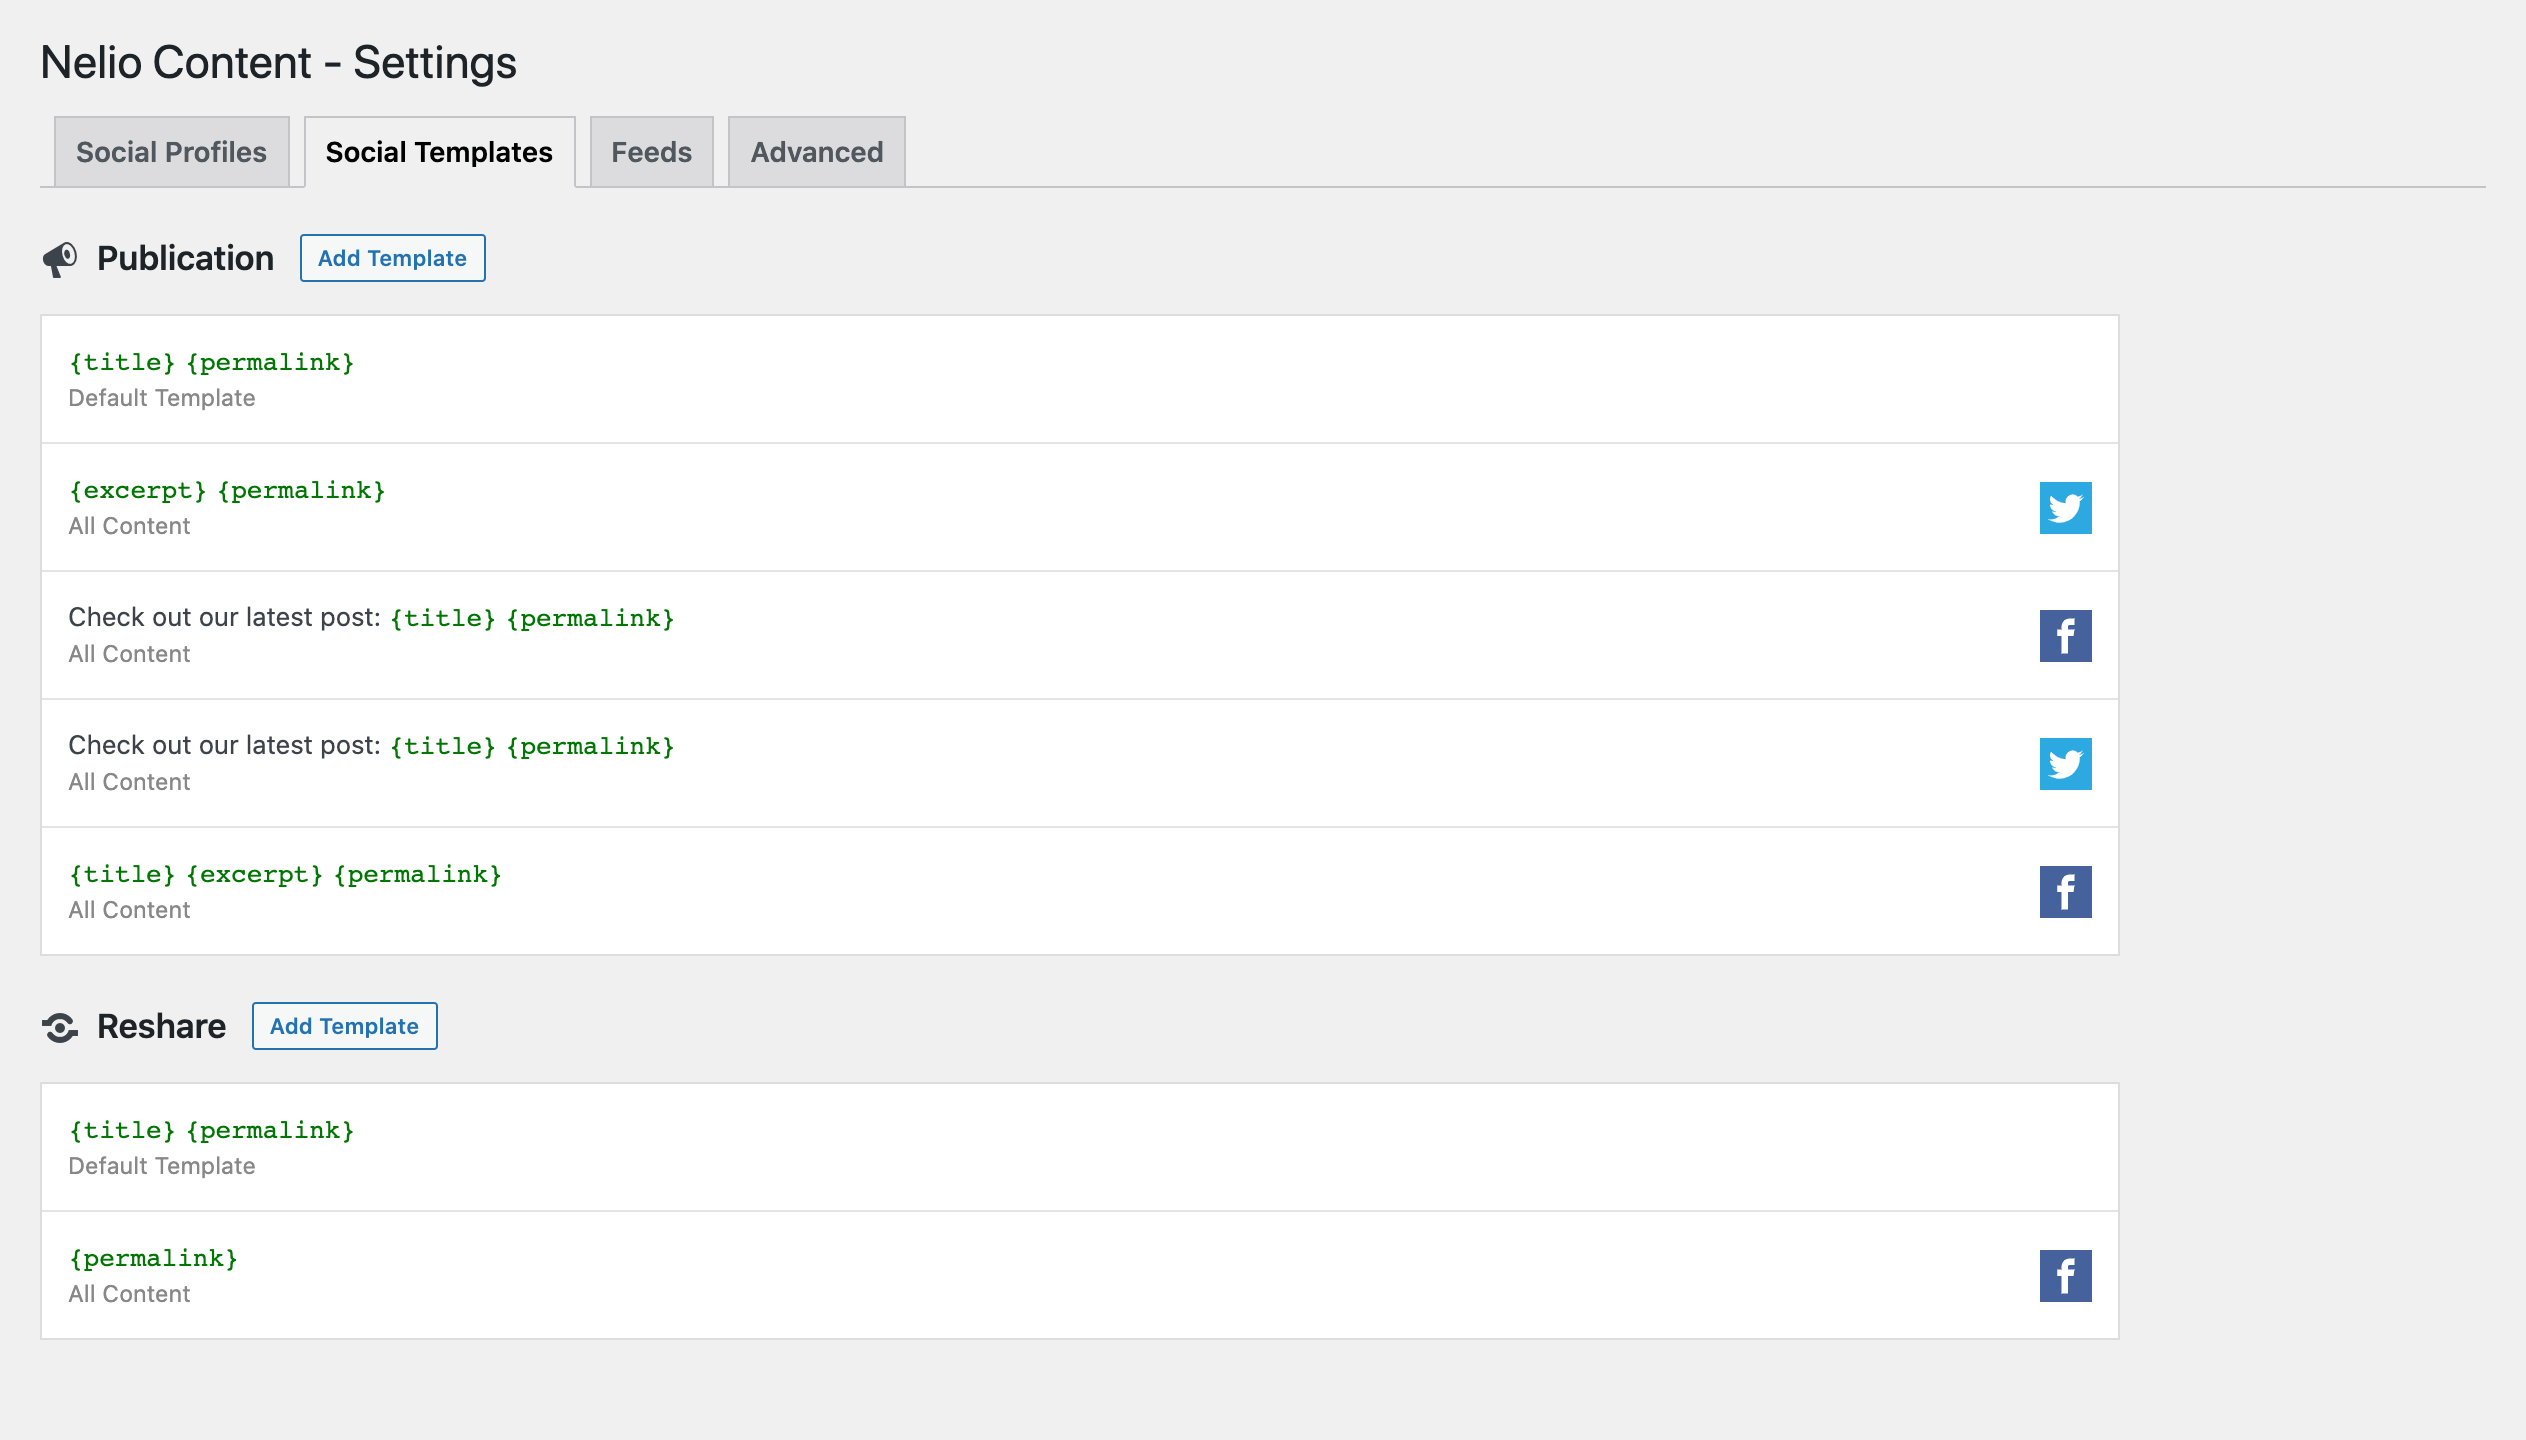
Social Templates are text patterns which you specify by going to Nelio Content > Settings in the WordPress sidebar. You can set them up under the Social Templates tab by clicking on Add Template. In the examples below, I’ve set up a number of variations for each social media profile:
You can also define the frequency of publication for each individual social media account. To do that, go to the Social Profiles tab and change the value of the selector to High, Medium, or Low Publication Frequency from the dropdown menu. You can also select a custom auto publication frequency for each account:
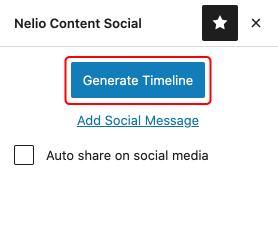
Back in your WordPress editor, click on Generate Timeline. In a few seconds, you’ll find automatically generated social media posts:
This feature saves you a lot of time, especially if you’ve got a large quantity of content to work with.
Of course, these automatic messages can be altered at any time by clicking on the edit or delete buttons on each message card. If you’re using Nelio Content Premium, the popup box will give you a few more options.
It will allow you to specify the particular day from the following:
- Same day as publication
- The day after publication
- A week after publication
- A month after publication
- _ days after publication
- Choose a custom date
You can also select the time for each social media post from the following:
- Morning (8am – 11am)
- Noon (11am – 3pm)
- Afternoon (3pm-7pm)
- Night (7pm – 11pm)
- Choose a custom time
Once you’re happy with your social media messages, save your blog post and you’re ready!
Nelio Content’s Other Features
The awesome thing about Nelio Content is that it is so much more than a social media plugin.
Once you install the plugin, you’ll get access to a fully-fledged calendar. Here, you can schedule your blog posts as well as your social media messages by simply dragging them to a specific day.
To add to this, you will also get some helpful tools in your block editor such as:
- Quality analysis – Improve the quality of your posts with automatic analysis.
- Editorial Tasks (Premium) – Create tasks and assign them to team members.
- Editorial Comments (Premium) – Leave comments for your writers.
- References (Premium) – Add helpful resources and suggest links.
Support
Support is one of the best assets of any good plugin. After personally reaching out through Nelio’s online contact form, I’m happy to report back that support was excellent.
All my questions were answered within a few hours with helpful tips and explanations.
Final Thoughts
Nelio Content is one of the best plugins I’ve encountered to schedule social media posts for WordPress articles. It’s easy to use, comes with a number of social media platform integrations and several great features.
While the free version is great to start off with and get a feel for the setup, I recommend upgrading to the premium version to enhance your editorial process.
Nelio Content is one of our selected plugins of choice for WP Mayor!
Are you ready to upgrade your content management strategy with Nelio Content?
You bet!






One Response
Thanks for this automation services!