


Searching for a way to accept WordPress and/or WooCommerce crypto payments?
Crypto payments are attractive because they can lower your transaction fees, make it easy for people to pay from anywhere in the world, and stop any problems you’re having with fraudulent chargebacks.
However, WordPress doesn’t offer any built-in support for crypto. So unless you just want to paste your wallet address on the page, you’ll need some help if you want to accept crypto payments in a structured way.
In this step-by-step tutorial, you’ll learn how to accept cryptocurrency payments on any type of WordPress site.
If you have a WooCommerce store, there’s a dedicated plugin to add a WooCommerce crypto payment gateway. And if you don’t have a WooCommerce store, you can still accept payments without the need for a WordPress plugin.
The neat thing about this method is that you’ll be able to accept 70+ cryptocurrencies while still receiving money in your preferred cryptocurrency (or fiat currency, with support for USD and Euro).
Keep reading for the step-by-step guide…
What You Need to Accept WordPress Crypto Payments
For the easiest way to accept WordPress and WooCommerce crypto payments, you can use CoinGate.
CoinGate has a dedicated WordPress plugin to integrate with WooCommerce stores and it also offers payment button functionality that you can add to any WordPress site.
With CoinGate, you can accept 70+ different cryptocurrencies while still receiving payouts in your preferred crypto or fiat currency. That’s one of the most unique benefits of CoinGate – you can offer people the convenience to pay in any cryptocurrency without needing to manage 70+ different wallets.
You can then receive payouts to your own wallet (if you prefer crypto) or via methods like bank transfers (for fiat).
CoinGate also offers other benefits including the following:
- A user-friendly interface that tells shoppers instantly when their payments have been detected in the network and then confirmed
- Lighting network support
- Helpful customer support if you need help with anything
There are no fixed fees to use CoinGate on your site. Rather, CoinGate just charges a 1% transaction fee in exchange for its convenience and automatic conversions, which is well below the standard 2.9% + $0.30 that you’ll see for credit and debit cards.
In this article, we’re specifically focused on how to use CoinGate to accept WordPress crypto payments. But if you want to learn more about the service in general, you can check out our full CoinGate for WordPress review.
First Step – Create Your Free CoinGate Business Account
Before getting into the WordPress parts of the tutorials, you’ll first need to register for a free CoinGate account (and then a free CoinGate Business account).
You’ll actually want to create two accounts – one on the live CoinGate service and then another on the CoinGate Sandbox service (which you can use for testing with testnet Bitcoin).
You’ll need to create separate accounts for the live service and the sandbox service. I recommend starting with the Sandbox service because it eliminates the need to verify your identity.
Once you’ve got everything working with the sandbox service, it only takes a few clicks to switch over to the live service.
1. Create Your Free CoinGate Account
To get started, use the links below to register for a free account:
Creating an account only takes a minute or so.
2. Create Your CoinGate Business Account
Once you’ve logged into the CoinGate dashboard using your account, you’ll want to also set up a CoinGate Business account, which is what lets you access the WordPress crypto payments functionality.

How to Accept WooCommerce Crypto Payments
In this first tutorial, let’s look at how to accept WooCommerce crypto payments with CoinGate.
For this, you’ll use CoinGate’s dedicated WordPress plugin to add a CoinGate payment gateway to WooCommerce.
If a shopper selects this gateway at checkout, they’ll be able to pay in any one of the 70+ cryptocurrencies that CoinGate supports.
Here’s how to set it up…
1. Install CoinGate Plugin
To begin, install and activate the free CoinGate plugin from WordPress.org.
2. Create CoinGate API Key
Next, you need to open your CoinGate Business account dashboard and create a new app to generate an API key.
This API is what will allow your WordPress site to connect directly to CoinGate.
Here’s how to do it:
- Open your CoinGate Business account dashboard.
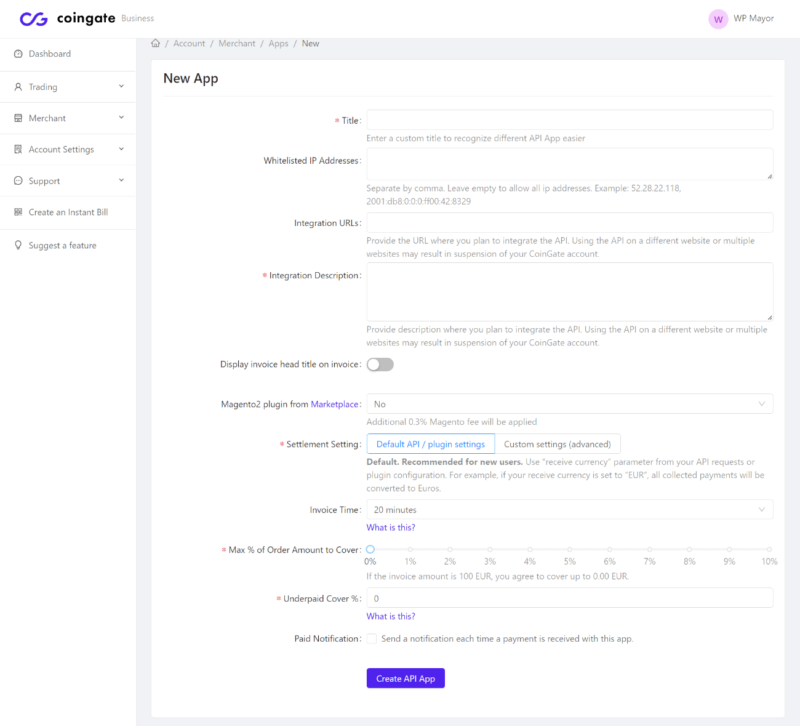
- Go to Merchant → API → Apps and click New App.
- Fill out the form. You can leave most of these as the defaults, but feel free to adjust them if needed. For example, shoppers have 20 minutes to send the crypto by default, but you can change this by adjusting the Invoice Time.
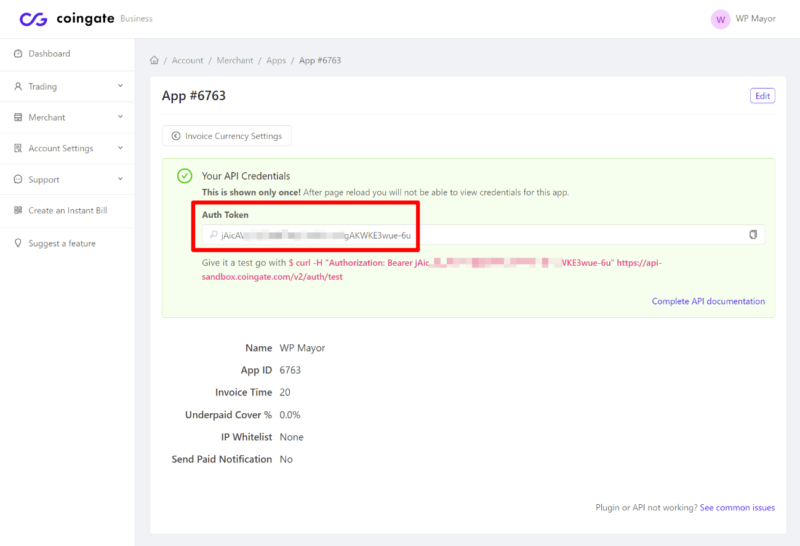
On the next screen, CoinGate will show your API key. Keep this page open because you’ll need your API key in the next step and CoinGate will only show it once.
If you accidentally close it – don’t worry! You can just create a new app to get another API key.
3. Configure CoinGate WooCommerce Payment Gateway
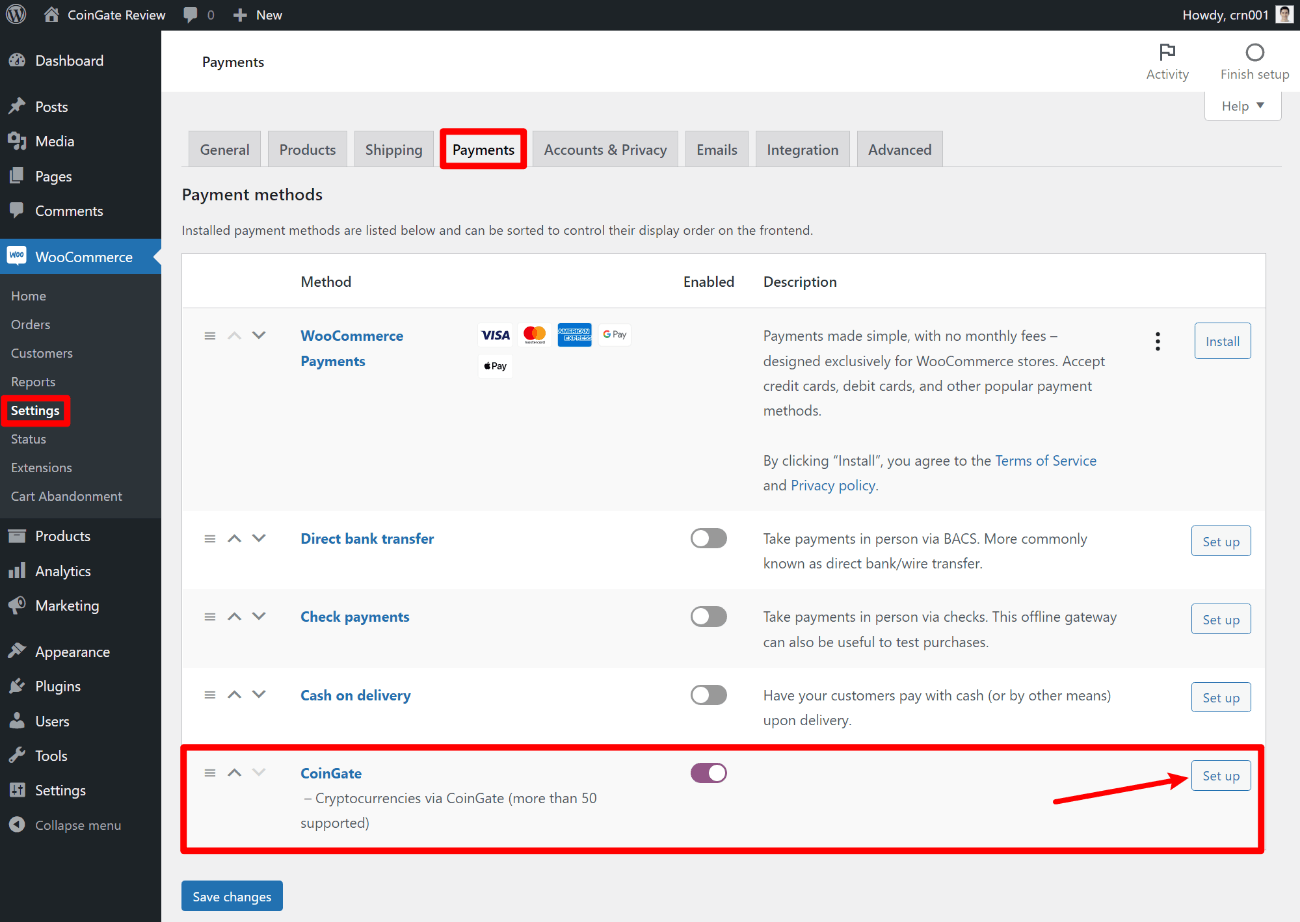
Now, head back to your WordPress dashboard and go to WooCommerce → Settings → Payments.
You should see a new payment gateway option for CoinGate.
Enable the CoinGate gateway and then click the Set up button to further configure it:
On the next screen, paste the API key that you generated in the previous step into the API Auth Token box. If you’re using a CoinGate Sandbox account, you’ll also want to check the Test (Sandbox) checkbox. For live payments, you should not check this box.
Then, you can adjust the other settings to control how the payment gateway functions:
- Title and Description – this text will appear to shoppers on the checkout page.
- Payout Currency – this is the single currency in which you’ll receive payments (no matter which crypto a shopper sends).
- Order Statuses – CoinGate will automatically update the WooCommerce order status based on the status of the payment. For example, once the crypto payment has been confirmed by the network, CoinGate will automatically mark the order as Processing (by default – you can adjust this behavior using these dropdowns).
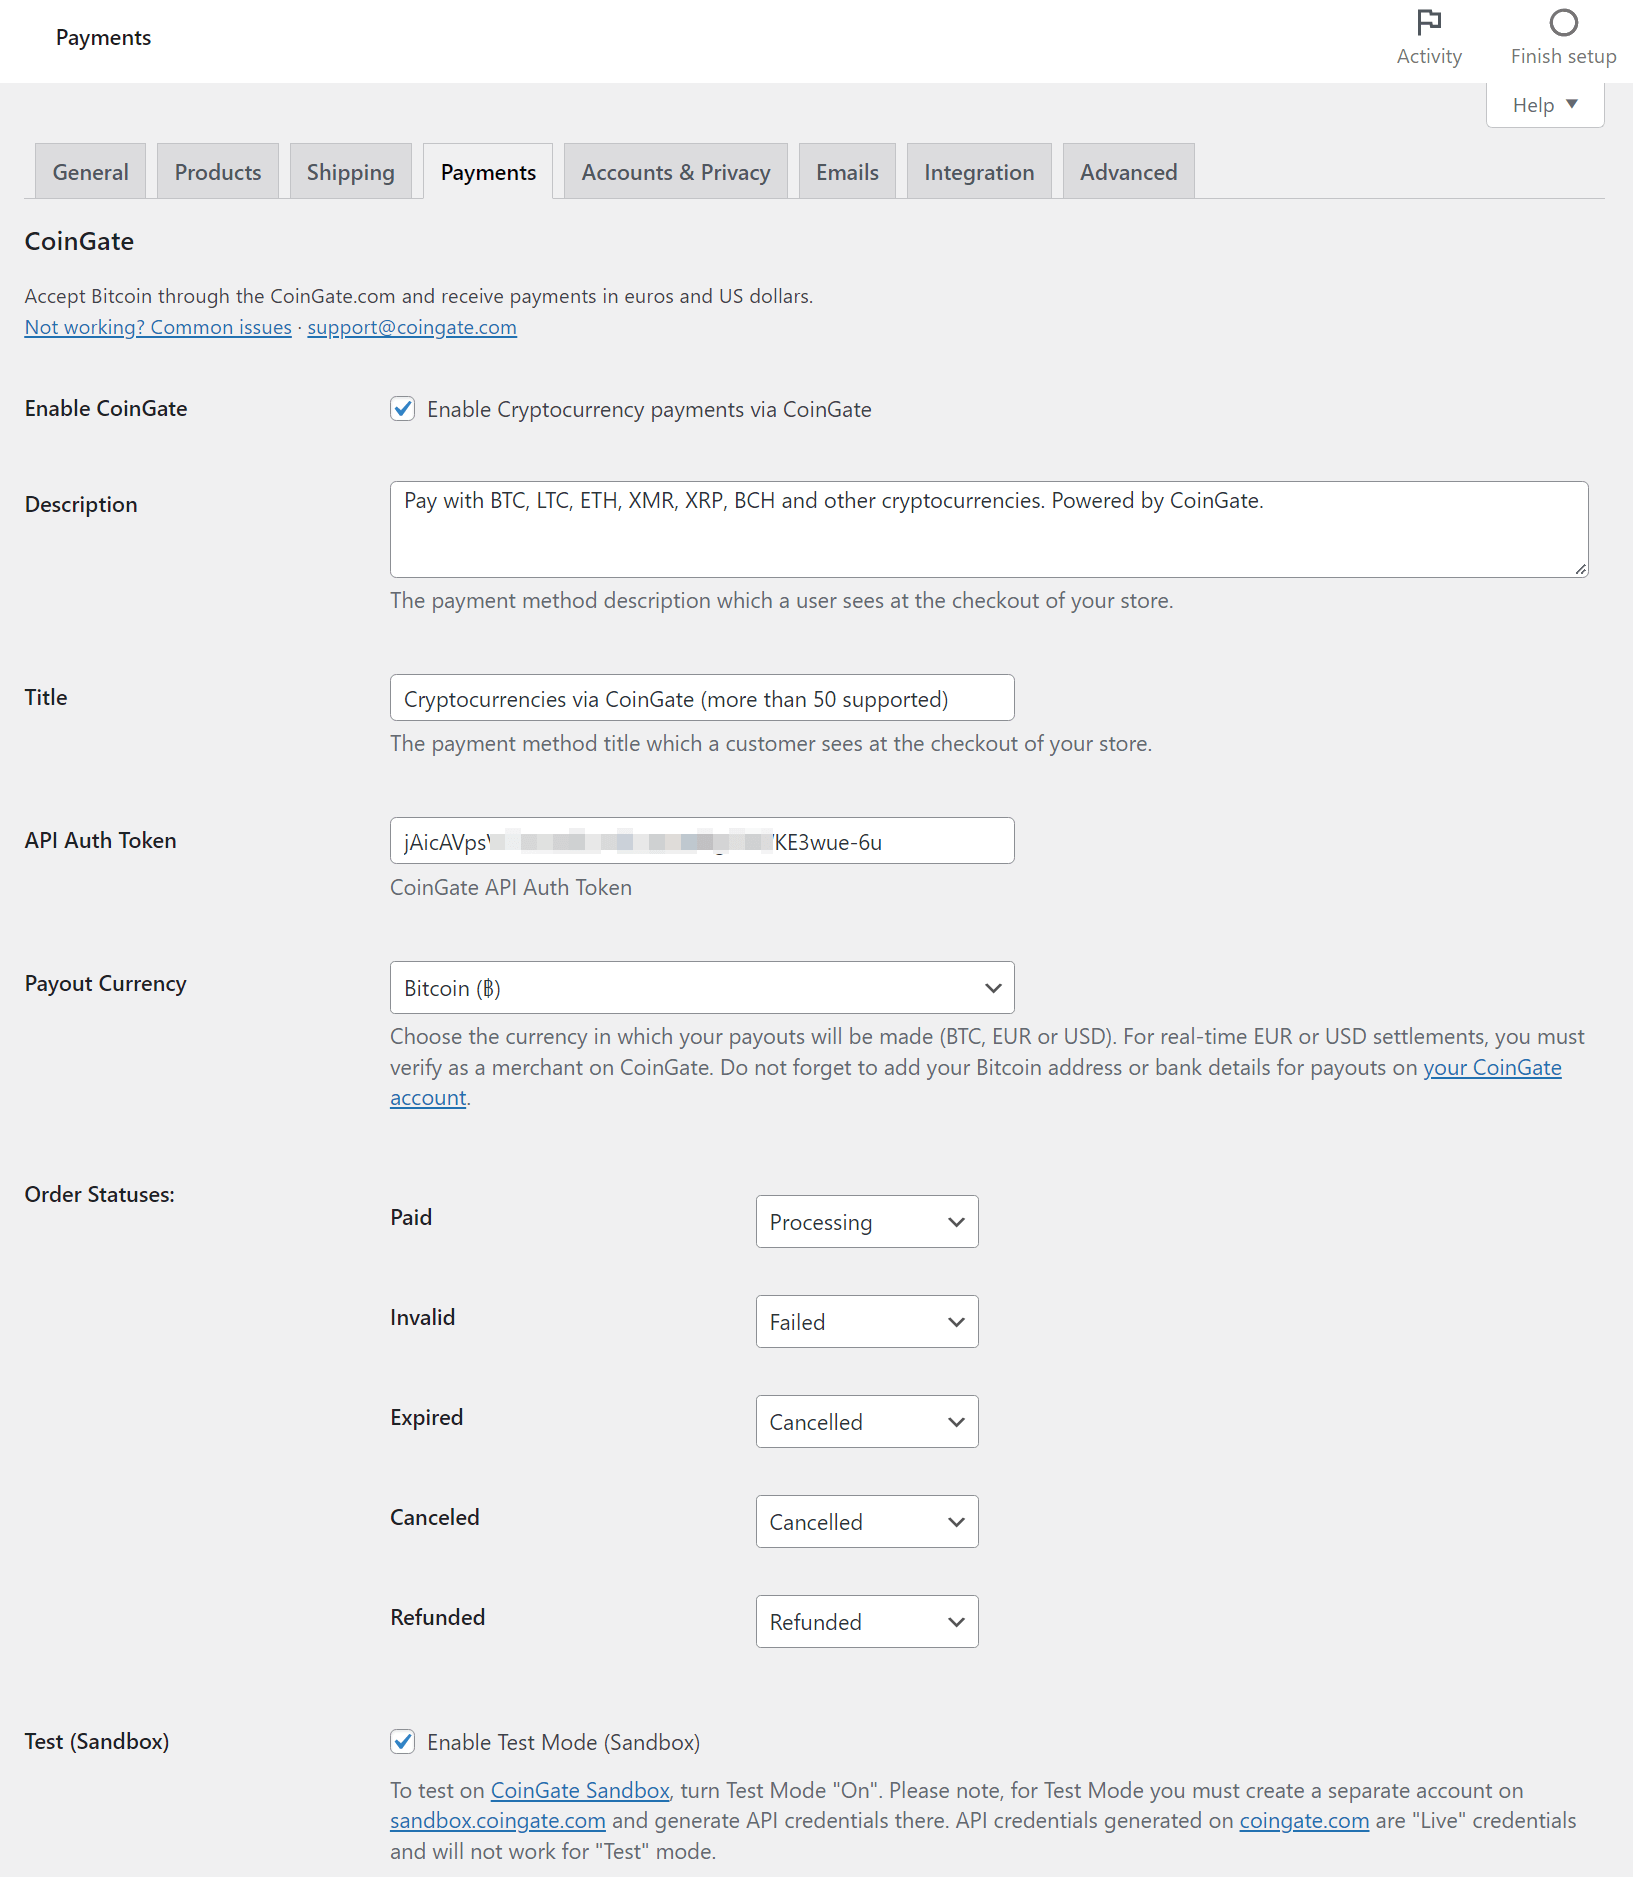
Make sure to save your changes when you’re finished.
4. Start Accepting Payments
At this point, you’re ready to start accepting WooCommerce crypto payments. Or, if you’re using the Sandbox, you can start sending some testnet Bitcoin payments to test the integration. This Bitcoin Testnet Faucet allows for easy testing.
When someone checks out, they’ll see a new CoinGate payment option:

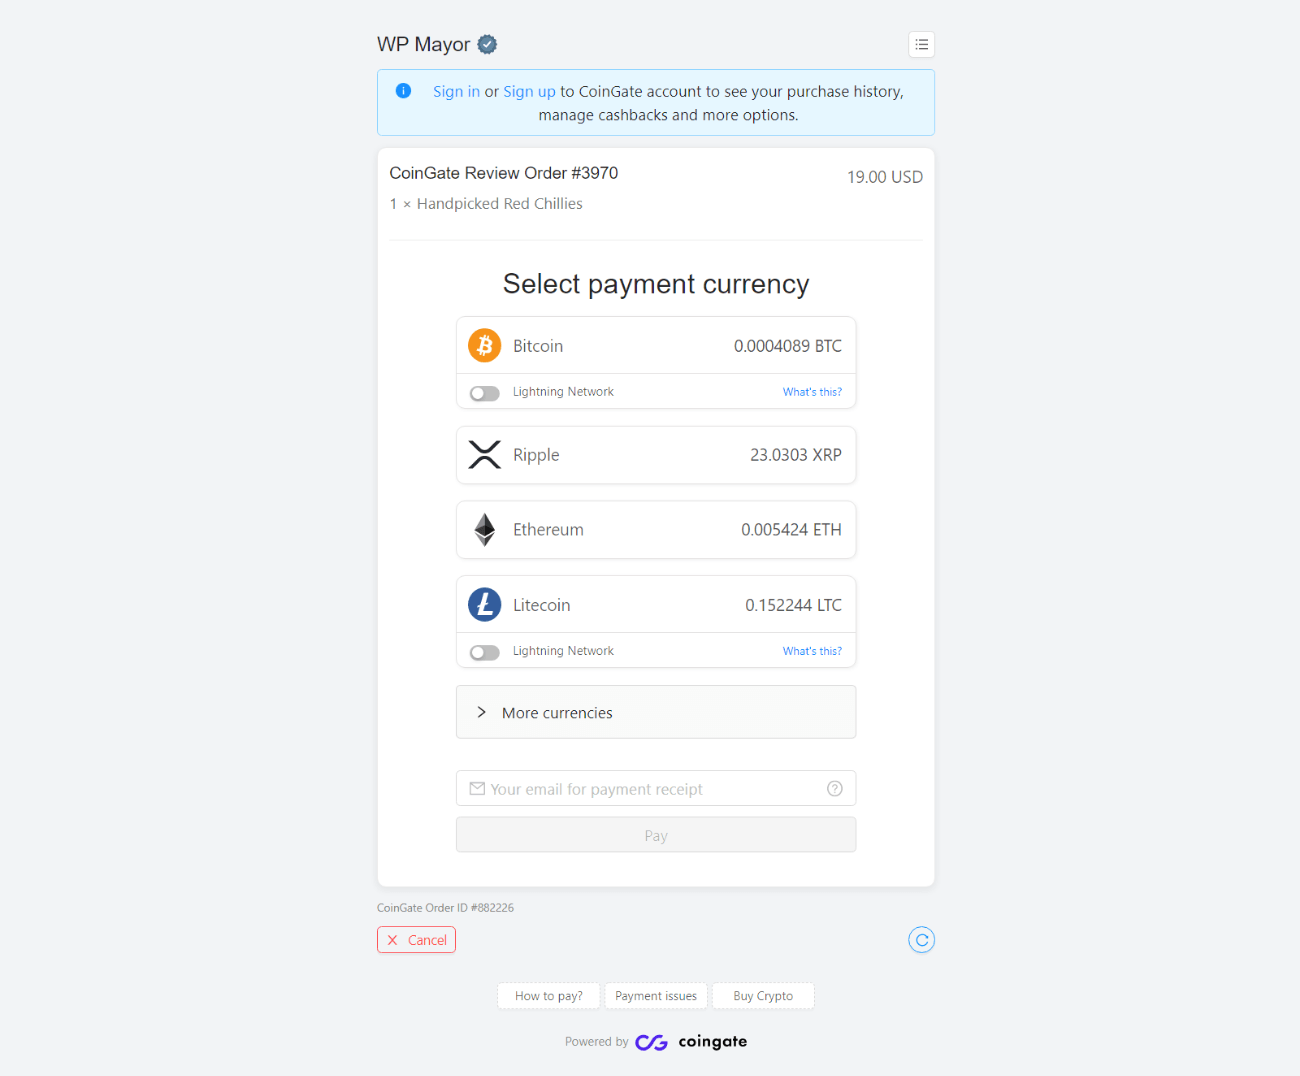
Then, they’ll choose their preferred cryptocurrency on the CoinGate payment form:
They’ll then be prompted to send money to the wallet:

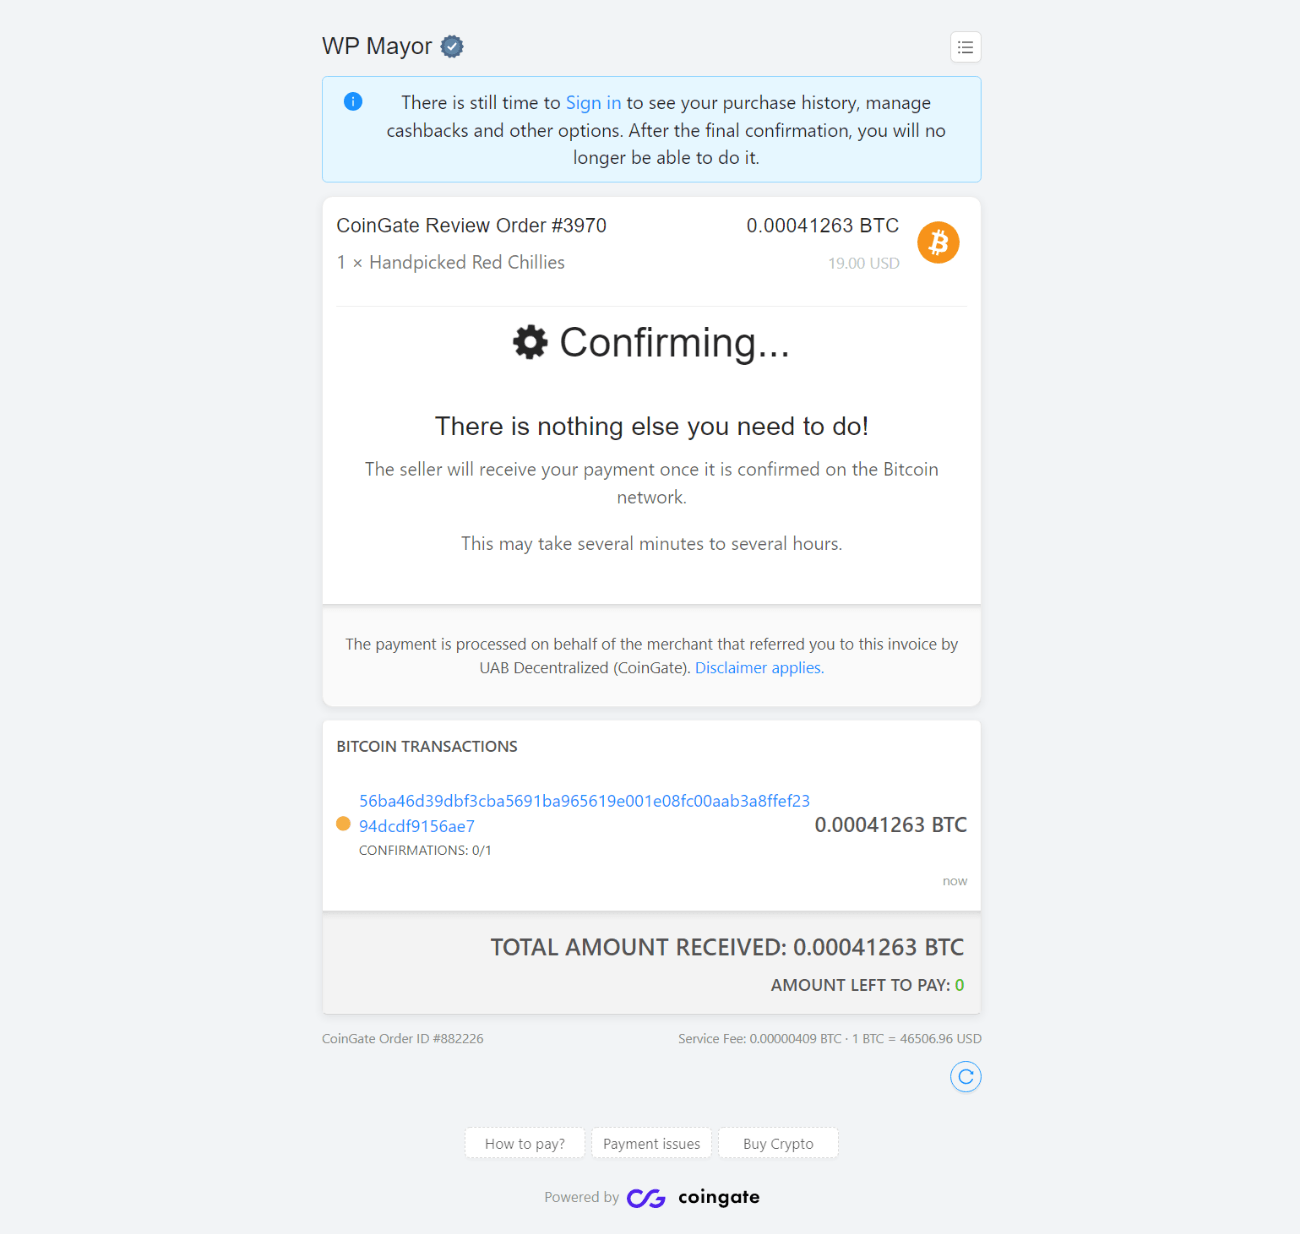
As soon as CoinGate detects the payment in the blockchain, it will automatically update the payment screen as “Confirming”:
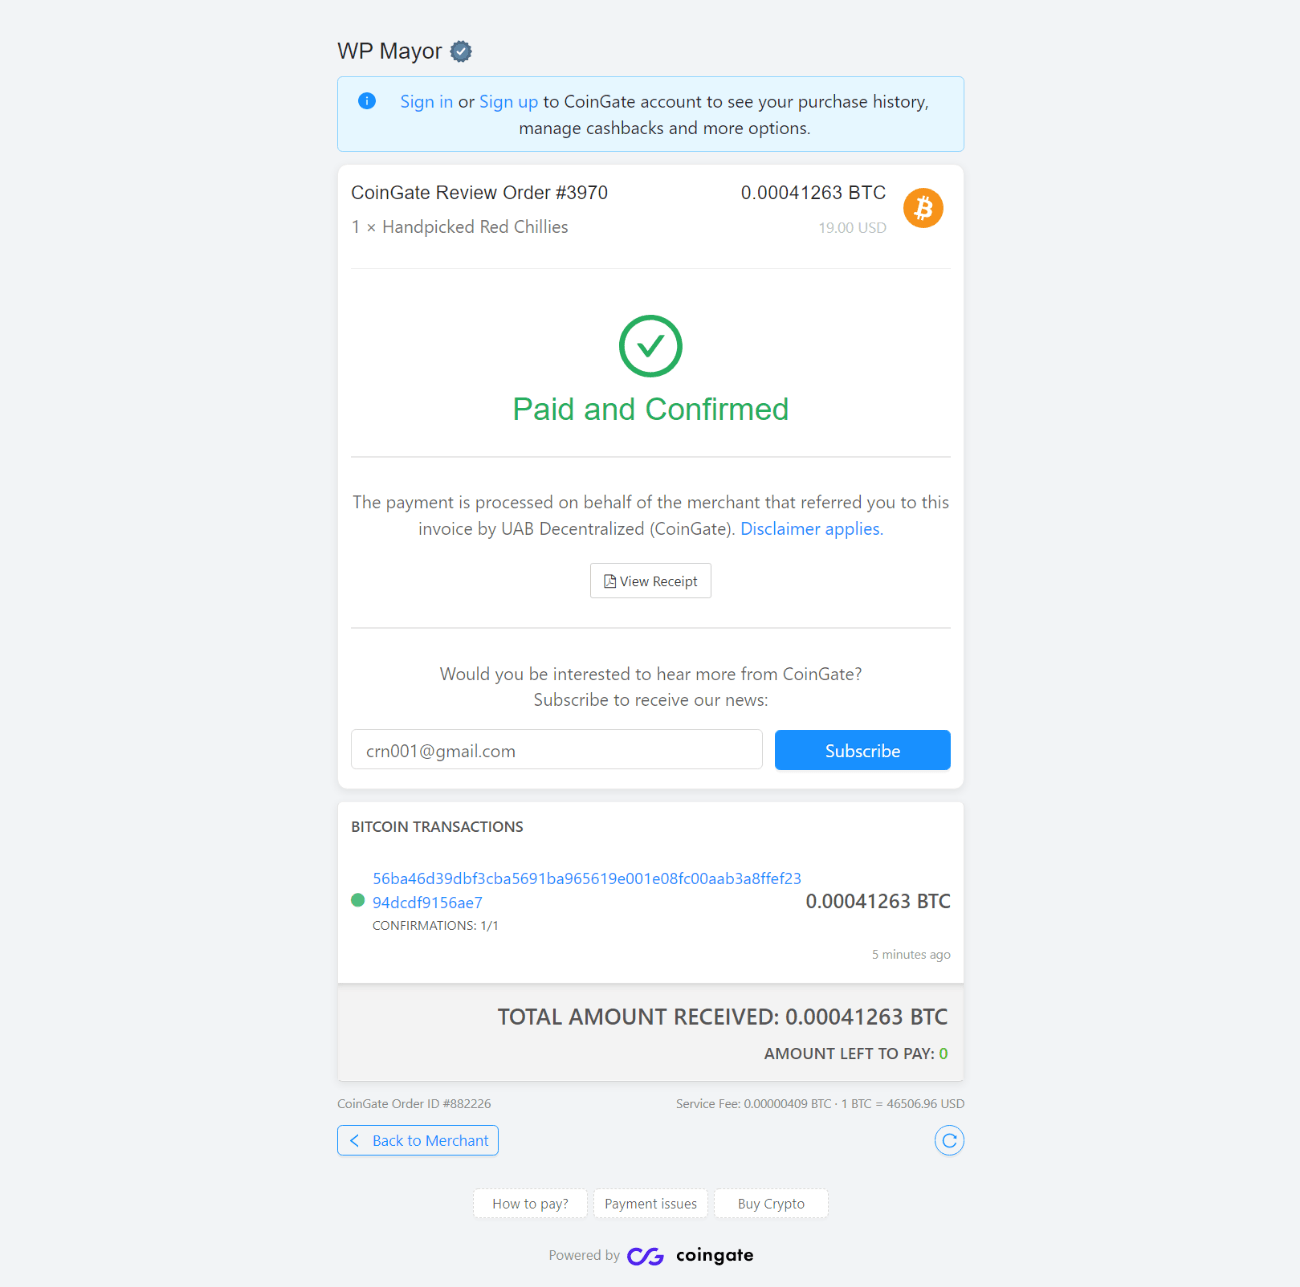
Once the network confirms the transaction, it will update again to indicate that the payment was successful:
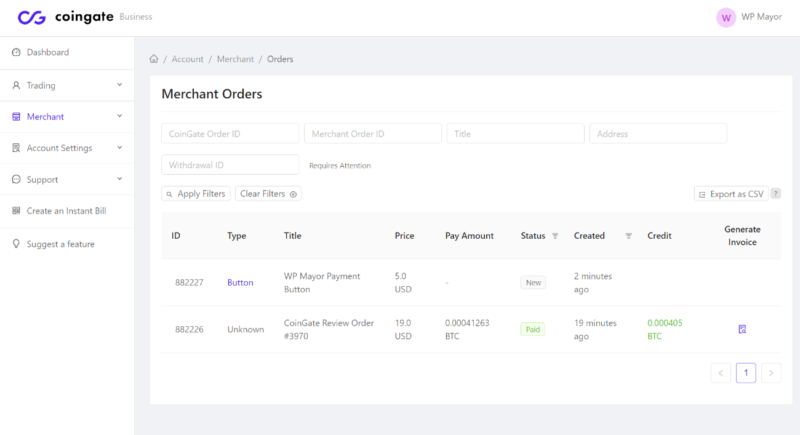
CoinGate will also change the WooCommerce order status from Pending Payment to Processing (or whatever status you chose in the previous section). You can also view all orders in your CoinGate dashboard:
How to Accept WordPress Crypto Payments Without a Plugin
If you don’t have a WooCommerce store, you can still accept WordPress crypto payments using CoinGate.
In fact, you don’t even need a plugin to do so. Instead, you can use CoinGate’s Payment Button feature. Then, you can link to your buy button from any text link, button, image, and so on.
Once shoppers click the link, they’ll be able to check out using the same system that you saw in the WooCommerce section above.
Here’s how it works…
1. Create a New Payment Button in CoinGate
To begin, open your CoinGate Business dashboard. Then, go to Merchant → Payment Buttons and click New Payment Button.
Here, you’ll get a form where you can configure how the payment will function. While all of the settings are worth considering, the most important option is the Button Kind, as this lets you configure the amount that people will pay:
- Fixed Price – enter a single fixed price.
- Slider – enter a minimum and maximum price, along with a step amount. Shoppers can choose an amount by using the slider.
- Dynamic Price – enter multiple fixed prices that shoppers can select from. You can also let them enter their own custom amounts.
You can also add your own branding to the payment page to make it your own.
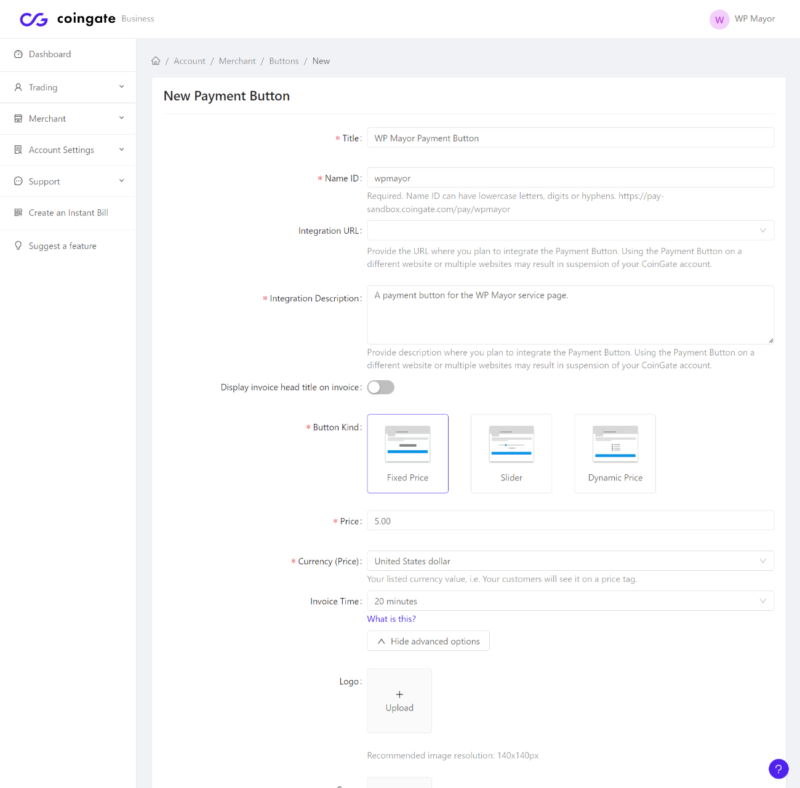
Once you’ve configured the Button Kind along with the other settings, click the Create Button at the bottom.
2. Choose Currency Options
On the next screen, you’ll get some options to choose which currencies to enable/disable, along with which currencies you want to receive money in:

3. Add Payment Button to WordPress
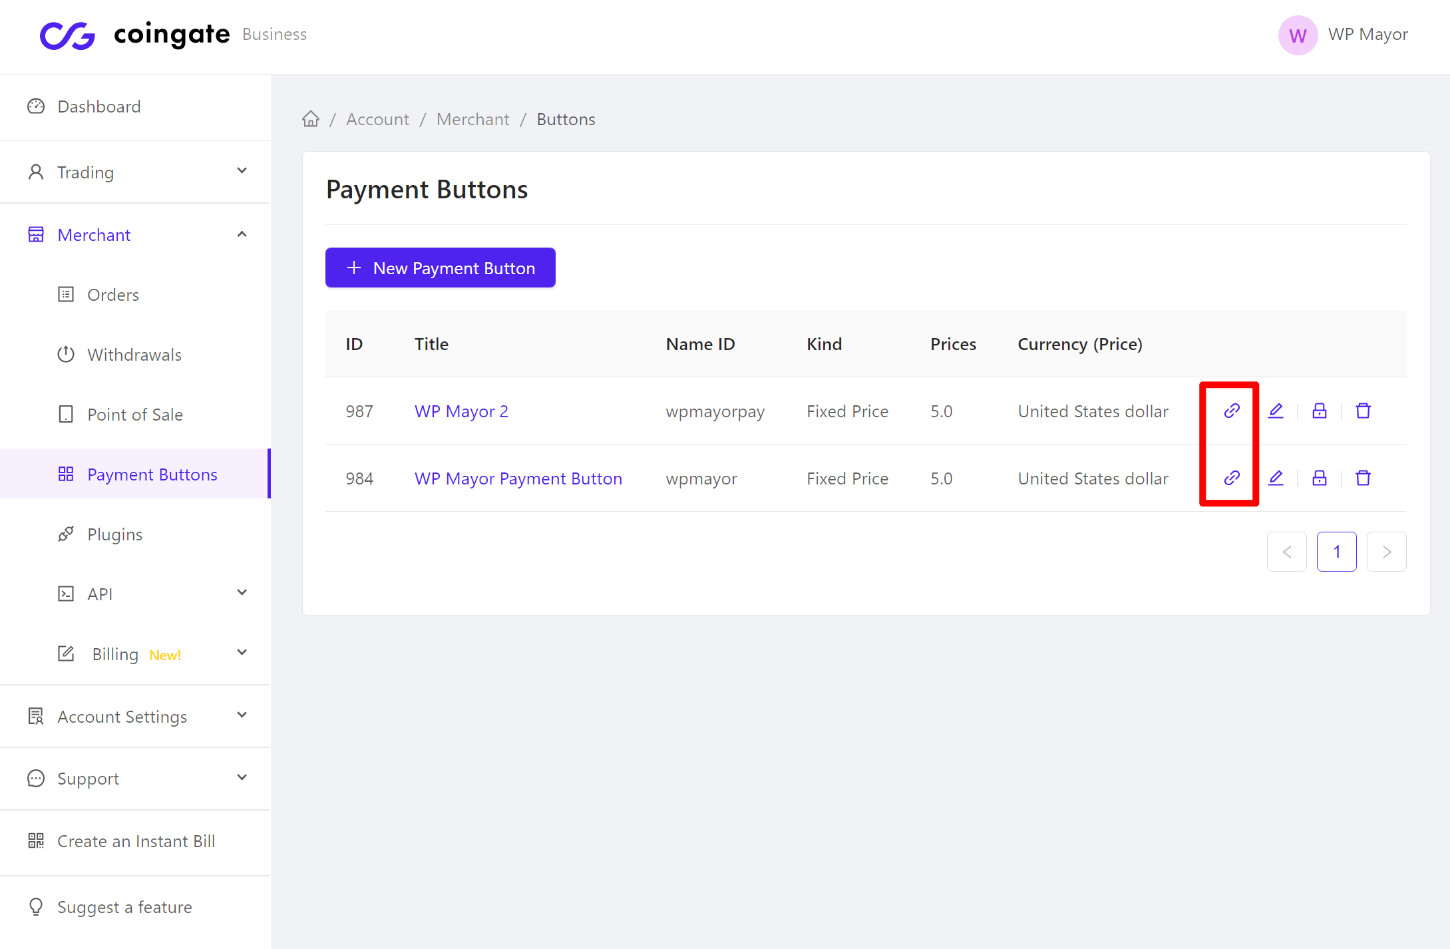
Now, you can add your buy button to WordPress by linking to the buy button URL.
To find the buy button URL, go to Merchant → Payment Buttons and look for the link icon. This will link to the payment page, which is what you need to add to WordPress.
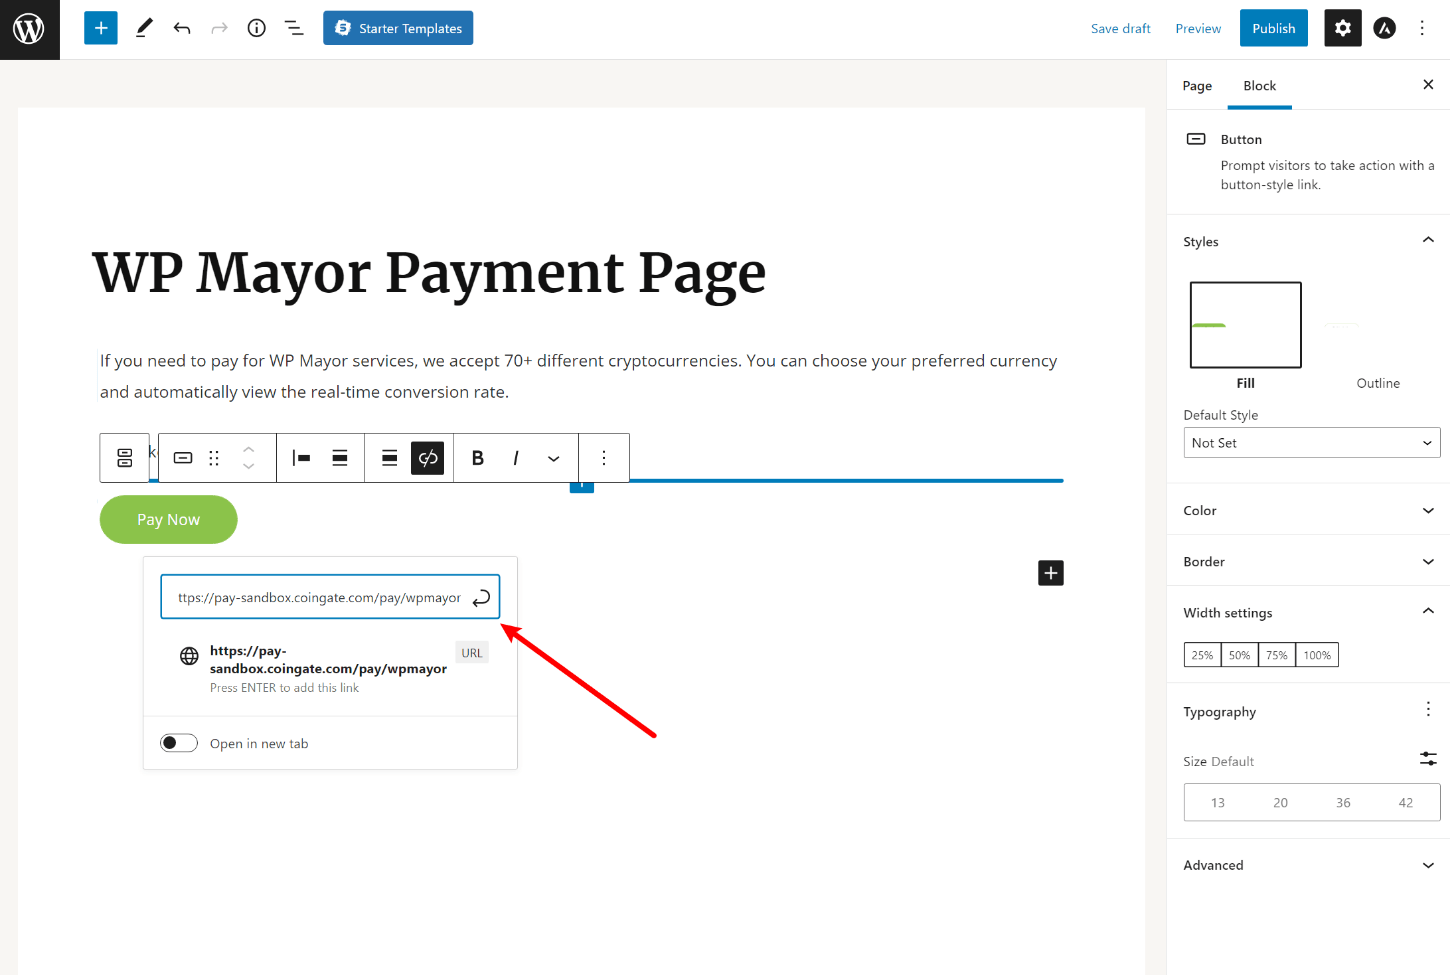
Again, you can add this button to WordPress however you want. Here are some options:
- Add a text link.
- Use the Button block.
- Link an image.
- Add the link to your favorite page builder plugin.
Here’s an example of creating a simple payment page with the native WordPress editor and using the Button block to link to the payment page:
4. View Payments
Once someone accesses your payment page, they’ll use essentially the same interface from the WooCommerce section to send their payment.

The only difference is that they might be able to choose their own payment amount if you configured that.
Once the network confirms the transaction, you’ll be able to view the details in your CoinGate dashboard.
Other Options to Accept WordPress Crypto Payments With CoinGate
Beyond the two methods above, CoinGate also supports a few other payment options.
First, for more advanced users with development knowledge (or the budget to hire a developer), you can set up your own custom API integration. CoinGate maintains detailed documentation that helps you hook into the API.
For example, you could use this to integrate another plugin with CoinGate, such as your favorite form plugin.
Second, you can also use CoinGate to accept in-person payments via a Point of Sale (POS) system. This is helpful if your WooCommerce store sells both online and in-person, as you can accept crypto payments wherever you’re interacting with customers.
By default, you can accept PoS payments using any web browser, but there are also mobile apps on the way.
Get Started With WordPress Crypto Payments Today
If you want to accept WordPress or WooCommerce crypto payments, CoinGate offers an easy way to get up and running.
Beyond being easy to set up, it also simplifies your admin experience because you can receive payouts in your preferred crypto or fiat currency, while still accepting 70+ different cryptocurrencies.
If you’re using WooCommerce, you can use the dedicated CoinGate plugin to add a CoinGate payment gateway to your store.
For non-WooCommerce sites, you can still accept crypto payments by linking to a CoinGate payment button from anywhere on your site.
Either way, you can be up and running in just a few minutes. Get started with CoinGate and WordPress today and start watching the crypto payments rolling in.
Do you still have any questions about how to accept WordPress or WooCommerce crypto payments? Let us know in the comments.
